Difference between revisions of "E-puck Mobile Robot"
| (30 intermediate revisions by one other user not shown) | |||
| Line 1: | Line 1: | ||
[[Image:E-puck.png]] |
|||
== e-puck Mobile Robot == |
|||
The e-puck is a very capable little differential-drive mobile robot |
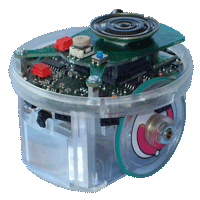
The e-puck is a very capable little differential-drive mobile robot developed at EPFL, Switzerland. It has two stepper-motor-controlled wheels, a VGA camera, a ring of IR proximity sensors, a number of LEDs, a 3-axis accelerometer, 3 microphones, a speaker, and bluetooth communication, all controlled by a 16-bit Microchip PIC (dsPIC30F6014A). We have a few of them in the mechatronics lab. |
||
The e-puck page is [http://www.e-puck.org http://www.e-puck.org], and it is the primary source for all updated information on the e-puck. Here we |
The e-puck page is [http://www.e-puck.org http://www.e-puck.org], and it is the primary source for all updated information on the e-puck. Here we keep a local copy of everything you need to get started, which includes a snapshot of the EPFL e-puck libraries from December 2007. |
||
To get started, you need |
To get started, you need |
||
* the Microchip MPLAB IDE under "Development Tools" at [http://www.microchip.com http://www.microchip.com] to allow you to program the PIC with a PC |
|||
* the MPLAB C30 PIC30 C compiler, also under "Development Tools" at [http://www.microchip.com http://www.microchip.com] |
|||
* the [[Media:Tinybld195.zip|tiny bootloader]] that allows you to download your program to the PIC using bluetooth (from [http://www.etc.ugal.ro/cchiculita/software/tinyblddownload.htm http://www.etc.ugal.ro/cchiculita/software/tinyblddownload.htm]) |
|||
* the [[Media:e-puck.zip|e-puck software and documentation (zip file)]] |
|||
After you have downloaded the e-puck software and unzipped it, you will see five folders: docs (including a reference manual and a listing of all the source files), library (functions for inclusion in user programs), program (some example e-puck programs using the library), tool (some example PC programs for interacting with the e-puck), and tutorial (a "getting started" document and associated programs). This "e-puck" folder is normally placed in the C:\ directory, but other locations are fine. |
|||
Now follow the instructions on the "getting started" documentation in the "tutorial" folder. After you have installed the MPLAB IDE, C compiler, and bootloader, get tutorial A working. (You may need a USB-to-bluetooth adapter and software if your PC does not have bluetooth.) |
|||
Once you have successfully compiled and made small modifications to the tutorial, the next thing you might want to try is EpuckMonitor.exe, found in the tool/e-puck_monitor folder. This PC executable file gives you a GUI interface to the e-puck's functions. To use it, you must load the sercom.hex program on to the e-puck, found in program/advance_sercom. |
|||
Now let's look at another way to interact with the e-puck, using the PC's hyperterminal program, under Start/Programs/Accessories/Communications. Follow the instructions in program/NUtest/NUtest.c to create an MPLAB project. (Here is the [[Media:NUtest.c|NUtest.c code]] by itself. It is included in the software zip file.) After compiling the program and downloading it to the e-puck PIC, connect to the e-puck using hyperterminal on the proper COM port, a comm rate of 115,200 bits/sec, 8 data bits, parity none, 1 stop bit. Typing 'H' followed by enter should show you a menu of options, and you again can interact with the e-puck (minus the graphical interface). Since the program NUtest.c uses many of the functions of the e-puck, it is a good place to start your in-depth exploration of programming the e-puck. Try to understand in detail how the libraries are used to implement each of the functions. |
|||
Now you are well on your way to good programming of the robot. You might also find it instructive to look at the demo programs that were pre-loaded on the e-puck in e-puck/program/demo_swis_1. Here is some other information you might find helpful in your exploration (remember, more can be found at [http://www.e-puck.org the e-puck website]): |
|||
* A pdf [[Media:e-puckReferenceManual.pdf|software reference manual]] created (nearly automatically) by [http://www.stack.nl/~dimitri/doxygen/ Doxygen] from the comments in the code. Warning: it's long, and not necessarily easy to use. (This file is included in the software zip file.) |
|||
* A pdf [[Media:ProgramList.pdf|listing]] of (nearly) all the code in the libraries and demo programs, with table of contents. (This file is included in the software zip file.) You may find this useful for quickly looking up the definitions of functions in the various libraries (I did). (The code was automatically included in the file, and for some reason the indentation tabs were mostly lost in the process. This makes the code a little harder to read, but also mostly prevents the code from scrolling off the side of the page. The pdf file was generated using [[Media:ProgramList.tex|this LaTeX file]].) |
|||
* The [[Media:e-puck_mini_doc.pdf|mini-document]] included with the e-puck. |
|||
* Primary [[Media:Epuckprod_b_12.pdf|circuit schematics]] (pages 3-11 are especially useful). |
|||
* Be careful how you charge your e-puck Li Ion battery! See a [[battery disaster]]. |
|||
* PDF datasheets for some of the key components on the e-puck: |
|||
** [[Media:DsPIC30F6014A-datasheet.pdf|dsPIC30F6014A]] |
|||
** [[Media:pg15s020-geared-stepper-motor.pdf|pg15s020 geared stepper motor (1/50 gear ratio)]] |
|||
** [[Media:ADM3202-3.3V-RS232.pdf|ADM3202 CMOS to RS232 driver]] |
|||
** [[Media:LMX9820-bluetooth-datasheet.pdf|LMX9820 bluetooth]] |
|||
** [[Media:LP2985-IBPX-3.3-voltage-regulator.pdf|LP2985 voltage regulator]] |
|||
** [[Media:MIC2755-battery-supervisor.pdf|MIC2755 battery supervisor]] |
|||
** [[Media:MMA7260Q-3Daccelerometer.pdf|MMA7260Q 3D accelerometer]] |
|||
** [[Media:PO3030-camera.pdf|PO3030 640x480 VGA camera]] |
|||
** [[Media:SI3000-KS-voice-codec-mic-spkr-drive.pdf|SI3000-KS voice codec and microphone speaker drive]] |
|||
** [[Media:Si9986CY-buffered-hbridge.pdf|Si9986CY buffered H-bridge]] |
|||
** [[Media:SPM0208HD5-microphone.pdf|SPM0208HD5 microphone]] |
|||
** [[Media:TCRT1000-IR-reflective-sensor.pdf|TCRT1000 IR reflective sensor]] |
|||
** [[Media:TPA301-mono-audio-amplifier.pdf|TPA301 mono audio amplifier]] |
|||
** [[Media:UCC3952-LiIon-batt-protection.pdf|UCC3952 Lithium Ion battery protection]] |
|||
** [[Media:MAX1507ETA-lithium-ion-charger.pdf|MAX1507ETA lithium ion battery charger chip]] |
|||
** [[Media:VX3W-oscillator.pdf|VX3W oscillator]] |
|||
** HLP1033448 3.7V lithium ion battery: 1400 mAh, 50 ohm impedance, 58 grams, 10 x 33.7 x 63 mm |
|||
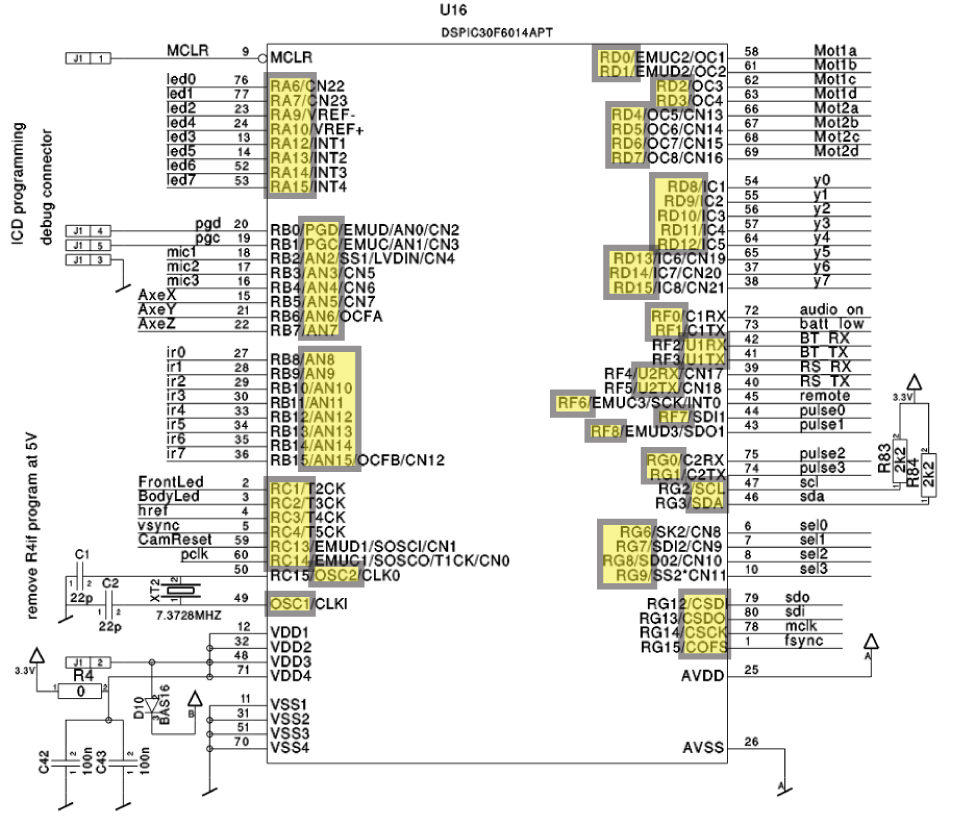
Below is the dsPIC30F6014A as it is used in the e-puck. For the pins that can be configured in more than way, the configuration used by the e-puck is indicated by yellow highlighting. |
|||
[[Image:PIC_in_e-puck.png|PIC_in_e-puck.png]] |
|||
[[Category:e-puck]] |
|||
Latest revision as of 13:48, 18 August 2009
The e-puck is a very capable little differential-drive mobile robot developed at EPFL, Switzerland. It has two stepper-motor-controlled wheels, a VGA camera, a ring of IR proximity sensors, a number of LEDs, a 3-axis accelerometer, 3 microphones, a speaker, and bluetooth communication, all controlled by a 16-bit Microchip PIC (dsPIC30F6014A). We have a few of them in the mechatronics lab.
The e-puck page is http://www.e-puck.org, and it is the primary source for all updated information on the e-puck. Here we keep a local copy of everything you need to get started, which includes a snapshot of the EPFL e-puck libraries from December 2007.
To get started, you need
- the Microchip MPLAB IDE under "Development Tools" at http://www.microchip.com to allow you to program the PIC with a PC
- the MPLAB C30 PIC30 C compiler, also under "Development Tools" at http://www.microchip.com
- the tiny bootloader that allows you to download your program to the PIC using bluetooth (from http://www.etc.ugal.ro/cchiculita/software/tinyblddownload.htm)
- the e-puck software and documentation (zip file)
After you have downloaded the e-puck software and unzipped it, you will see five folders: docs (including a reference manual and a listing of all the source files), library (functions for inclusion in user programs), program (some example e-puck programs using the library), tool (some example PC programs for interacting with the e-puck), and tutorial (a "getting started" document and associated programs). This "e-puck" folder is normally placed in the C:\ directory, but other locations are fine.
Now follow the instructions on the "getting started" documentation in the "tutorial" folder. After you have installed the MPLAB IDE, C compiler, and bootloader, get tutorial A working. (You may need a USB-to-bluetooth adapter and software if your PC does not have bluetooth.)
Once you have successfully compiled and made small modifications to the tutorial, the next thing you might want to try is EpuckMonitor.exe, found in the tool/e-puck_monitor folder. This PC executable file gives you a GUI interface to the e-puck's functions. To use it, you must load the sercom.hex program on to the e-puck, found in program/advance_sercom.
Now let's look at another way to interact with the e-puck, using the PC's hyperterminal program, under Start/Programs/Accessories/Communications. Follow the instructions in program/NUtest/NUtest.c to create an MPLAB project. (Here is the NUtest.c code by itself. It is included in the software zip file.) After compiling the program and downloading it to the e-puck PIC, connect to the e-puck using hyperterminal on the proper COM port, a comm rate of 115,200 bits/sec, 8 data bits, parity none, 1 stop bit. Typing 'H' followed by enter should show you a menu of options, and you again can interact with the e-puck (minus the graphical interface). Since the program NUtest.c uses many of the functions of the e-puck, it is a good place to start your in-depth exploration of programming the e-puck. Try to understand in detail how the libraries are used to implement each of the functions.
Now you are well on your way to good programming of the robot. You might also find it instructive to look at the demo programs that were pre-loaded on the e-puck in e-puck/program/demo_swis_1. Here is some other information you might find helpful in your exploration (remember, more can be found at the e-puck website):
- A pdf software reference manual created (nearly automatically) by Doxygen from the comments in the code. Warning: it's long, and not necessarily easy to use. (This file is included in the software zip file.)
- A pdf listing of (nearly) all the code in the libraries and demo programs, with table of contents. (This file is included in the software zip file.) You may find this useful for quickly looking up the definitions of functions in the various libraries (I did). (The code was automatically included in the file, and for some reason the indentation tabs were mostly lost in the process. This makes the code a little harder to read, but also mostly prevents the code from scrolling off the side of the page. The pdf file was generated using this LaTeX file.)
- The mini-document included with the e-puck.
- Primary circuit schematics (pages 3-11 are especially useful).
- Be careful how you charge your e-puck Li Ion battery! See a battery disaster.
- PDF datasheets for some of the key components on the e-puck:
- dsPIC30F6014A
- pg15s020 geared stepper motor (1/50 gear ratio)
- ADM3202 CMOS to RS232 driver
- LMX9820 bluetooth
- LP2985 voltage regulator
- MIC2755 battery supervisor
- MMA7260Q 3D accelerometer
- PO3030 640x480 VGA camera
- SI3000-KS voice codec and microphone speaker drive
- Si9986CY buffered H-bridge
- SPM0208HD5 microphone
- TCRT1000 IR reflective sensor
- TPA301 mono audio amplifier
- UCC3952 Lithium Ion battery protection
- MAX1507ETA lithium ion battery charger chip
- VX3W oscillator
- HLP1033448 3.7V lithium ion battery: 1400 mAh, 50 ohm impedance, 58 grams, 10 x 33.7 x 63 mm
Below is the dsPIC30F6014A as it is used in the e-puck. For the pins that can be configured in more than way, the configuration used by the e-puck is indicated by yellow highlighting.

