Persistence-of-Vision Display
Overview
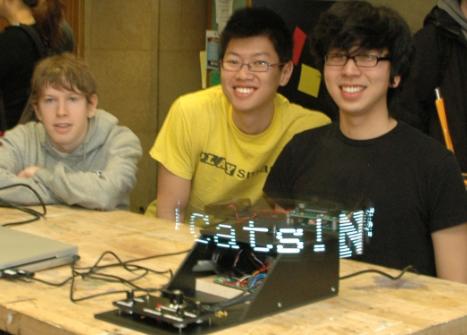
A fully customizable display using the concept of Persistence of Vision was created as a final project for ME333 in 2009. User-specified images (and even moving images) were displayed by rotating a column of LEDs at speeds faster than 300rpm. Each individual LED was modeled as a row of pixels. Conversely, the rotational position of the panel of LEDs represented the pixel columns of the display; the time interval and rotational speed determined the width of the pixel columns.
Team Members
- Gregory McGlynn (Computer Science, Class of 2011) [left]
- Kwang Xiong Sim (Mechanical Engineering, Class of 2010) [center]
- Alexander Park (Material Science and Engineering, Class of 2009) [right]
Theory of Persistence of Vision
Although arguably much more complex, human vision functions in a manner similar to modern motion pictures; our eyes retain images for a fraction of a second, not unlike a frame in a movie. This is called persistence of vision (POV). When images change fast enough, what we see is a subtle blend of what we see now and a fraction of a second ago.
Implementation
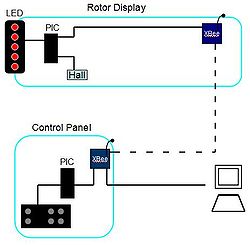
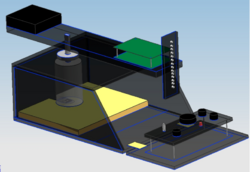
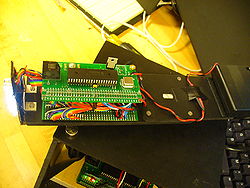
In order to avoid the complication of wiring a spinning object, all of the major components of the POV display were placed on a platform mounted on the output shaft of a 6W Maxon motor. The components of this rotating platform include a PIC Microcontroller, a panel of 14 bright white LEDs, a Hall switch, an XBee radio, and a battery pack to power the assembly. The strip of LEDs was mounted vertically (or parallel to the axis of rotation) at one end of the platform. To minimize wobbling of the assembly while spinning, the components were positioned such that the center of gravity of the panel passed through the axis of rotation.
Wireless communication between two PICs via XBees was used to enable live updating of the display based on user input: one PIC (the "display" PIC) was used to control the POV display and receive wireless information from a second PIC. This second "controller" PIC was used to receive user input and transmit it to the display PIC.
Modes of Operation
The POV display has two modes of operation, corresponding to two different input methods.
In the first mode of operation, the controller PIC transmits previously stored data to the PIC on the rotor panel. By varying the resistance of a potentiometer on the control panel, the user can choose between eleven "canned" messages.
In the second mode of operation, the controller PIC is connected to a computer via USB. Using a Java program written by Gregory McGlynn, the user can draw pictures or type letters in real time on the computer screen and on the POV display.
Position Sensing
To allow for accurate portrayal of the desired image, a Hall switch was utilized to implement position sensing. The Hall switch was mounted near the end of the rotor display platform and a magnet was attached on the top of the base box. The magnet was positioned directly under the path of the hall sensor such that each rotation of the platform triggered an electrical pulse. The display PIC was programmed to reset the image cycle each time a pulse was sensed from the Hall sensor. This allowed reproduction of a stationary image.
Using this implementation of the Hall switch, the display POV was programmed to calculate the rotational velocity of the POV after each rotation by timing the interval between pulses from the Hall switch. This allows for correction of pixel column spacing, such that the column width is consistent even at different speeds. As such, the display may function properly without any information from the motor about its speed.
Mechanical Design
Base
The base box was fabricated using black expanded PVC. There are three rectangular faces (the back, top, and bottom), two trapezoidal sides and a door that is hinged at the base such that it opens outwards. The control panel was mounted on the inner face of the door.
A wooden base was mounted to the bottom of this PVC box both to increase the box's integrity and to add to stability of the system with additional mass. A slot was cut near the back of the wooden panel to hold motor in place.
The motor output shaft was connected to the POV display platform through an aluminum coupler. This coupler extended out the top of the box through a radial ball bearing, which served to reduce lateral motion of the display platform and to support some of the weight of the platform. The end of the coupler was machined to fit snugly in to a slot-shaped hole in the display platform.
Control Panel
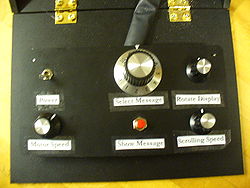
Several knobs, buttons, and switches were placed on a control panel to allow for user input: 1) Motor power switch, 2) Motor speed knob, 3) Selection knob for stored responses, 4) Selection button for stored response, 5) Message position knob, and 6) Scroll speed knob. These components were mounted on a piece of expanded PVC through appropriately sized holes. Specifics on the implementation of these components are described below in the Electronic Design section.
Rotating Display Platform
Because the display platform rotates rapidly during operation, all of the components were mounted rigidly onto two sheets of expanded PVC. These two sheets were screwed together at the center of the platform, such that a double layer of material was created at the slot for the motor coupler. At one end of the platform, the panel of 14 vertically mounted LEDs was mounted. The electronics of the platform (consisting of a solder board and a PIC board separated by standoffs) were mounted behind the LED panel. A 6V battery pack (4AA's) was mounted at the opposite end of the platform with Velcro. This non-permanent positioning of the battery pack was chosen so that the batteries could be easily replaced and such that the batteries could act as an adjustable counterbalance for the entire platform.
Parts List
- (1) Radial ball bearing
- Expanded PVC sheet
- Wood (approx. 6" x 5" x 0.5")
- Sheet metal screws
- Various nuts and bolts
Electrical Design
Display PIC Electronics
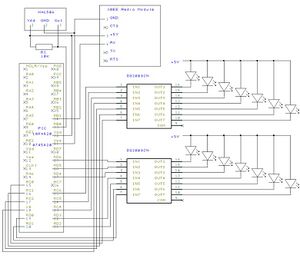
The rotating display platform has 14 LEDs which were controlled through Ports C and D of a PIC. Because bright LEDs were used, the amount of current need could not be supplied directly from the output ports of the PIC. As such, the LEDs were wired through two Darlington arrays (DS2003). These ICs consist of 7 Darlington pairs with a common emitter. The outputs of the PIC were connected to the bases of the transistors; when the PIC drives one of the bases high, current can flow through the transistor and the corresponding LED lights up. We did not find it necessary to use any resistors in this design.
The display uses a Hall switch to synchronize its display with its rotation, as described above. The implemented circuit, as shown schematically at the right, causes pin B0 of the PIC to go low whenever the hall switch is near the magnet mounted on the base box; when the PIC detects this falling edge on pin B0 it knows its relative position. By timing the interval between two of these events the PIC calculates how fast the display is rotating and adjusts its timing accordingly.
The display receives commands from the controller PIC via an XBee radio module.
Controller PIC Electronics
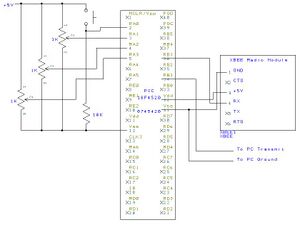
When using the first mode of operation, the control panel receives user input through three 1000-Ohm potentiometers and a push button. The states of these controls are read by the PIC which uses its XBee radio module to send appropriate commands to the display.
If the USB cable is plugged in, the second mode of operation takes effect and the controller PIC is also responsible for accepting commands from the PC and relaying them to the display PIC through the XBee.
Motor Control Electronics
The motor and its electronics were wired separately from the rest of the electronics. A toggle switch was wired in series with a variable resistor (a 25-Ohm potentiometer) between the motor and a 24V power supply. This allowed for the toggle switch to be used as a simple on/off power switch, and the potentiometer to be used to tune the voltage across the motor, effectively varying its speed.
Parts list
- (2) PIC18F4520 microcontrollers
- (1) XBee Radio pair and their interface boards
- (2) Darlington Pair Arrays (DS2003)
- (1) Hall switch
- (14) Bright white LEDs
- (3) 1000-Ohm potentiometers
- (1) Push-button
- (1) 6W Maxon Motor
- (1) Toggle Switch
- (1) 25-Ohm Potentiometer
- Solder Board
- Stranded wire
- 10-wire stranded ribbon cable.
Code
Code for the control panel PIC
Results
Mode 1: Canned Response
In the first mode of operation, the user can just plug in the POV display into a wall socket, turn on the display PIC's power, and turn on the motor to display an image. This allows for a quick and easy demonstration without a computer. We have stored eleven different responses on the display PIC's ROM. Using a knob and a button on the control panel, the user can set which canned response is displayed.
http://www.youtube.com/watch?v=zx5eXrf9oQI[1]
Mode 2: Real time image input
In the second mode of operation, a user can interact more closely with the POV display. In this mode, the POV display is connected via a USB port to a computer which needs to have Java installed. The Java program with the code listed above allows users to draw pictures or type letters which will be transmitted in real time from the controller PIC to the display PIC through the wireless XBee chips.
In both modes of operation, we have set up knobs that will allow a user to scroll a message manually or set the scroll speed of an image.
http://www.youtube.com/watch?v=urz729AbkG4[2]
Additional Notes
How to use the POV Display (a brief user's manual)
Basic Operation
In its most basic mode of operation, the display is quite simple to use:
- Plug the power cord into the wall.
- Turn on the battery pack on the rotating display platform.
- Unfold the control panel, and flip the power switch.
The display should spin up and the text "ME333 - Mechatronics" should be displayed. Try out the control panel knobs!
Connecting to a Computer
It's also possible to draw your own images for the display in real time using the PC software. Note that the program will on run on Windows machines.
Installing the software:
- Download POV-PC.zip and save it in its own directory somewhere on your computer.
- Unzip POV-PC.zip with WinZip or some other unzipping tool.
- This will extract 3 files. The important one is POVController.exe. Running this will start the control program. You can run POVController.exe by navigating to the folder it's in with Windows Explorer and double-clicking on the icon.
Starting up POVController.exe:
- Plug the USB cable into the computer before running POVController.exe
- Find out the COM port number of the POV device: in Windows Device Manager, look under "Ports (COM & LPT)" and you should see "USB Serial Port (COM#)," where # represents the appropriate COM port number.
- Run POVController.exe and provide it with the COM port number when prompted and press enter.
Using POVController.exe:
- After starting up POVController.exe as described above, the graphical user interface will appear.
- Click "Clear" to clear the POV display and start with a blank image.
- You can draw on the grid with your mouse to make images appear on the display.
- Selecting the "Erase" check box allows you to use the mouse to erase individual pixels.
- Typing in the applet will make text appear in the GUI.
- If the drawing or text doesn't show up you on the POV display, click the refresh button once. Avoid pressing the refresh button many times consecutively; refreshing takes several seconds and multiple clicks will cause the program to briefly become unresponsive.
Troubleshooting
"I don't see any lights!" - Did you turn on the battery pack on the display?
"When I type none of my letters appear in the interface!" - Try pressing backspace several times.
"None of the controls work!" - Try turning off the motor, letting the display spin down, and then pushing the reset buttons on both PICs. Sometimes the communication between the two PICs gets misaligned and the PICs have to be reset.
Possible Future Improvements/Enhancements
The use of PICs in this project allows for a great number of possibilities for improvement to the display. For instance, different sensors could be mounted to the display platform or added to the controller PIC to make the display more interactive; proximity sensors, microphones, or even touch screens could be added to create more modes of operation. Additionally, using RGB LEDS could allow for a more colorful user experience with the POV display.
