Robot Drummer
Team Members
- Bobby By: Senior in Electrical Engineering
- Agatha Lee: Master Student in Biomedical Engineering
- Dan Niecestro: Senior in Mechanical Engineering
Overview
The goal of this project was to create a high speed motor controller which can be tuned through MATLAB so that anyone could take a couple motors and a few dollars worth of hardward and implement accurate high-speed encoder-based feedback control. MATLAB sends commands via RS232 serial connection to a "master" PIC which in turn communicates with a number of "slave" PICs to initiate motor control. To demonstrate this, the Robot Drummer was created.
Mechanical Design
Mechanical Overview
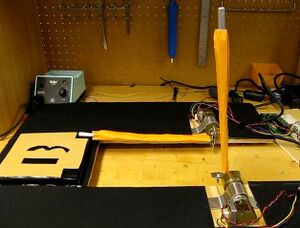
In this project, we were asked to present motor control of two separate motors running simultaneously. It was thought that a simple way to visually demonstrate motor control and be aesthetically pleasing was to make a small drum set.
This drum set consisted of a base, a drum pad and two drum sticks. All the parts were manufactured in the Northwestern machine shop, with materials supplied. The motors are removable and can be switched by loosening the brackets that hold them down. One of the main considerations was reusability of the motors and this setup allows easy removal or switching of motors from our device.
Base
The base was made in a U shape; this was done to allow the motors to hang over the insides and share the same drum pad, as seen above. Also, small legs were planted under the base so that when the motor rotated, the drumsticks would not hit the surface underneath. Both the legs and the main base was made of wood. Cardboard was placed over the base for aesthetic reasons
Securing Motor to Base
The motors were secured to the base using two brackets. The first bracket went around the circular part of our motor to hold the motor down and prevent side-to-side movement. Next, around the square part, a small, thin bracket was used to prevent the motor from moving up and down and slipping. Both brackets were set in place using screws to allow the bracket to open and close with ease. After securing it in place, the motors did not move at all and proved to be very secure.
Drum Pad
The drum pad is elevated off the base to allow the ends of the drumstick to hit it without hitting the base. Like the base, the drum pad is made of wood; it was then was covered in a thick poster/foam board material to dampen the sound since the metal hitting the wood was rather loud. This also gave the look of a drum pad. The number 13 was put on the pad represents our team number.
Drum Sticks
This was the most intensive part to make--there was a large number of trials and different ways of creating them. It was decided that the drum sticks should be made as light as possible to ensure that the motor could support it, therefore aluminum sheet metal was used. Basically, two L beams were made mirrored of each other and one hole was drilled for a screw on each side at the base of each beam. This was to connect to another small beam to go on the other side which will make a simple collet and a nice force fit on the shaft of the motor. To connect the two L beams together, rivets had to be used as spot welding aluminum is not very effective. Only three rivets were placed on the beam because a small circular rod of aluminum was added at the end of the beam. The beam had to open up and the rod was place in the middle, where two holes were drilled to prevent the rod from moving. Lastly, we wrapped it in a yellow glossy paper to make them look more like drumsticks; however, these coverings are not exactly round because it had to attach to the beam itself, which isn’t round. The result showed that it created a very nice force fit which had very little to no slipping on the motor shaft.
Electrical Design
Component List
| Part | Part No. | Qty |
|---|---|---|
| PIC18F4520 Prototyping Board | --- | 3 |
| Microchip 8-bit PIC Microcontroller | PIC18F4520 | 1 |
| Microchip 8-bit PIC Microcontroller | PIC18F4431 | 2 |
| RS232 Cable | TTL-232R | 1 |
| Pittman Motor with Encoder | GM8224 | 2 |
| Hex Inverter Chip | SN74HC04 | 1 |
| H-Bridge Chip | L293D | 2 |
| 10K Resistor | --- | 2 |
Setup
All of the components, except the Pittman motors, were powered with 5V DC. The Pittman motors were powered with 12V DC.
PICs
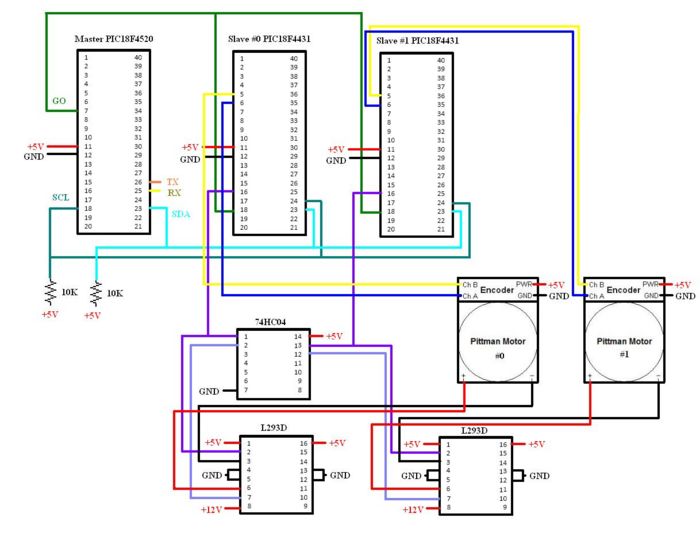
Two kinds of PICs were used: one "master" 18F4520 and two "slaves" 18F4431. The 18F4431 has a built in quadrature encodermakes it convenient for encoder-based motor control. This eliminates the need of a counter chip, such as a LS7083 used in the original I2C motor control circuit. Although not explored in this project, the 18F4431 also has a Power Control PWM module which may be used in other motor control applications. The PICs communicated via I2C. I2C communication requires 2 connections: clock(SCL) and data(SDA). The SCL line and SDA line were connected from pin 18 and pin 23 of the master PIC to pin 24 and pin 23 of all slave PICs, respectively. Note that the SCL and SDA lines needed a 10 Kohm pull-up resistor. There is also a "Go" signal from pin 7 of the master to pin 18 of the slave PICs.
The TTL-232R has six color-coded wires, but only 3 were required with this project. The black GROUND wire was connected to PIC ground, the orange Tx wire was connected to pin 26 of the master PIC and the yellow Rx wire was connected to pin 25 of the master PIC.
H-Bridge
The slave PICs send an individual PWM to a L293D H-bridge. This PWM determines the speed of each motor. The motor is at rest at a 50% duty cycle and is at its maximum speed at 0 and 100% duty cycles. Pin 16 of the slave PICs was connected to pin 2 of a L293D. The H-bridge needed to be powered with +12V on pin 8, +5V on pin 1 and grounded on pins 4 and 5. Pin 16 was also powered with +5V and pins 12 and 13 were grounded to minimize noise. Note that the L293D is rated for 1A of output current only. You may want to use a different H-bridge if higher current capacity is required.
Hex Inverter
Pin 16 of the slave PICs was also run through the 74HC04 hex inverter chip (pin 1 or pin 13). The output of the hex inverter (pin 2 or pin 12) was sent to pin 7 of L293D. Pin 14 was powered with +5V and pin 7 was grounded.
Pittman Motors
The positive end and negative end of the Pittman motor were connected to pin 6 and pin 3 of the H-bridge, respectively. Encoder A of the Pittman motor was connected to pin 6 of the slave PICs, while encoder B was connected to pin 5.
Schematic
Programming
Overview
Three sets of code were required for our project: the MATLAB code, C code for the master PIC, and C code for the slave PICs. The MATLAB code sends commands to the master PIC. The master PIC code read all the serial communication from MATLAB and converted it into appropriate I2C commands for the slave PICs, which were completely dedicated to motor control and encoding.
Code
Robot_Drummer_Matlab.zip
Robot_Drummer_MotorControllerFunctions.c
Robot_Drummer_Master.c
Robot_Drummer_Slave.c
Matlab
Robot_Drummer_Matlab.zip contains all the MATLAB functions used in our implementation, as well as two sample code files. The following table outlines the commands that can be sent from MATLAB. (The original MATLAB functions are written by Matt Turpin in his I2C Motor Controller project, modified slightly for our controller implementation.)
| Matlab Function | Purpose | Command Format | Example | Example's Outcome |
|---|---|---|---|---|
| MotorControllerConnect.m | Enables communication between Matlab and the master PIC | serial object = MotorControllerConnect(serial port number) | s = MotorControllerConnect(6) | Will connect the master and Matlab through COM port 6 |
| mc_resetpos.m | Resets the current position to zero | mc_reset_pos(device,serial object) | mc_reset_pos(0,s) | Will reset slave #0 motor's current position to zero |
| set_mc_position.m | Sets the desired position | set_mc_position(position,device,serial object) | set_mc_position(5000,0,s) | Will set slave #0 motor's current position to 5000 |
| mc_get_position.m | Gets the current position | position = mc_get_position(device,serial object) | position = mc_get_position(0,s) | Will get slave #0 motor's current position |
Master
There are two files related to the master PIC. Robot_Drummer_Master.c is the file that needs to be put on the master PIC. Robot_Drummer_MotorControllerFunctions.c should be put in the same directory as Robot_Drummer_Master.c. Refer to this datasheet for more details on the master PIC functions.
The master PIC can be used in two ways:
1) Receive commands from Matlab through the RS232 cable and then send it to a slave PIC
2) Directly send commands to a slave PIC without having MATLAB involved
When the master PIC receives data through the serial connection to the PC, the appropriate function in Robot_Drummer_MotorController.c is called; the command is then relayed to the slave with the appropriate address via I2C. If data was requested, the master receives the requested data from the slave and sends it back to Matlab.
Slave
Each slave PIC is programmed with Robot_Drummer_Slave.c. Here, we have assigned the I2C address explicitly in the code, but you may also connect pins B4, B5, E2, E1 as described in the I2C Motor Controller datasheet to assign the address to each slave.
The following table shows a few preset I2C addresses. The device numbers are used in the Matlab commands, while the Hex addresses are the ones defined in the slave code. There are 16 preset addresses in the MATLAB device lookup table.
| Device Number | Hex I2C Address |
|---|---|
| 0 | 80 |
| 1 | 82 |
| 2 | 84 |
Quad Encoder
We used the PIC 18F4431 quadrature encoder interface (QEI), for which registers were not defined in the CCS .h file; hence the registers need to be defined and modified explicitly in the code.
#byte QEICON= 0xFB6  // Quadrature Encoder Interface control register
int16 POSCNT;        // Position Count register (16 bit)
#byte  POSCNT  = 0xF66
#byte  POSCNTH = 0xF67
#byte  POSCNTL = 0xF66

int16 MAXCNT;        // Can set POSCNT to reset when POSCNT=MAXCNT
#byte  MAXCNT  = 0xF64
#byte  MAXCNTH = 0xF65
#byte  MAXCNTL = 0xF64
The Pittman motor encoder has a resolution of 39000 counts per revolution at 4x encoding. It would be desirable to be able to set any angle within 720 degrees (-360 to +360); however, since POSCNT is only a 16bit integer, the count cannot exceed 65535. You may be able to count a full 720 degrees by keeping track of position counter overflow/underflow (bit 7 of QEICON). Instead, we implemented angle control of approximately -180 to +360 degrees, which was sufficient for our Robot Drummer. The QEI mode is set to position mode, 4x encoding, position counter reset on matching MAXCNT.
   QEICON = 10011000; //Velocity mode disabled, 4x update mode, reset on POSCNT=MAXCNT
   MAXCNT = 59000;    //count 540 degrees max
   POSCNT = 20000;    //start at 0 degrees
I2C
We had a great deal of trouble trying to get I2C communication to work between the 18F4431 and the 18F4520, all of which was resolved by simply including this register definition in the slave code:
#byte SSPCON = 0xFC6
This is possibly due to the fact that the 4431 uses an SSP module instead of MSSP like the 4520, and has one SSP control register instead of two (refer to this PIC forum thread).
Control
Each slave PIC is programmed with a PD control algorithm with hard-coded control gains to drive the motor to the desired position. The code may be easily modified to receive gain values from the master to tune the controller. The error between the target and actual position is calculated, and the derivative term approximated by finding the difference between the errors of the current and previous iteration of the status update. The sum of the proportional and derivative error terms multiplied by the gain is used to modify the PWM duty to adjust the position of the motor. When the error is zero, the duty is at 50% and the motor stops. It was noted that there is a "dead band" of duty values near 50% at which the motor will stop even though the motor has not reached the target position. This band is relatively narrow when the motor is powered at +12V but gets wider as the voltage input decreases.
Results
Objectives Met
Despite the problems we encountered early on in the project, overall we are pleased with the progress we've made in a relatively short amount of time. We believe this project will be of great use to others. We were able to meet the following objectives:
- Make it easy for anyone to do high-speed encoder-based feedback control of brushed DC motors cheaply.
- The master PIC is consistently able to receive commands from Matlab using the RS232 cable.
- The master PIC is consistently able to communicate the commands back to the slave PICs using I2C.
- Learn about and take advantage of the 18F4431's built-in quad encoder module.
- The slave PICs implement feedback PD control.
- Upon request, data can be sent from the slave PICs back to MATLAB.
Datalogging to Flash Memory
One of the original objectives of this project was to store the position data onto a flash memory chip during PID control to get a high resolution profile of the motor movement to let the user to better tune the motor controller. Unfortunately, this part of the project was left unfinished.
Overview
The flash memory chip W25X40AVDAIZ-ND uses SPI communication to store and read data. The 18F4431 uses the SSP module for both SPI and I2C communication; since the hardware SPI pins are used by I2C communication with the master we attempted to use software SPI. It may be possible to use reassign the SPI pins to other I/O pins and use the soft SPI functions available in CCS, as described here, but you may need to change the SSPCON registers to switch between SPI and I2C modes.
Flash Memory Circuit
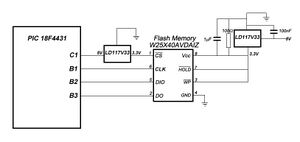
The flash memory chip takes 3.3V input, although transient pin voltage may go up to +5V. We used a 3.3V voltage regulator to supply the flash chip. It appeared that the quality of the DO signal from the flash chip was sensitive to the RC values on the output of the voltage regulator. There may be better values of resistor/capacitor for the circuit. The /HOLD and /WP pins are tied high to disable the two functions; they may be connected to PIC I/O pins if those functions are desired. /CS pin is connected to PIC pin C1 through another 3.3V voltage regulator, as the pin would be held high for an extended length of time. The Clock, Data In and Data Out pins are connected to Pins B1, B2 and B3 of the PIC.
SPI Communication
SPI operates full duplex, so data can be sent and received simultaneously on two separate data lines. Each byte of data is sent MSB (bit 7) first.
#include <18f4431.h>
#fuses HS,NOLVP,NOWDT,NOPROTECT
#use delay(clock=40000000)
#define SPI_CS PIN_C1	//Chip select
#define SPI_CLK PIN_B1	//Clock
#define SPI_DO PIN_B2	//Data Out - connect to DIO of flash chip
#define SPI_DI PIN_B3	//Data In - connect to DO of flash chip

int i=0;
int count=0;
int data=0;
int32 address=0;
byte d_in=0b00000000;
byte d_out=0b00000000;


void setup()
{
set_tris_b(248);       //Set Pins B1-B2 as outputs, B3 as input
output_high(SPI_CS);   //Chip not selected
output_low(SPI_CLK);   //Mode 0 - clock is low during standby
output_low(SPI_DO);
address=0;
}

int8 xfer_spi(int8 data)
{
   d_in=data;

   // Loop through all the bits, 7...0
   for(i= 0; i < 8; i++)
   {
       output_bit(SPI_DO, shift_left(&d_in, 1, 0));
       shift_left(&d_out, 1, input(SPI_DI));
       output_high(SPI_CLK);         // flash input data latched on rising edge
       delay_us(2);
       output_low(SPI_CLK);          // flash output data latched on falling edge
   }
   output_low(SPI_DO);
   return d_out;
}
The xfer_spi function is modified from this bit banging code. This function can be used to send or receive a byte of data. The flash memory chip has an instruction set of 15 basic instructions to read, program, erase data etc. Refer to the datasheet for the full instruction set.
To test whether we can read from the chip, you can send an instruction to get the manufacturer and device ID (0xEF12).
void main()
{
   setup();
   address=0;
   output_low(SPI_CS);   //drive CS pin low to enable
   xfer_spi(0x90);       //instruction to read manufacturer/device ID
   xfer_spi((int8)(address));  //send 24-bit address=0x000000
   xfer_spi((int8)(address>>8));
   xfer_spi((int8)(address>>16));
   data1 = xfer_spi(0x00);  //get manufacturer ID
   data2 = xfer_spi(0x00);  //get device ID
   delay_us(10);
   output_high(SPI_CS);  //CS pin high to deselect chip
}
We were able to read the manufacturer and device data. Unfortunately, we didn't have time to check that we can write data and read it back, or to integrate flash data logging into our project.
Problems Encountered
Initially we encountered a lot of trouble with communication of the different units. For those trying to recreate this project, it may be useful to build each part separately and then combine them. We found the debugging strategy below to be useful.
Debuggging Strategy
Test RS232
In order to test the RS232, connect the RS232 cable to the appropriate pins of the master PIC (see Electrical Design). To determine whether the master PIC can receive data from the RS232, send a desired position from Matlab and turn on some LEDs (e.g. display the position in the LEDs) in the master PIC code. The following code in the master PIC's Robot_Drummer_MotorControllerFunctions.c will do this.
void set_mc_pos(int device,  int32 position)
{
   int* output[5] = {0,0,0,0,0};
   int ii;
   output_d(position);
   output[0] = 2;
   for(ii=0;ii<2;ii++)
   {
      output[ii+1] = (int8)(position>>(8*(ii)));
   }
   mc_transmit(device,output);
}
Test I2C
Commands can be sent directly to a slave PIC from the master PIC. For example, the following code can be used in the main loop to send a desired position.
set_mc_pos(0x80,5000);
mc_go();
Look at the I2C lines on the oscilloscope and make sure that the slave is acknowledging when the master is sending the address, etc. It may also be useful to turn on LEDs to see that the master is transmitting data and/or the slave is receiving data.
Test Motor Control
In the slave code, instead of waiting to receive commands from the master, manually set the target position in the main loop. This way, you can tweak the code directly and see if the motor control is working.
Other Problems
- The L293D H-bridge heated up and eventually burnt out a couple of times during testing.
- Occasionally, the drum sticks tried to reach their position by making a complete 360, probably due to overflow/underflow of the position counter, but this was not possible due to the drum. This would cause internal problems in the motor.
- The drum sticks would sometime fall from its position due to gravity.
Future Work
There are many options that could be researched and developed to make this project better.
- Due to time constraints, we were not able to implement the flash memory. Flash memory is a more reliable method of data logging than currently implemented.
- In addition to the position control that is available, velocity control would be useful.


