Pulse width modulation
Pulse width modulation (PWM) for driving motors or other high current devices
The PIC has two outputs (CCP1 and CCP2) each of which can produce a square wave of variable duty cycle, for use in driving motors with variable speed, and in either direction.
The PIC's outputs are intended as logic signals, and are limited to 25mA and 5V, too little to drive any but the tiniest motors. An H-bridge allows logic level signals to control a larger current and voltage.
The L293D (1.2 amp) and L298 (4 amp) H-bridge chips each contain four "half-bridges", thus each chip can run two motors bidirectionally, or four motors at variable speed in only one direction. The H-bridge chip takes two supply voltages (as well as ground): +5 for logic, and +Vs for the high power side of the device.
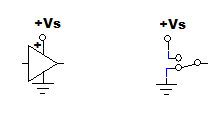
Each half bridge is a buffer: it takes a logic level input and switches a power-level output.
As suggested above, you can think of each half-bridge as a toggle switch, controlled by a logic-level input. When the logic input is high, the output is connected to a positive voltage rail +Vs, which may be much bigger than 5V. When the logic level is low, the output is connected to ground (in some H-bridges, it can be connected to a negative rail). The +Vs rail may be able to supply a lot of current to a motor, often limited mainly by the heatsinking of the H-bridge chip.
Using H-bridges for PWM In use with a PIC, two of the half-bridges are connected to two outputs of the PIC. One output is duty-cycle adjusted by the PIC's PWM capability, and the other output is held at a steady logic high or logic low. (This is not the only way to do PWM; you can also use two logic signals inverse to each other. See Driving_a_DC_Motor_using_PWM)
Here we've used CCP1 as the PWM output, and RC3 as the steady logic output. When both CCP1 and RC3 are high, +Vs is switched to both sides of the motor and so there is no voltage across the motor. Similarly when CCP1 and RC3 are both low.
When RC3 is low and CCP1 is at 50% duty cycle, there is a voltage of +Vs across the motor half the time, and it spins. If CCP1's duty cycle is 75%, the motor spins faster, because +Vs is across the motor three-quarters of the time.
If RC3 is high and CCP1 is at 75% duty cycle, there is a voltage of +Vs across the motor only one-quarter of the time, and it is reversed in polarity from the previous example. Thus the motor spins slowly, and in the opposite direction.
You can put the above pieces together to torque the motor in either direction with any duty cycle between 0 and 100%.
Which H-bridge?
Each of them contains four half-bridges, enough to run two motors.
The L298 is cabable of handling much more current, especially if you heat sink it. However it is in a very inconvenient package that won't plug into a solderless breadboard.
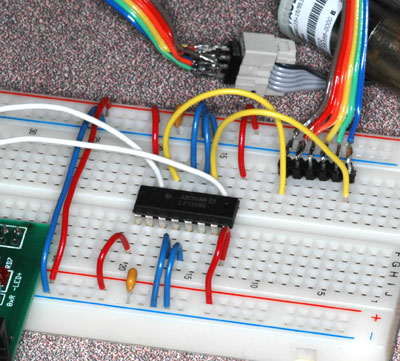
The L293D (or DD) is in a convenient DIP16 package. Also, the two necessary diodes for each half-bridge are built in. However it handles only 1A peak,and cannot be efficiently heat sinked. Try it; if it doesn't get too hot, it's much preferable to the L298.
At right it is shown running one motor. Note the 1uF capacitors.
The L298 H-bridge
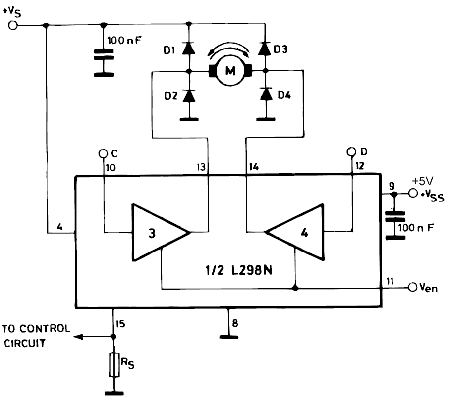
Electrically, it is necessary to have supply decoupling capacitors (typ. 1uF) from +5 to logic ground, and from +Vs to ground, near the chip. The four diodes shown are important when driving an inductive load such as a motor, to shunt away inductive spikes when the current switches. Note that the diodes are in a full-wave-bridge configuration and you can conveniently use a 4-pin full wave bridge chip such as a DF04.
If you have trouble with noise from the PWM and/or motor contaminating sensitive analog circuits, you can use a completely separate power supply for +Vs, not even sharing a ground with the PIC and with analog circuits. To do this you would use optoisolators to convey the logic signals CCP1 and RC3. You would in this case need to supply the H-bridge chip with a +5V rail derived from +Vs, not shared with the PIC.
The pinout for half of the L298N is shown above. Note that in addition to the logic ground pin 8, there is a power ground pin 15 which should be connected to ground, even if you don't want to pass the motor current through a resistor Rs for current sensing. There is also Ven logic enable input which can be wired high. If Ven is low, the buffers connect their output to neither +Vs nor to ground. You might want to do this: when the motor's winding is "open" the rotor spins more freely than when it is "crowbarred" (shorted by having both ends connected to +Vs or to ground).
Software for PWM
Refer to the sample code. A PWM output is designated as such by setup_ccp1(CCP_PWM). The overall repetition rate of the PWM output is determined by Timer 2. There are also Timers 0, 1, and 3, but Timer 2 is the only one that can be used for PWM.
Timer 2 is initiated by setup_timer_2(T2_DIV_BY_4, 78, 16), which may be understood as follows: The standard 20MHz oscillator is always divided by 4 to produce the basic clock frequency for the PIC, here a 200nS cycle time per instruction. T2_DIV_BY_4 tells Timer 2 to further divide the clock frequency by 4 (called a "prescaler") to produce a 0.8uS clock for incrementing the timer. Timer 2 is set to count only to 78, then overflow and restart. The overflows determining the repetition rate for the PWM generator. 78 * 0.8uS gives 62.4uS, or a 16KHz repetition rate for the PWM signal.
The third argument indicates that an interrupt, if enabled, will take place every 16 overflows, giving a rate of 1KHz for interrupts. We will use this elsewhere for servo calculations.
A statement set_pwm1_duty(DutyCycle) specifies for how many of the 78 counts the PWM output should be high. DutyCycle ranges from 0 (0% duty cycle) to 79 (100% duty cycle).
Of course to control motor direction you will also have to set digital output C3 high or low appropriately. When C3 is low, a high duty cycle at CCP1 gives maximum forward speed. When C3 is high, a low duty cycle at CCP1 gives maximum reverse speed.


