I2C communication between PICs
Original Assignment
Microcontrollers commonly talk to each other using protocols such as RS-232, SPI (for "serial peripheral interface"), I2C (or I^2C, "I squared C," for inter-integrated circuit), CAN bus, or other. This project is to demonstrate bidirectional I2C communication between two PICs. A demonstration might have the value of an analog input (potentiometer) at one PIC displayed as a "light bar" on the LEDs of the other PIC board, and simultaneously vice-versa.
Overview
I2C is pronounced "I squared C" and stands for Inter-Integrated Circuit. Is is a 2 line (plus common ground) communication method for one master device to control up to 112 slave devices. While it is possible to have multiple masters on the same I2c bus, this page will only deal with a one master configuration.
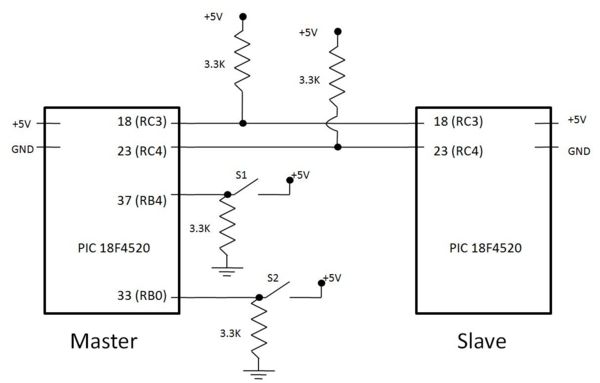
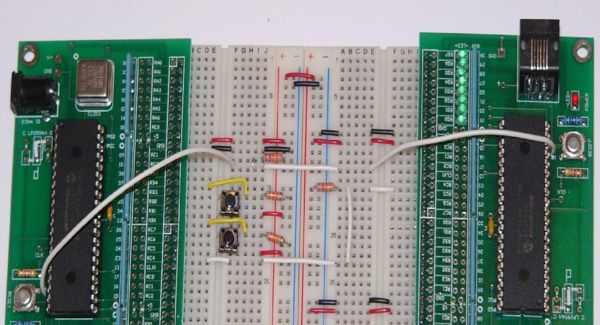
The two lines are named SCL and SDA where SCL is the CLock line and SDA is the DAta line. The PIC 4520 is designed to use pin 18 as SCL and pin 23 as SDA for hardware I2C. Note that pin 18 is one of the only pins not accessible on the prototyping board. An additional wire can be added as shown in the example image. I2C requires the lines to be high unless the master or the slave is pulling the line down, so you will need to use pull up resistors on both the clock and data lines.
An communication diagram is shown:
- S - As the master pulls down the data line, the falling edge of the data line signifies the start condition.
- P - As the master allows the data line to rise, the rising edge of the data line signifies the stop condition.
- B - Individual bits being transferred.
The data line can only change while the clock line is low. The data line is only read when the clock line is high and therefore 1 bit can be transferred per cycle of the clock line.
The master is initially sends a start bit followed by the 7-bit address of the slave it wishes to communicate with. The next bit represents whether it wishes to write(0) to or read(1) from the slave.
The slave then responds with an acknowledge bit. The transmission continues according to whether the master is attempting to read to or write from the device.
The master then ends the transmission with a stop bit. Another option is to send another start bit to continue the transfer in a combined message.
Circuit
Below is a simple circuit diagram showing the master PIC with 2 close button switches. Note that pin 18 (RC3) is not brought out to the circuit board, but a wire can be soldered next to the PIC itself. Both SDA and SCL need pull up resistors as either the master or the slave can hold the line low to stop communication.
Here is an example image of how to wire this.
Code
Code for master to slave transfer of one byte with switch de-bouncing can be found here:
Master
For the Master PIC, we first need to define the output pins and force hardware I2C communication.
#use I2C(FAST, SCL=PIN_C3, SDA=PIN_C4, FORCE_HW) //using hardware I2C, built into the PIC, make sure to include this line in any master I2C program
To communicate with a device, we use the following lines of code where 0x14 is the device name. The first line is the issuing of the start command and this forces all slave devices on the bus to wait for their address. The next write command is the address of the slave. The following byte is the data being sent to the slave. All communication must terminate with a stop command or the line will remain open and no future communication is possible until the command is given.
  i2c_start();               //begin transmission
  i2c_write(0x14);           //select address of device to communicate with
  i2c_write(data);           //send actual data
  i2c_stop();                //terminate communication
Slave
For the Slave PIC, we first need to define the output pins, define the name of the device and force hardware I2C communication. This device was randomly assigned name 0x14, but could have been just about any even hex number with a few exceptions noted below code.
#use i2c(SLAVE, FAST, SCL=PIN_C3, SDA=PIN_C4, address=0x14, FORCE_HW) //make sure to include this line in any Slave I2C program
The SSP interrupt is used for I2C communication. When the master begins to transmit data, the PIC goes into this interrupt.
  #INT_SSP                      //Interrupt for I2C activity
  void sspinterupt()
  {
The definition of state is to determine whether or not the master is requesting or sending data.
state = i2c_isr_state(); //Reading the type of transmission
State is less than 0x80 for all read operations.
     if(state < 0x80)           //Master is sending data
     {
        data = i2c_read();      //An array will be needed to store data if more than one byte is transferred
     }
State will be equal to 0x80 for write commands.
     if(state == 0x80)          //Master is requesting data
     {
        i2c_write(data);
     }
     output_d(data);            //Output data to port D to visualize
  }
Somewhere in the main section of the program, probably right away, the SSP interrupt will need to be enabled.
  enable_interrupts(INT_SSP);
  enable_interrupts(GLOBAL);
Address exceptions:
  0000 000 1 START byte - for slow micros without I2C h/w
  0000 001 X CBUS address - a different bus protocol
  0000 010 X Reserved for different bus format
  0000 011 X Reserved for future purposes
  0000 1XX X Hs-mode master code
  1111 1XX X Reserved for future purposes
  1111 0XX X 10-bit slave addressing
Two Way Communication
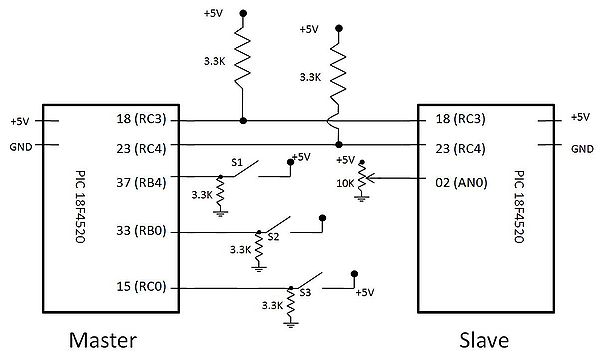
An alternate circuit diagram is shown below.
Changes are made to the code to allow more than one bit of data as well as data transferred from the slave to the master.
Master
An alternate address of 0xa0 is used to demonstrate any address can be used.
To read from the slave, the first byte sent is the address of the slave. The second byte is the location of the data on the slave being requested. The communication is terminated before being restarted.
  i2c_start ();           //begin communication
  i2c_write (0xa0);       //send slave address
  i2c_write (0x02);       //request slave internal memory address for analogue data
  i2c_stop();             //stop write cycle to shift to read cycle
  i2c_start ();           //send repeated start command to begin read cycle
Immediately after restarting, the address plus one read bit added is sent. The data requested previously is read and the communication is terminated.
  i2c_write (0xa1);       //add 1 to the address to send a read bit
  result = i2c_read(0);   //read analogue information from the slave
  i2c_stop ();            //terminate communication
  output_d(result);       //display analogue information from the slave
Slave
In this example a larger information buffer is used, an array of 0x03 bytes, but this can be as large as needed.
int address, buffer[0x03];
In the interrupt, most of the same code is used as before.
  #INT_SSP
  void ssp_interupt ()
  {
     state = i2c_isr_state();
     if(state < 0x80)                 //master is sending data
     {
the first command bit is empty, so nothing is done.
        if(state == 0)
        {
        }
The first data byte returns state 1 and is the address to be written to.
        if(state == 1)                   //first received byte is address
        {
           address = i2c_read();
        }
The second data byte is the information being received from the master and is stored in the address sent in the first data byte.
        if(state == 2)                   //second received byte is data
        {
           buffer[address] = i2c_read();
        }
     }
If the master is requesting data, the slave sends data from the requested address.
     if(state == 0x80)                //master is requesting data
     {
        i2c_write (buffer[address]);  //send requested data
     }
  }


