SPI communication between PICs
Original Assignment
Microcontrollers commonly talk to each other using protocols such as RS-232, SPI (for "serial peripheral interface"), I2C (or I^2C, "I squared C," for inter-integrated circuit), CAN bus, or other. This project is to demonstrate bidirectional SPI communication between two PICs. A demonstration might have the value of an analog input (potentiometer) at one PIC displayed as a "light bar" on the LEDs of the other PIC board, and simultaneously vice-versa.
Overview
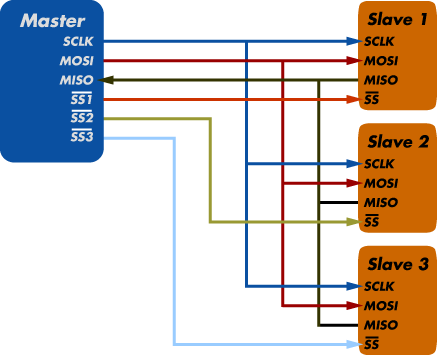
SPI or Serial Peripheral Interface is a communication method that was once used to connect devices such as printers, cameras, scanners, etc. to a desktop computer. This function has now been taken over by USB, however SPI can still be a useful communication tool for some applications. SPI runs as a master slave set-up and can run in full duplex mode, meaning that signals from the master to the slave and vis versa can be transferred at the same time. SPI involves four lines, and is therefore often termed the “four wire” serial bus. The four lines are:
SCLK — Serial Clock (output from master)
MOSI/SIMO — Master Output, Slave Input (output from master)
MISO/SOMI — Master Input, Slave Output (output from slave)
SS — Slave Select(active low; output from master)
The Master controls all communication. It starts the clock, decides when data is sent and received and selects the slaves to communicate with (SS line). Within each clock cycle a full duplex communication is carried out. Each bit is shuffled into the slave line and a bit is shuffled from the slave line back to the master line. The SS line selects the slave to transfer data with. Multiple slaves may be selected with an output low. If a slave is not selected they must disregard signals sent by the master. Although possible it is rare for a multi-master system.
The master first sends logic low to select the slave. There is no general protocol for the transmission. The slave can then either just receive or receive and reply to the Master. The Master can also either just send data or send and receive data.
Circuit
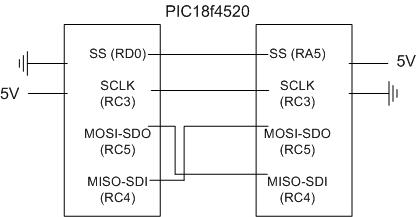
Above shows the Master connected to three slaves. Each slave must be enabled through the slave select pin in order to communicate with the Master. The two PICs can be wired directly by connecting these input and output pins of the diagram above.
Code
/*MASTER CODE*/
/* This code is valid only for devices that support hardware spi such as the PIC18F4520. For all other devices use
software spi. This code does not work on PIC18F4520 and will require more experimentation. This is the code that
looks most promising to start with from our review of codes on the internet for hardware SPI*/
/* For hardware spi, library functions such as spi_setup(), spi_read() and spi_write() can be used */
/* For software spi, spi_xfer() can be used alongwith the #use spi directive*/
/* We are not entirely sure if an output pin of the master should be connected to the SS pin (A5 for PIC18f4520)
of the slave and so we have commented out code that should be included if an output pin (PIN_D0 in this case) of
the master is connected to the SS pin of the slave/

#include <18f4520.h>
#fuses HS,XT,NOLVP,NOWDT,NOPROTECT
#use delay(clock=20000000)

void main(){

int value; 	//for 8 bit transfer which is default
int value_read; // to be read from spi

setup_spi(SPI_MASTER|SPI_H_TO_L|SPI_CLK_DIV_16); // sets the PIC as a master which generates the clock signal, a slower clock can be  generated by changing 16 to 64
 while (TRUE) {

      value = 4;     // value to be sent to spi

    //output_low(PIN_D0); //Turns on slave if slave select is used

      spi_write(value);

      value_read = spi_read();

      delay_us(100);

   // output_high(PIN_D0); //Turns off slave if slave select is used

   }

}

/*SLAVE CODE*/

/* This code is valid only for devices that support hardware spi such as the PIC18F4520. For all other devices use
software spi. This code does not work on PIC18F4520 and will require more experimentation. This is the code that
looks most promising to start with from our review of codes on the internet for hardware SPI*/

/* For hardware spi, library functions such as spi_setup(), spi_read() and spi_write() can be used */
/* For software spi, spi_xfer() can be used alongwith the #use spi directive*/
/* We are not entirely sure if an output pin of the master should be connected to the SS pin (A5 for PIC18f4520)
of the slave */
/* In most cases, simply grounding the SS pin of the slave should work */
/* slave code is really hard to find on the internet */


#include <18f4520.h>
#fuses HS,XT,NOLVP,NOWDT,NOPROTECT
#use delay(clock=20000000)

void main(){


int value_read; // to be read from spi

setup_spi(SPI_SLAVE|SPI_H_TO_L); // sets the PIC as a slave which recieves a clock signal and data is transferred during H to L

 while (TRUE) {


      value_read = spi_read(); // according to the reference manual this should work but also see the code below

     // if(spi_data_is_in())   // Checks to see if data is ready to be read
	//	value_read = spi_read(); //reads the data from spi

      delay_us(100);

      ouput_d(value_read);  //display the number that has been read
      spi_write(0);        // This is probably unnecessary

   }

}


/* WATCH OUT FOR UPDATES */

