Difference between revisions of "NU32v2: Digital Input and Output"
| Line 19: | Line 19: | ||
OK, this looks pretty complicated, so let's go through it systematically. First, there may be some symbols you are unfamiliar with in this figure. Consult the figure below: |
OK, this looks pretty complicated, so let's go through it systematically. First, there may be some symbols you are unfamiliar with in this figure. Consult the figure below: |
||
<table border=1 cellpadding=5> |
<table border=1 cellpadding=5 align=center> |
||
<tr> |
<tr> |
||
<td>'''Symbol'''</td> |
<td>'''Symbol'''</td> |
||
Revision as of 22:04, 22 January 2011
Digital inputs and outputs (DIO) are the simplest of interfaces between the PIC and other electronics, sensors, and actuators. The PIC32 has many DIO pins, each of which can take one of two states: high or low. More information can be found in Chapter 12 of the Data Sheet and Chapter 12 of the Reference Manual.
Overview
The PIC32 offers many digital I/O pins, arranged into "ports" A through G. The pins are labeled Rxy, where x is the port letter and y is the pin number. For example, pin 5 of port B is named RB5. Ports B and D are "full" 16-bit ports, with pins 0-15. Other ports have a smaller number of pins, not necessarily sequentially numbered; for example, port C has pins 1-4 and 12-15. All pins labeled Rxy can be used for input or output, except for RG2 and RG3, which are input only. For more details on the available pin numbers, see chapter 1 of the Data Sheet.
Each pin configured as an output can be configured to be a typical 0 or 3.3 V output (since our PIC is powered by 3.3 V), or to be "open drain." An open drain output can take one of two states: 0 V or "floating" (disconnected). An open drain output allows you to attach an external "pull-up" resistor from the output to any positive voltage, e.g., 5 V. Then when the output is left floating by the PIC, the external pull-up resistor will pull the voltage up to 5 V. A reasonable resistance for the pull-up is 1 K to 10 K ohms.
An input pin will read low if the input voltage is close to zero, and it will read high if it is close to 3.3 V. Many input pins will tolerate voltages up to 5 V; see the figure showing the PIC pins near the beginning of the data sheet. Some input pins, those that can also be used for "change notification" (labeled CNy), can be configured to have an internal pull-up resistor to 3.3 V. If configured this way, the input will read "high" if it is disconnected (left floating). Otherwise, if an input pin is not connected to anything, we can't be certain what the input will read.
Details
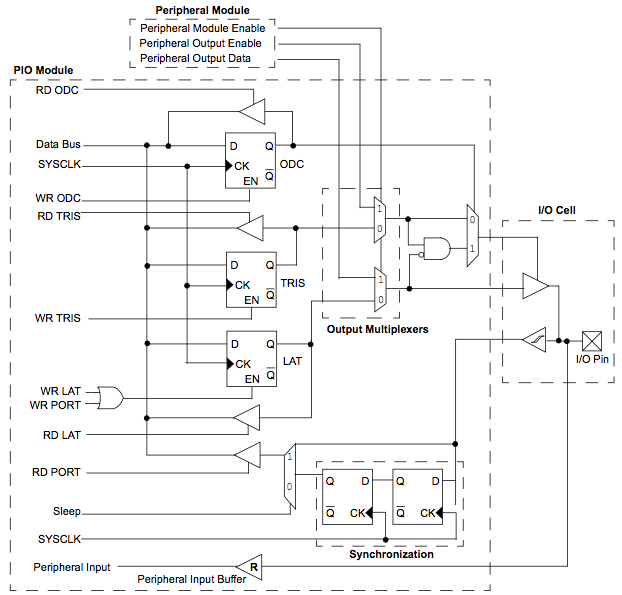
A block diagram of a typical input/output port is shown below, taken from the Reference Manual.
OK, this looks pretty complicated, so let's go through it systematically. First, there may be some symbols you are unfamiliar with in this figure. Consult the figure below:
| Symbol | Name | Description |
 |
||
starting at the I/O pin on the right. There are three things connected to it: a triangle pointed to the right, a triangle pointed to the left with a symbol inside of it, and a triangle pointed to the left with an "R" inside. We can ignore this last one; this could be for analog input, which is not the topic of this page.
Library Functions
Code Samples
This example uses two pins as digital outputs and one pin as digital input. When the switch is pressed, one LED will turn on and the other will turn off. When the switch is not pressed, the opposite LED will turn on and the other one will turn off.
/********************************************************************
Super simple Digital Output and Digital Input.
********************************************************************/

#include <plib.h>

// NOTE THAT BECAUSE WE USE THE BOOTLOADER, NO CONFIGURATION IS NECESSARY
// THE BOOTLOADER PROJECT ACTUALLY CONTROLS ALL OF OUR CONFIG BITS

// Define constants for PINS D1 - D2 and C1
#define PIN_D1			LATDbits.LATD1	// Digital Output
#define PIN_D2			LATDbits.LATD2	// Digital Output
#define PIN_C1			PORTCbits.RC1	// Digital Input

int main(void)
{

    // Configure the proper PB frequency and the number of wait states
	SYSTEMConfigPerformance(SYS_FREQ);

	// LATX sets the value (0 or 1) for each pin of port X
	// LATXbits.LATXY sets the value (0 or 1) for pin Y on port X
	// PORTX gets the value (0 or 1) for each pin of port X
	// PORTXbits.RXY gets the value (0 or 1) for pin Y on port X
	// TRISX declares the pin as either digital output (0) or digital input (1)
	// use &= for setting the inputs
	// use |= for setting outputs

	// Initialize Pins D1 and D2 output.
	// Initialize pins D1 and D2 as high
	// Need to set TRIS bits 1 and 2 to low for output
	LATD |= 0x0006; TRISD &= 0xFFF9; // initialize

	// Initialize Pin C1 as digital input
	// Need to set TRIS bit 1 to high for input
	// note that all pins are initialized as digital input
	// except for the analog and JTAG pins, but here's how you would do it
	TRISCbits.TRISC1 = 1;

	// Set all analog pins to be digital I/O
	// This line of code only needs to be used if your pins are Analog Input (B port)
    AD1PCFG = 0xFFFF;

    while(1)
    {
		// Toggle LEDS based on digital input
		if(PIN_C1)
		{
			PIN_D1 = 1;
			PIN_D2 = 0;
		}
		else
		{
			PIN_D1 = 0;
			PIN_D2 = 1;
		}
	}
}
