Difference between revisions of "NU32: Using the MAX9918 current sensor"
NickMarchuk (talk | contribs) |
NickMarchuk (talk | contribs) |
||
| Line 1: | Line 1: | ||
Using the MAX9918 current sensor. |
Using the MAX9918 current sensor. |
||
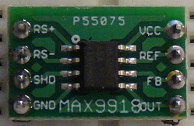
[[Image:NU32_MAX9918.jpg|thumb|200px|The MAX9918 current sensor breakout board|center]] |
|||
== Overview == |
== Overview == |
||
| Line 5: | Line 7: | ||
The MAX9918 is a bi-directional current-sense amplifier. |
The MAX9918 is a bi-directional current-sense amplifier. |
||
[[Image:MAX9918.png|thumb|200px|left]] |
|||
Image |
|||
By placing a small resistance in series with a load, a small voltage is generated across the "current sense" resistor that is proportional to the current through the load. The voltage is small so that most of the supply voltage is still across the load. The MAX9918 amplifies the small voltage, and the output can be read using the ADC in a microcontroller and interpreted as the current through the load. |
By placing a small resistance in series with a load, a small voltage is generated across the "current sense" resistor that is proportional to the current through the load. The voltage is small so that most of the supply voltage is still across the load. The MAX9918 amplifies the small voltage, and the output can be read using the ADC in a microcontroller and interpreted as the current through the load. |
||
Revision as of 10:14, 28 February 2012
Using the MAX9918 current sensor.
Overview
The MAX9918 is a bi-directional current-sense amplifier.
By placing a small resistance in series with a load, a small voltage is generated across the "current sense" resistor that is proportional to the current through the load. The voltage is small so that most of the supply voltage is still across the load. The MAX9918 amplifies the small voltage, and the output can be read using the ADC in a microcontroller and interpreted as the current through the load.
Details
The MAX9918 breakout board brings out all of the pins of the MAX9918 to the breadboard. The chip runs on 5V (on VCC, pin 8) and GND (pin 4). Put the SHD pin (pin 3) high (5V) to have the chip operate.
A 0.015 Ohm current-sense resistor has been soldered between RS+ (pin 1) and RS- (pin 2), rather than giving you a through-hole resistor for your breadboard (the contacts of the breadboard have more resistance than 0.015 Ohm!)
When zero current is going through the current-sense resistor, the output (pin 5) will be the voltage applied to REF (pin 7). Put 1.65V on REF using a voltage divider of 10k resistors between 3.3V and GND.
To set the voltage gain the MAX9918 will apply to the voltage read across the current sense resistor, place a resistance R1 between REF and FB (pin 6) and R2 between FB and output. The voltage gain will be (1 + R2 / R1).
Library Functions
This code How to get the count
The functions are:
- void NU32_Initialize(void) - enables UART1 and UART4 at 115200 baud. UART4 starts with the interrupt at priority level 3, UART1 starts with no interrupt enabled
- void NU32_EnableUART1Interrupt(void) - enables the UART1 interrupt
- void NU32_WriteUART1(const char *) - call with the character array you wish to send, make the array with sprintf()
- void NU32_ReadUART1(char *, int) - call with the array you want to read into, and the maximum size of the array. The code will wait at this function and buffer all characters received until you send a '\r' or '\n' (by pressing [enter] on your keyboard)
NU32Example.c in the .zip file above demonstrates how to use the functions.
Sample Code
To initialize the serial communication, call NU32_Initialize(), :
NU32_Initialize();
To write a string to the computer, use NU32_WriteUART1(charArray). The special characters '\r' and '\n' are carriage return and newline. Using them together puts the cursor on the next line.
NU32_WriteUART1("\r\nHello World!\r\n");
To write a string with the value of a variable in it, use sprintf(charArray,"%d") and NU32_WriteUART1(charArray).
More Information
NA

