Difference between revisions of "Controlling a seven segment display"
JamesYeung (talk | contribs) |
EricNickel (talk | contribs) |
||
| (4 intermediate revisions by 3 users not shown) | |||
| Line 1: | Line 1: | ||
== Original Assignment == |
|||
In this project you will use your PIC to display numbers on a seven-segment display. |
|||
== Overview == |
== Overview == |
||
| Line 22: | Line 18: | ||
== Circuit == |
== Circuit == |
||
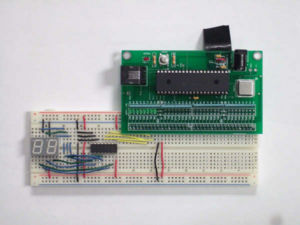
[[image:7SegmentCircuit1.jpg|thumb|300px| |
[[image:7SegmentCircuit1.jpg|thumb|300px|[7-Segment display circuit with PIC]|right]] |
||
There are three primary elements required for a circuit involving a 7-segment display. |
There are three primary elements required for a circuit involving a 7-segment display. |
||
| Line 40: | Line 36: | ||
===7-Segment Display=== |
===7-Segment Display=== |
||
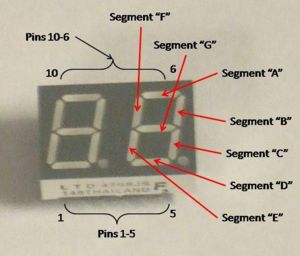
[[image:LTD4708JS_Pic1.jpg|thumb|300px| |
[[image:LTD4708JS_Pic1.jpg|thumb|300px|[LTD 4708JS 7-Segment display]|right]] |
||
The [http://media.digikey.com/pdf/Data%20Sheets/Lite-On%20PDFs/LTD-4708JS.pdf LTD-4708JS] 7-segment display has 10 pins. Seven pins correspond to the seven LED segments, one pin corresponds to the decimal point, and two pins select which digit is being activated. Both digits can be activated simultaneously, however they would not be able to display independent digits in such a manner. To achieve multi-digit display, the digits must alternate back and forth at a rate preferably greater than 45 Hz for a complete cycle of display (approximately the flicker fusion frequency for the human eye, allowing it to appear that all displayed digits are on continuously). |
The [http://media.digikey.com/pdf/Data%20Sheets/Lite-On%20PDFs/LTD-4708JS.pdf LTD-4708JS] 7-segment display has 10 pins. Seven pins correspond to the seven LED segments, one pin corresponds to the decimal point, and two pins select which digit is being activated. Both digits can be activated simultaneously, however they would not be able to display independent digits in such a manner. To achieve multi-digit display, the digits must alternate back and forth at a rate preferably greater than 45 Hz for a complete cycle of display (approximately the flicker fusion frequency for the human eye, allowing it to appear that all displayed digits are on continuously). |
||
| Line 74: | Line 70: | ||
===Decoder=== |
===Decoder=== |
||
The decoder used in this demonstration was the [http://www.standardics.nxp.com/products/hef/datasheet/hef4543b.pdf HEF 4543B]. It receives a 4-bit binary input as an input and outputs seven logic pins which correspond to the respective segments of a 7-segment display unit. Some display units require that the inputs be logic low to set a segment active. To achieve this, the chip has a phase input pin which will invert the outputs when the pin is set high. There is also a Blanking pin which will inhibit outputs, ensuring a blank display when set high. For more information regarding this pin, click on the chip name to access the data sheet or [http://www.standardics.nxp.com/products/hef/datasheet/hef4543b.pdf |
The decoder used in this demonstration was the [http://www.standardics.nxp.com/products/hef/datasheet/hef4543b.pdf HEF 4543B]. It receives a 4-bit binary input as an input and outputs seven logic pins which correspond to the respective segments of a 7-segment display unit. Some display units require that the inputs be logic low to set a segment active. To achieve this, the chip has a phase input pin which will invert the outputs when the pin is set high. There is also a Blanking pin which will inhibit outputs, ensuring a blank display when set high. For more information regarding this pin, click on the chip name to access the data sheet or [http://www.standardics.nxp.com/products/hef/datasheet/hef4543b.pdf click here]. |
||
===Circuit Wiring=== |
===Circuit Wiring=== |
||
[[image:CircuitDiag.jpg|thumb|300px| |
[[image:CircuitDiag.jpg|thumb|300px|[Circuit diagram for the 7-segment display circuit]|right]] |
||
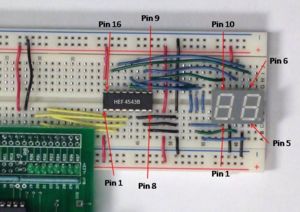
[[image:7SegmentCircuit4.jpg|thumb|300px| |
[[image:7SegmentCircuit4.jpg|thumb|300px|[Close-up picture of circuit wiring]|right]] |
||
For the simplest of cases (which is what this module will demonstrate), the decoder needs to receive the number to be displayed in 4-bit binary form. In addition, the 7-segment display will need the seven independent segment outputs from the decoder as well as one decimal point input and one digit select input for each digit being used (all others can be set to ground to ensure they are not active). In the simplest case (displaying one digit only) the PIC need not have an output to control which digit is active. For more complex displays which have multiple digits, up to three digits could reasonably be controlled by the PIC directly, or a decoder could be used for four or more digits so that the PIC need only output the binary number of the desired digit and the decoder would activate the appropriate digit on the display. |
For the simplest of cases (which is what this module will demonstrate), the decoder needs to receive the number to be displayed in 4-bit binary form. In addition, the 7-segment display will need the seven independent segment outputs from the decoder as well as one decimal point input and one digit select input for each digit being used (all others can be set to ground to ensure they are not active). In the simplest case (displaying one digit only) the PIC need not have an output to control which digit is active. For more complex displays which have multiple digits, up to three digits could reasonably be controlled by the PIC directly, or a decoder could be used for four or more digits so that the PIC need only output the binary number of the desired digit and the decoder would activate the appropriate digit on the display. |
||
Latest revision as of 11:46, 19 March 2008
Overview
In this example, we will be using PIC 18F4520 to control a double digit 7-segment display LTD-4708JS. A few notes about using this display is that it is only designed to display one digit at a time, so when trying to use both digits, you have to use a method to switch between the two digits fast enough to create the illusion that both are on simultaneously. We've made a simple loop that switches between the two digits every 5ms, but an ISR could also work.
Now, since there are 7 segments, one would assume that you would need 7 outputs from the PIC to display 1 digit. But it is very wasteful to use outputs from the PIC for just displaying, so we will be using a chip (HEF 4543B) that will take 4-bits and convert it to the 7-bit output for the 7-segment display.
If you want to display a decimal, this particular 7-segment display will allow you to do so. However, it will take up another output from your PIC.
Finally, if you are planning on displaying more than one digit, you will need an extra bit for every digit that you want to display.
This Example
The example that you will see here will simply display one digit on the 7-segment display. We will use the PIC to output a value between 0 and 9 using output pins D0-D3. The 4-bits will then be passed to the HEF 4543B chip which will convert it into 7-bits that will control the display. We did not use the decimal point in our example and we only used one of the digits, so we've hard wired the pins that control them to +5V or ground where appropriate.
Capabilities
To display a 2-digit number where a decimal point is needed, you will need a total of 7 outputs from the PIC. 4 for the value, 1 for the decimal point, 2 for each of the digits. However, since you will only be displaying 1 of the 2 digits at any given moment, you can use a logic inverter gate (74LS05) to reduce 1 output needed for selecting which digit to display. A logic inverter gate is a chip that will take an input and return a high if the input is low or low if the input is high. Finally, you will need to make a loop with a delay of 5ms to switch between the digits, or use an ISR if you will be doing other computations with the PIC.
Circuit
There are three primary elements required for a circuit involving a 7-segment display.
The elements are:
1) the 7-segment display
2) the controller (in this case the PIC)
3) the decoder
The 7-segment display used in this demonstration was the LTD-4708JS which can display 2 digits with trailing decimal points. The controller was the PIC 18F4520. The decoder used was the HEF 4543B which takes one 4-bit binary input and converts it to the appropriate 7 logic outputs to drive the 7-segment display.
7-Segment Display
The LTD-4708JS 7-segment display has 10 pins. Seven pins correspond to the seven LED segments, one pin corresponds to the decimal point, and two pins select which digit is being activated. Both digits can be activated simultaneously, however they would not be able to display independent digits in such a manner. To achieve multi-digit display, the digits must alternate back and forth at a rate preferably greater than 45 Hz for a complete cycle of display (approximately the flicker fusion frequency for the human eye, allowing it to appear that all displayed digits are on continuously).
The LTD-4708JS has 10 pins and they are designated as follows:
Pin 1: Segment "C"
Pin 2: Decimal Point
Pin 3: Segment "E"
Pin 4: Select pin for the second digit
Pin 5: Segment "D"
Pin 6: Segment "F"
Pin 7: Segment "G"
Pin 8: Segment "B"
Pin 9: Select pin for the first digit
Pin 10: Segment "A"
Controller
The controller used in this demonstration was the PIC 18F4520. The demonstration outputs were the digital output pins D0-D3 representing the output number in binary form. The PIC was not used to control which digit was used by the display (the display was hardwired instead to display only one digit). For a multiple-digit display a multiplexer could be used to decode a binary output from the PIC specifying the desired active display digit while the PIC outputs the appropriate digit on the data pins, although there is an upper limit to the number of digits which can be output while retaining a display frequency of greater than 45 Hz. This limit is dependent on the time between data outputs (likely to be calls of an ISR) used to display a digit. At 50 Hz each digit must be displayed every 20ms, so if the PIC outputs to a new digit every 4ms, then at most 5 digits may be displayed.
Decoder
The decoder used in this demonstration was the HEF 4543B. It receives a 4-bit binary input as an input and outputs seven logic pins which correspond to the respective segments of a 7-segment display unit. Some display units require that the inputs be logic low to set a segment active. To achieve this, the chip has a phase input pin which will invert the outputs when the pin is set high. There is also a Blanking pin which will inhibit outputs, ensuring a blank display when set high. For more information regarding this pin, click on the chip name to access the data sheet or click here.
Circuit Wiring
For the simplest of cases (which is what this module will demonstrate), the decoder needs to receive the number to be displayed in 4-bit binary form. In addition, the 7-segment display will need the seven independent segment outputs from the decoder as well as one decimal point input and one digit select input for each digit being used (all others can be set to ground to ensure they are not active). In the simplest case (displaying one digit only) the PIC need not have an output to control which digit is active. For more complex displays which have multiple digits, up to three digits could reasonably be controlled by the PIC directly, or a decoder could be used for four or more digits so that the PIC need only output the binary number of the desired digit and the decoder would activate the appropriate digit on the display.
The yellow wires in the circuit are the four digital output bits from the PIC. In order from LSB to MSB they connect to pins 5, 3, 2 and 4 of the HEF 4543B. If this wiring is not correct, cycling through the numbers from 0-9 will show numbers out of sequence and even missing numbers (binary numbers higher than nine have no output from the decoder).
The red and black wires track the +5V and ground from the PIC board respectively. Be careful to keep all of the circuit on the same reference node so that the +5V is not floating for one or more of the elements as this may prevent you from getting an appropriate output.
The blue and green wires represent the data lines from the decoder to the 7-segment display module. They are two colors to assist in visualization. The wires cross over and travel to both sides of the display module, so it may be easier to track which outputs go to which display module pins using the circuit diagram. On the circuit diagram, crossing lines only connect when a connector dot is present.
Code
The code below simply loops through 0-9 with a 1 second delay and outputs them to D0-D3.
/*
j.yeung, a.care, e.nickel 2008-01-31

This code will count from 0-9 continuously and output the binary value
on D0-D3 for a HEF 4543B chip to control a 7-segment display.
*/

#include <18f4520.h>
#fuses HS, NOLVP, NOWDT, NOPROTECT
#use delay(clock=20000000)       // 20 MHz crystal on PCB

void main() {

   int i=0;

   while (TRUE) {
      if (i>9) i=0;              // if i is 9, set it to 0
      output_d(i & 15);          // display nibble on pins RD0...RD3
      i++;
      delay_ms(1000);
   }
}
The code below loops through 00-99 with a 1 second delay and outputs them to D0-D3 and using simple delays for digit control on D4 and D5.
/*
j.yeung, a.care, e.nickel 2008-01-31

This code will count from 00-99 continuously and output the binary value
on D0-D3 for a HEF 4543B chip to control a 7-segment display. Output D4
controls the one's digit and D5 controls the ten's digit.
*/

#include <18f4520.h>
#fuses HS, NOLVP, NOWDT, NOPROTECT
#use delay(clock=20000000)       // 20 MHz crystal on PCB

void main() {

   int i=0, j=0, count=0;

   while (TRUE) {
      if (i>9){
         i=0;                    // if i is greater than 9, set it to 0
         j++;                    // since i counted to 10, increment j
      }
      if (j>9) j=0;              // if j is greater than 9, set it to 0
      for(count=0; count<100; count++){
         output_d(i & 15);       // display nibble on pins RD0...RD3
         output_d4(1);           // enable one's digit
         delay_ms(5);
         output_d(j & 15);       // display nibble on pins RD0...RD3
         output_d5(1);           // enable ten's digit
         delay_ms(5);
      }
      i++;
   }
}


