PIC32MX: SPI Communication between PIC32s
Overview
SPI or Serial Peripheral Interface is a communication method that was once used to connect devices such as printers, cameras, scanners, etc. to a desktop computer. This function has largely been taken over by USB, but SPI can still be a useful communication tool for some applications. SPI runs using a master/slave set-up and can run in full duplex mode, meaning that signals can be transmitted between the master and the slave simultaneously. There is no standard communication protocol for SPI.
SPI is still used to control some peripheral devices and has some advantages over I2C (another type of serial data communication). SPI can communicate at much higher data rates than I2C. Furthermore, when multiple slaves are present, SPI requires no addressing to differentiate between these slaves. Compared to parallel buses, SPI has the additional benefit of requiring only simple wiring. However, one disadvantage when compared to I2C is that each slave must have a dedicated slave line. A slave line is not necessary when only one slave is present.
Peripheral devices that still use SPI:
• Converters (ADC and DAC)
• Memories (EEPROM and FLASH)
• Real Time Clocks (RTC)
• Sensors (temperature, pressure, etc.)
• Others (signal mixer, potentiometer, LCD controller, UART, CAN controller, USB controller, amplifier)
Basic Operation
SPI requires three lines, and the optional slave select, and is therefore often termed the “four wire” serial bus. These four lines are described in the table below.
| Line | Name | Description |
|---|---|---|
| SCK1 | Serial Clock | Output from master |
| SDO1 | Master Output, Slave Input | Output from master |
| SDI1 | Master Input, Slave Output | Output from slave |
| SS1 | Slave Select | Output from master (active low) |
The master, as its name suggests, controls all communication. By controlling the clock, the master decides when data is sent and received. Within each clock cycle a full duplex communication is carried out; each side sends and receives one bit of information. Because there is no standard communication protocol, the master can either send data or both send and receive data, depending on the needs of the application. Likewise, the slave can either receive data or both receive and send data back to the master.
The "Slave Select" line is not required, if only one slave is used. However, using the SS line, the master can choose which slave with which to communicate. Note that more than one slave may be selected, simply by applying a logic low to the desired SS lines.
References
SPI Background(www.totalphase.com)
SPI Wikipedia Article (www.wikipedia.org)
More Information (www.mct.net)
Circuit
Code
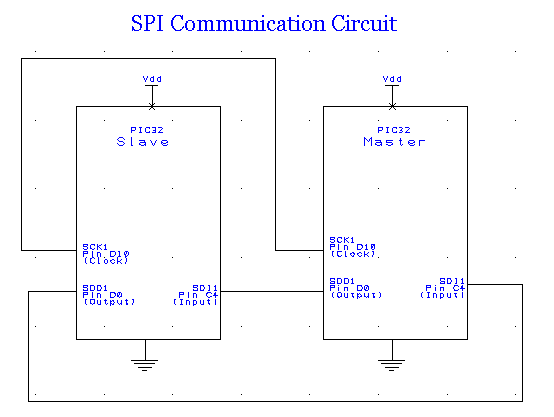
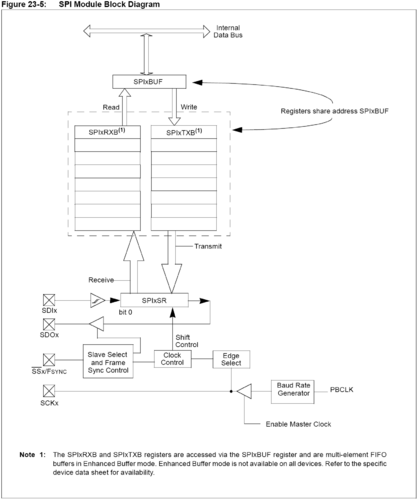
This code, coupled with the circuit diagram above, sends one of two bytes of data from the master to the slave, and back. The data bytes are 0xAA and 0x23 which are sent on different button presses (PRG and USER). Slave-LED0 toggles when 0xAA is received from the master, and slave-LED1 toggles when anything else (for example, 0x23) is received from the master. No slave select line is used since there is only one slave, but if there were multiple slaves it would have to be used. The SPI module sends and receives at the same time, so whenever a byte is written to SPI1BUF the module immediately sends out that byte on SDO which clocking with SCK and a byte is clocked in at the same time and written back to SPI1BUF. The send and receive buffers, SPI1TXB and SPI1RXB, cannot be written to directly, but instead are memory mapped to SPI1BUF. If the slave is not sending a value back when the master sends a byte, a 0x00 will be written into SPI1BUF. Because of this, in the code below the master reads from SPI1BUF after sending to clear the buffer and prevent overflow. To actually receive a byte, the master must send a byte as well. In the code below, by writing a zero to SPI1BUF, the master clocks out zero and in the slave message at the same time, at which point the slave message can be used. Since SPI is slower than the system clock, reading from SPI1BUF immediately would not result in the correct byte, instead the pic must wait for the module to finish sending, which the function getcSPI1() does automatically. Similarly, the slave sends a byte back by writing a value into SPI1BUF, but since the module is in slave mode the clock is not generated immediately. Instead the value waits in SPI1TXB until the clock is generated by the master. At this point the slave clocks out that value and in another value.
Master Code
/****************************************************
 * SPI_master_btwnPIC32s.c: Master code for Master- *
 *    Slave SPI communication. Both PICs are set to *
 *   use the SPI1 module and no SS line. A SS line  *
 *   would be used if there were more than two PICs.*
 *                                                  *
 * Hardware: 2 PIC32MX460F512L PICs on NU32 boards  *
 ****************************************************
 * Thomas Peterson, James Rein, Eric West           *
 * ME333 Winter 2010                                *
 * File Created:    05-FEB-2010                     *
 * Last Modified:    10-FEB-2010                    *
 ****************************************************/

#include "HardwareProfile.h"
#include <plib.h>

//No-operation; asm stands for assembly
#define Nop() asm( "nop" )

#pragma config FPBDIV = DIV_1            //Sets PBCLK to SYSCLK

//function definitions
void SendData(int);         //Sends data
void Delayms( unsigned t);   //Delay fcn


/* Main Function */
int main(void)
{
   // Configure the proper PB frequency and the number of wait states
   SYSTEMConfigPerformance(SYS_FREQ);

   // Set all analog pins to be digital I/O
   AD1PCFG = 0xFFFF;
   //Initialize all of the LED pins
   mInitAllLEDs();
   mInitAllSwitches()

   //SPI setup
   int rData = SPI1BUF;    //Clears receive buffer
   IFS0CLR = 0x03800000;   //Clears any existing event (rx / tx/ fault interrupt)
   SPI1STATCLR = 0x40;      //Clears overflow
   //Enables the SPI channel (channel, master mode enable | use 8 bit mode | turn on, clock divider)
   SpiChnOpen(1, SPI_CON_MSTEN | SPI_CON_MODE8 | SPI_CON_ON, 1024);   // divide fpb by 1024, configure the I/O ports.

   /* Main while loop: Waits for button press to send/ receive data */
   while(1)
   {
      if (swProgram)   //If button 1 depressed
      {
         while(swProgram) { Nop(); }      //Wait for release
         mLED_2_Toggle();               //Toggle LED
         putcSPI1(0xAA);                 //Sends hex data 0xAA to slave
         Delayms(50);                  //delay
         SpiChnClrIntFlags(1);            //Clear interrupt flags (Tx / Rx buffers empty)
         int receive = SPI1BUF;            //Read SP1BUF (dummy read)
         SPI1BUF = 0x0;                  //Write SP1BUF- sets Tx flag, if not done read will not clock
         receive = getcSPI1();            //Generates clock and reads SDO
         Delayms(100);
      }//if loop ending


      if (swUser)
       {
         while(swUser) { Nop(); }
         mLED_1_Toggle();//Toggle LED
         putcSPI1(0x23);               //Sends hex data 0x23 to slave
         Delayms(50);               //delay
         SpiChnClrIntFlags(1);         //Clear interrupt flags (Tx / Rx buffers empty)
         int receive = SPI1BUF;         //Read SP1BUF (dummy read)
         SPI1BUF = 0x0;               //Write SP1BUF- sets Tx flag, if not done read will not clock
         receive = getcSPI1();         //Generates clock and reads SDO
         Delayms(100);
      }//if loop ending
   }//while loop ending

   return 0;
} //ending main


void Delayms( unsigned t)
// This uses Timer 1, can be changed to another timer. Assumes FPB = SYS_FREQ
{
    OpenTimer1(T1_ON | T1_PS_1_256, 0xFFFF);
    while (t--)
    {  // t x 1ms loop
        WriteTimer1(0);
        while (ReadTimer1() < SYS_FREQ/256/1000);
   }
   CloseTimer1();
} // Delayms
Slave Code
/****************************************************
 * SPI_slave_btwnPIC32s.c: Slave code for Master-   *
 *    Slave SPI communication. Both PICs are set to *
 *   use the SPI1 module and no SS line. A SS line  *
 *   would be used if there were more than two PICs.*
 *                                                  *
 * Hardware: 2 PIC32MX460F512L PICs on NU32 boards  *
 ****************************************************
 * Thomas Peterson, James Rein, Eric West           *
 * ME333 Winter 2010                                *
 * File Created:    05-FEB-2010                     *
 * Last Modified:    10-FEB-2010                    *
 ****************************************************/

#include "HardwareProfile.h"
#include <plib.h>


#define Nop() asm( "nop" )   //No-operation; asm stands for assembly, using an assembly command in C.  Cool!


//Function definition for Delay function
void Delayms( unsigned t);


/* Main function */
int main(void)
   // Configure the proper PB frequency and the number of wait states.
   SYSTEMConfigPerformance(SYS_FREQ);

   // Set all analog pins to be digital I/O
   AD1PCFG = 0xFFFF;

   /* Set TRIS bits for SPI lines (this may not be necessary */
   TRISDbits.TRISD10=1;
   TRISDbits.TRISD0=0;
   TRISCbits.TRISC4=1;

   //Initialize all of the LED pins
   mInitAllLEDs();
   mLED_3_Off();

   //SPI setup
   SPI1CON = 0;         //Clears config register
   int rData = SPI1BUF;   //Clears receive buffer
   IFS0CLR = 0x03800000;   //Clears any existing event (rx / tx/ fault interrupt)
   SPI1STATCLR = 0x40;      //Clears overflow
   //Enables the SPI channel (channel, master mode enable | use 8 bit mode | turn on, clock divider)
   SpiChnOpen(1, SPI_CON_SLVEN | SPI_CON_MODE8 | SPI_CON_ON, 1024);   // divide fpb by 1024, configure the I/O ports.

   //While loop to test LED functionality
   while(1)
   {
      rData = SpiChnGetC(1);               //Wait and read character when aviliable
      if (rData == 0xAA){mLED_0_Toggle();}   //Toggle LED0 if 0xAA
      else {mLED_1_Toggle();}               //Toggle LED1 if not
      putcSPI1(rData);                  //Send character back (when clock arrives)
      rData = SPI1BUF;                  //Clear recieve buffer (brevents overflow)
      Delayms(5);
   }//while loop ending

   return 0;
} //ending main


void Delayms( unsigned t)
// This uses Timer 1, can be changed to another timer. Assumes FPB = SYS_FREQ
{
    OpenTimer1(T1_ON | T1_PS_1_256, 0xFFFF);
    while (t--)
    {  // t x 1ms loop
        WriteTimer1(0);
        while (ReadTimer1() < SYS_FREQ/256/1000);
   }
   CloseTimer1();
} // Delayms

