HelloWorld PIC32
These directions detail how to turn on different LEDs on the NU32 board based on the USER switch. No additional circuitry is needed.
Create a New Project
- For NU32 board: Download these HardwareProfile header files and the procdefs.ld file.
- For UBW32 board: Download these Hardware Profile header files and the procdefs.ld file.
- Extract these files into your PIC32 Project code folder
HardwareProfile.h is a header file tells MPLAB which specific hardware profile to use, based on the board that you are using.
HardwareProfile_NU32.h is a header file that creates functions to initialize and turn on and off LEDs on the NU32 board as well as initialize the USER and PROGRAM switches.
When creating new projects to download to the PIC, you must include a linker file. If you have installed a bootloader, the linker file tells the bootloader to put the program after the bootloader memory to prevent erasing of the bootloader. The required linker file is called procdefs.ld. The standard linker file for PIC32 is located in the zip file above. The procdefs.ld for UBW32 is different than the standard procdefs.ld for PIC32 when using the bootloader originally installed on UBW32. Make sure to use the procdefs.ld file here for UBW32. Also, the procdefs.ld file downloaded above is different than the one used to install the bootloader, since we want the programmer to put the new code in a different spot than the bootloader code.
This website warns that if the procdefs linker file is not in the project the bootloader may be damaged or erased.
- Create a new folder called HelloWorld and copy the downloaded files in this folder (ie each project will need to have these files copied into the folder)
- Open MPLAB
- Choose Project -> Project Wizard to create a new project.
- Click Next
- Select the device you are using (PIC32MX460F512L) and click Next.
- Choose the Microchip PIC32 C-Compiler Toolsuite from the drop down menu and click Next.
- Create a new project called HelloWorld in the folder called HelloWorld that you created above and click Next.
- Add HardwareProfile.h, HardwareProfile_NU32.h, and procdefs.ld to the project and click Next.
- Click finish.
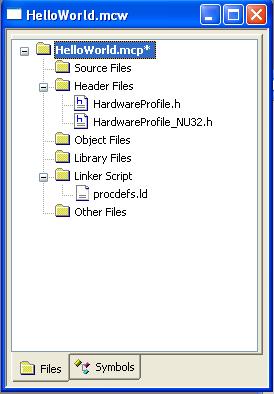
You have now created a new project. The project window should appear as below.
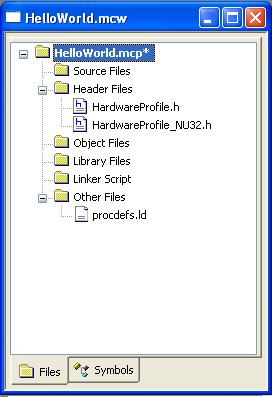
The procdefs.ld is not the only linker file.
- In the project window, drag procdefs.ld from the 'Linker Script' folder to the 'Other Files' folder.
- Choose File->New
- Choose File->Save As and call the new file main.c in the HelloWorld folder. This will create a source file for your main code.
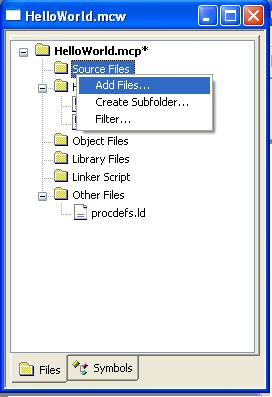
- Right click on the 'Source Files' folder and choose 'Add files'. Choose the main.c file to add it to the project.
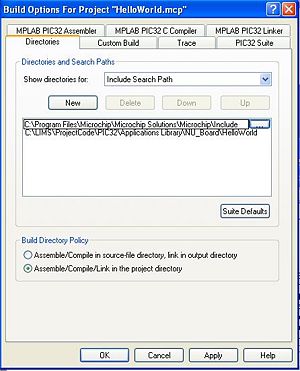
You should have downloaded the Microchip Applications Library. This library contains common header files. We need to tell MPLAB where to look for these files. We also need to tell MPLAB where the project folder is.
- Choose Project->Build Options -> Project
- In the Directories tab, from the drop down menu choose Include Search Path.
- Click New and navigate to ...\Microchip Solutions\Microchip\Include (where ... is the installation folder). Click OK.
- Click New and navigate to your HelloWorld folder. Click OK.
Don't click on OK in the Build Options folder yet.
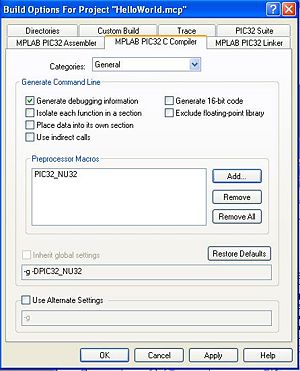
Since we are using the general HardwareProfile header file, we need to tell MPLAB which board we are using. You can open HardwareProfile.h to see which boards are included in this header file. If you create your own board, you will need to add it to HardwareProfile.h. If you want, you can name your header file HardwareProfile.h and not mess with the general header file.
- In the MPLAB PIC32 C Compiler tab, click Add, type PIC32_NU32 and click OK
This creates a constant called PIC32_NU32 which is used to tell MPLAB that we are using the NU32 board. You can see why in the HardwareProfile header file.
You are now ready to code your first program.
HelloWorld Code
This program will turn on the second and fourth LEDs on the NU32 board. When the USER switch is pressed, these LEDs will turn off and the first and third LEDs will turn on.
You are now ready to edit your new main.c file. You can write your programs in any text editor you are comfortable with and cut and paste to MPLAB, or you can write your code directly in the MPLAB editor. For now, you can simply cut and paste the code below into your main.c file.
/* HelloWorld
* main.c
* For the NU32 PIC32 board.
*/

#include "HardwareProfile.h"    // info on how the PIC is used, based on the constant you defined above

int main(void)
{
  SYSTEMConfigPerformance(SYS_FREQ);  // tell PIC its operating frequency
  mInitAllLEDs();                    // initialize LED pins, defined in HardwareProfile_NU32.h

  while(1) {                         // loop forever
    if(swUser) {                     // swUser is high (true) until pressed
      mLED_0_Off();
      mLED_1_On();
      mLED_2_Off();
      mLED_3_On();
    }
    else {                           // swUser is low (false) if pressed
      mLED_0_On();
      mLED_1_Off();
      mLED_2_On();
      mLED_3_Off();
    }
  }                                  // end of while loop
}                                    // end of main.c
To load this program to the PIC with the bootloader, we need a hex file. MPLAB creates a hex file in the project folder when you compile the program.
- Choose Project -> Build all
The output window should say 'Build Succeeded'. If it doesn't, fix the errors.
Load Program with Bootloader
With the hex file created above, follow these directions to load the program to the PIC32 with the HID Bootloader.
