Creating a Simple xPC Program
From Mech
Jump to navigationJump to searchOnce you have created a Simulink model, certain settings need to be changed to in order to run the model in xPC. This section describes the absolute minimum number of steps required to configure a model for building in xPC Real-Time Workshop. For a more thorough setup, refer to Advanced xPC Model Setup.
NOTE: xPC is a real-time OS and therefore the models contain discrete states. Make sure and swap out "continuous" blocks with "discrete" blocks or use appropriate holds. Also, make sure to check all of your blocks to specify the timestep as "dt"
- Open Simulink
>> simulink
- Create a new file
- Create the simple model shown below using the Simulink\Sources\Sin Wave and xPC Target\Misc\Scope (xPC) blocks.
- Setup the Simulation and Build Parameters
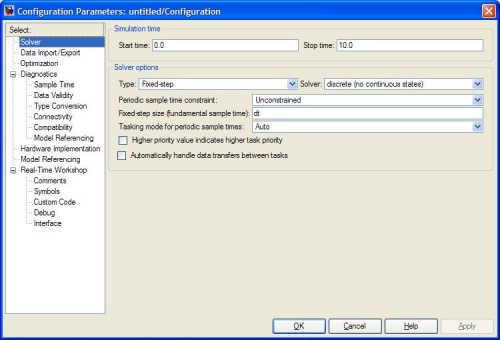
- Click on Simulation->Configuration Parameters
- Under "Solver"
- Set Type to "Fixed Step"
- Set solver to "discrete (no continuous state)"
- For "Fixed-step size", enter "dt"
- Under "Real-time Workshop"
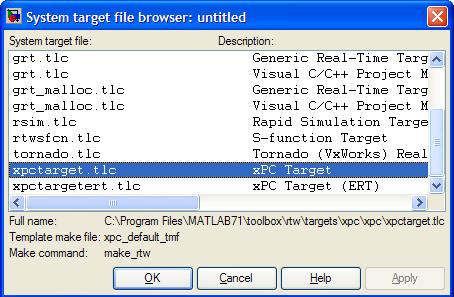
- Next to system target file, click Browse and select "xpctarget.tlc" from the list.
- Click OK to exit the Configuration
- Build and Run the model on the Target PC
- Make sure the Target PC is booted into xPC and the IP address is defined properly in xpcexplr (see Configuring xPC Target PC).
- Define the timestep by typing in the main Matlab window:
>> dt=1/1000;
- Build the model and download to the Target PC by selecting Tools -> Real-time Workshop -> Build Model. (or press Ctrl+B)
- Wait for the build process to complete (may take up to 30 seconds). When complete, the Target PC display should change.
- Switch the Simulink model to "External" using the drop-down list.
- Connect to the Target PC by clicking on the little icon next to the simulation time.
- Press the play button to execute the model on the Target PC.


