Serial communication with Matlab
Original Assignment
Matlab has a "serial" function that allows it to communicate through a serial port. This project is to establish serial port connection with the PIC and demonstrate bidirectional communication between the PIC and a Matlab program, using, for example, a USB to RS232 adapter and level shifter chip. The Matlab program could simply log data from the PIC (e.g., the angle of a potentiometer knob), or plot it on a user interface in real time. Keystrokes from the user of the Matlab program should be obviously received by the PIC, perhaps by lighting the LEDs on the PIC board.
Overview
Matlab has a "serial" function that allows it to communicate through a serial port. This project is to establish serial port connection with the PIC and demonstrate bidirectional communication between the PIC and a Matlab program. To demonstrate this, the PIC will send potentiometer readings to Matlab as well as receive keystrokes from the Matlab user to light up LEDs on its circuit board.
A USB to RS232 adapter and level shifter chip were used to hook up the computer to the PIC. A level shifter is necessary because the power/ground voltages are different for the desktop computer and the PIC. An RS232 plug looks like this: http://www.aggsoft.com/rs232-pinout-cable/serial-cable-connections.htm
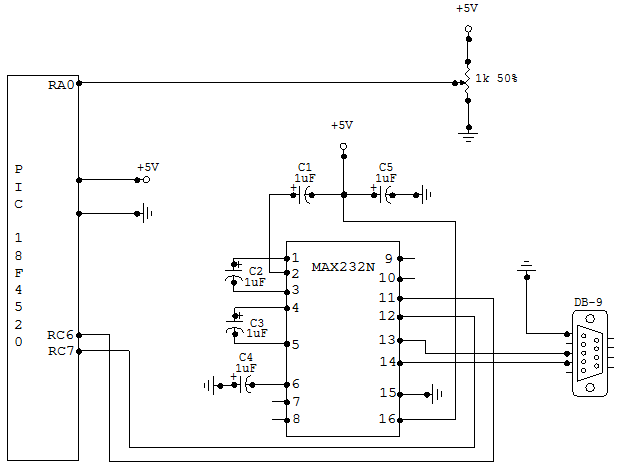
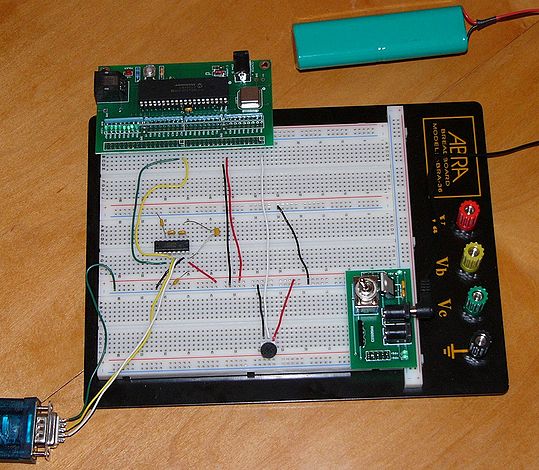
The RS232 was wired to our level shifter to convert the voltages, and then the level shifter was wired to our PIC. Refer to the Circuit section for details.
First, the PIC was stamped with our C code (Refer to PIC Code below). It was programmed to read the potentiometer readings from its ADC (Analog to Digital Convertor) port and transmit the digitized readings through the RS232 cables to Matlab. If the Matlab user typed a character, the PIC was also programmed to display the character on its LED array. (8 on/off LEDs represent the 1 byte binary equivalent of any character). In real-time, Matlab would display the potentiometer reading from the PIC and the PIC LEDs would display the keystroke from the user.
Circuit
The wiring diagram for serial communication is shown below. There are three basic components in this setup. The potentiometer serves as an analog input to the PIC, which is converted to a digital signal through the PIC's analog to digital converter pin. The MAX232N level converter provides bidirectional voltage shifting for digital communication between the PIC and PC (read more about this chip and level conversion on the RS232 wiki here). Finally, the female DB-9 connector allows the circuit to connect to the PC's serial port.
The data sheet for the MAX232 can be found here: http://rocky.digikey.com/WebLib/Texas%20Instruments/Web%20data/MAX232,232I.pdf
PIC Code
/*
   SerialComm.c Scott McLeod, Sandeep Prabhu, Brett Pihl 2/4/2008
   This program is designed to communicate to a computer using RS232 (Serial) Communication.

   The main loop of this program waits for a data transmission over the Serial port, and
   responds with a current reading of an analog input (potentiometer) and the last received data.

   Note the analog input is only for testing purposes, and is not necessary for serial communication.
   Lines unnecessary for RS232 communication are commented with enclosing asterisks ('*..*').
 */

#include <18f4520.h>

#fuses HS,NOLVP,NOWDT,NOPROTECT
#DEVICE ADC=8                          // *set ADC to 8 bit accuracy*
#use delay(clock=20000000)             // 20 MHz clock
#use rs232(baud=19200, UART1)          // Set up PIC UART on RC6 (tx) and RC7 (rx)

int8 data_tx, data_rx = 0;             // Set up data_tx (transmit value), data_rx (recieve value)

void main()
{
   setup_adc_ports(AN0);               // *Enable AN0 as analog potentiometer input*
   setup_adc(ADC_CLOCK_INTERNAL);      // *the range selected has to start with AN0*
   set_adc_channel(0);                 // *Enable AN0 as analog input*
   delay_us(10);                       // *Pause 10us to set up ADC*

   while (TRUE)
   {
      data_tx = read_adc();            // *Read POT on analog port (0-255)*
      output_d(data_rx);               // Output last recieved value from computer
      delay_ms(10);

      if (kbhit())                     // If PIC senses data pushed to serial buffer
      {
         data_rx = fgetc();            // Read in recieved value from buffer
         printf("Pot: %u Char: %u\n", data_tx, data_rx);  // Once data sent and read, PIC sends data back
         delay_ms(100);
      }
   }
}
Matlab Code
%  SerialComm.m  Scott McLeod, Sandeep Prabhu, Brett Pihl 2/4/2008
%  This program is designed to communicate to a PIC 18F4520 via RS232 (Serial) Communication.
%
%  The main loop of this program waits for a character input from the user,
%  upon which it transmits the ascii value and waits for data to be written.

s = serial('COM14','BAUD',19200);           % Create serial object (PORT Dependent)
fopen(s)                                    % Open the serial port for r/w

myChar = 'a';
prompt = 'Enter a character (q to exit): ';

while (myChar ~= 'q')                       % While user hasn't typed 'q'
    myChar = input(prompt, 's');            % Get user input
    fprintf(s, '%s', myChar(1))             % Write first char of user input to serial port
    fprintf(fscanf(s))                      % Read Data back from PIC
end

fclose(s);                                  % Close the serial port
delete(s);                                  % Delete the serial object
If your program doesn't close and delete the serial port object correctly, you can use the command shown below to delete all of the serial port objects.
delete(instrfind)

