NU32: 16x2 LCD
THIS PAGE REFERS TO A PRE-RELEASE VERSION OF THE NU32 PIC32 DEVELOPMENT BOARD. FOR INFORMATION, SAMPLE CODE, AND VIDEOS RELATED TO THE PRODUCTION VERSION (2016 AND LATER), AND TO THE CORRESPONDING BOOK "EMBEDDED COMPUTING AND MECHATRONICS WITH THE PIC32 MICROCONTROLLER," VISIT THE NU32 PAGE.
Parallel LCD
The popular HD44780 (and compatible chipsets) can be interfaced to the NU32 PIC32 board using 10 pins for easy character output to an LCD. This can be highly useful in either debugging or generating a more complex user interface for a PIC (or other microcontroller)-based device.
This implementation of an HD44780 LCD uses 10 I/O on the PIC as output, and the code uses fixed delays after sending commands to allow the LCD time to complete the issued command. The RW pin is fixed to ground, but could instead be used to monitor if the LCD is ready for a new command, but this optimization is not implemented in this code.
Here is the datasheet.
LCD Hookup
The LCD uses the following connections with the NU32:
| LCD Pin | PIC Pin |
| 1 - VSS | GND |
| 2 - VDD | +5V |
| 3 - V0 | ~1k resistor to GND (see note) |
| 4 - RS | G12 |
| 5 - RW | GND |
| 6 - E | G15 |
| 7 - D0 | E0 |
| 8 - D1 | E1 |
| 9 - D2 | E2 |
| 10 - D3 | E3 |
| 11 - D4 | E4 |
| 12 - D5 | E5 |
| 13 - D6 | E6 |
| 14 - D7 | E7 |
| 15 - A | 100 ohm resistor to 3.3V |
| 16 - K | GND |
Note: The V0 pin on the LCD sets the contrast of the characters on the LCD. Create a voltage around 1V using a 10k pot between GND and 5V to get a nice contrast, or hook the V0 pin to GND through a 1kOhm resistor, which also seems to work well.
If you power the LCD but do not send it any commands, the top row should fill with boxes. Use this to set your contrast and check that your LCD is powered.
The NU32 board is based on 3.3V logical outputs, which works fine for most LCDs, but this LCD must be supplied with 5V on VDD.
LCD Commands
In the main.c file, before the main while loop, you must initialize the LCD
setupLCD();
The basic command used to write to the LCD is
LCDWriteString("Hello World", 1, 2);
where 1 is the first row (options are 1 or 2), and 2 is the location to start in (options 1-16). There are only 16 characters per row, so don't try to print a string with more than 16 characters!
You can clear everything on the LCD by using
LCDClear(0);
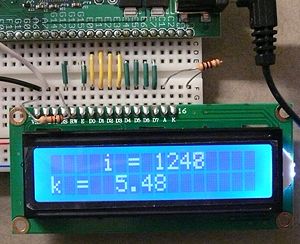
Write the contents of a variable using
sprintf(LCD_Out_Buffer,"k = %5.2f", k);
LCDWriteString(LCD_Out_Buffer, 2, 1);
LCD_Out_Buffer is a 16 element char array declared in LCD.h Use sprintf just like in serial communication, but pay attention to the modifies to your variable. In this case, k is a float, and we don't want to print every character in the decimal number. %5.2f means use at least 5 characters (including the .) to represent the number, but only two decimals, so we should see 12.34, not 12.345, but we could see 123.45, and _1.23, where _ is really a blank space.
Files and Example Code
Include the following h and c files to your project: h and c files
