Creating an xPC Flash Boot Disk
This is the procedure you will have to follow to create a compact flash bootdisk for xPC. If you are using a brand new CF disk, start with the first section. If you need to change your IP or if you just upgraded to a new version of MATLAB, you may be able to skip this first section. For creating a stand alone boot disk see last section.
A DOS PC in the lab office is set up to do this. See this document for more information.
Format the Compact Flash Disk
We wish to use the Compact Flash disk as a book disk into xPC (or any other OS), but CF disks aren't set up for this usually. Here we will format the disk to the proper file format and enable the MBR (Master Boot Record) allowing us to boot off it.
NOTE: The CF adapter is connected directly to the Secondary IDE bus on the Advantech board. It will be drive C: if no other hard drive is present.
- What You Need
- Advantech CPU Board w/ Keyboard, Monitor and Floppy
- Windows PC w/ Floppy drive
- Compact Flash Disk
- Blank Floppy Disk (you will be erasing the contents)
- Create a Bootable Floppy in Windows
- Insert a floppy disk into the Windows PC
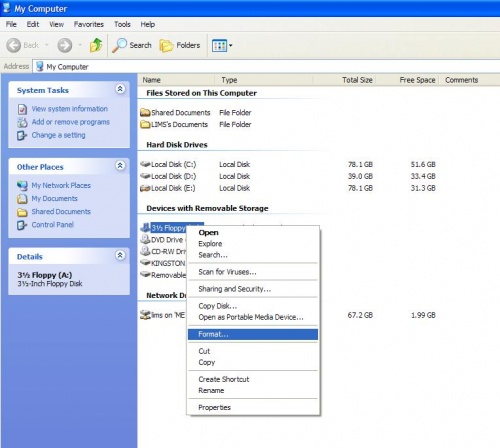
- Format the floppy by right clicking on the disk drive in My Computer and selecting Format. Do not check "quick erase".
- Run the file boot600.zip
- Click OK when prompted
- Once finish, the floppy is formated
- Format the Compact Flash Disk on the Advantech PC
- Insert the CF card and DOS bootdisk into the Advantech PC
- Turn on the Advantech PC
- Let the target PC boot into DOS off the floppy
- Enter the FDISK utility
A:> fdisk
- Use the menu to delete every partition on the CF drive
- After all partitions are deleted, create a single new Primary DOS partition
- The Advantech PC will have to be restarted. Allow it to boot off the floppy again.
- Reset the Master Boot Record (MBR) by typing
A:> fdisk /mbr
- Now format the CF as a DOS boot disk
A:> format c: /s
- Remove the floppy disk and reboot to make sure the drive boots correctly
- Turn off the Advantech PC
- Now all you will need to connect from now on is the monitor, ethernet and power:
xPC Boot Disk
In this section, you will create a boot disk to load the xPC operating system on the Target PC. You must first configure your target PC in xpcexplr (See: Configuring xPC Target PC). If you wish to boot from a floppy disk, you can stop after Step 4. Students should not need to do this - just use your assigned CF disks
- Open Matlab on the Host PC and run xpcexplr
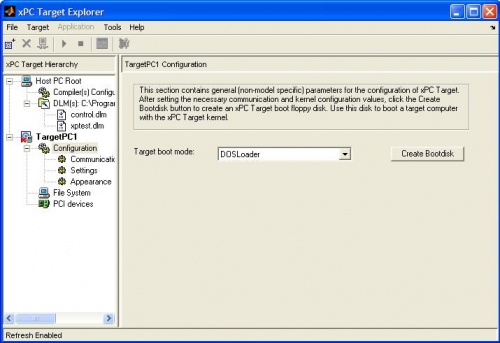
- Under TargetPC1, click on "Configuration" and select "DOSLoader" from the drop-box
- Insert the disk into the Host PC floppy drive.
- Click "Create Bootdisk"
- Insert the CF card into the CF card reader
- DO NOT delete all existing files from the CF card!!
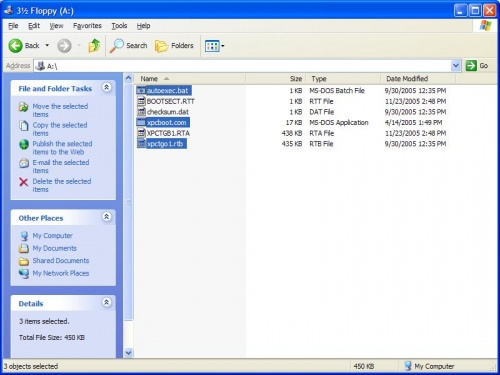
- Open the floppy drive in My Computer and copy the files below to the CF drive:
- xpcboot.com
- xpctgo1.rtb (or xpctgo4.rtb if you set matlab's xpcexplr to use a 4MB model allocation)
- autoexec.bat
- Remove both the floppy and CF card from the Host PC.
xPC Boot Disk--Stand Alone
In this section, you will create a boot disk to load the xPC operating system on the Target PC for stand alone mode. Only do this when you have tested your simulink model and confirmed that it works. To convert back from Stand Alone mode only perform steps 1 through 11 and delete the MyModelNameHere.rtb that was created in step 14.
- Open Matlab on the Host PC and run xpcexplr
- Under Settings, select a size of 4MB
- Under Communication, confirm the IP address is correct for you PC-104 stack.
- Under TargetPC1, click on "Configuration" and select "DOSLoader" from the drop-box
- Insert the disk into the Host PC floppy drive.
- Click "Create Bootdisk"
- Insert the CF card into the CF card reader
- DO NOT delete all existing files from the CF card!!
- Open the floppy drive in My Computer and copy the files below to the CF drive:
- xpcboot.com
- xpctgo4.rtb (note image shows xpctgo1.rtb, delete xpctgo1.rtb on your CF card if it exists)
- autoexec.bat
- Remove both the floppy and CF card from the Host PC.
- Insert CF card into you PC-104 stack. Turn on your PC-104.
- Under configuration in the xpcexplr window on your host PC switch from DOSloader to Stand Alone.
- Open and build your simulink model
- The last lines on the Matlab command window should read: "created MyModelNameHere.rtb in MyModelNameHere xpc emb directory". Matlab has created 3 files a MyModelNameHere.rtb file, xpcboot.com file and a autoexec.bat file in the current Matlab directory in a folder called MyModelNameHere xpc emb.
- Turn off your PC-104 stack and take out the CF card. Insert the card into the reader.
- Copy the three files MyModelNameHere.rtb , xpcboot.com and autoexec.bat onto your CF card.
- Safely remove the CF card and insert it back into the PC 104 stack.
- Your model should run when you turn on the PC 104.


