Swarm Robot Project Documentation
e-pucks
The e-puck is a cylindrical robot from EPFL with a diameter of 70 mm and a height of 53 mm, with a stepper motor driven wheel mounted on each side of the body. The e-puck’s size was ideal for the project, and its stepper motor driven wheels offered consistency and accuracy—highly desirable features for motion planning and dead reckoning. In order to address the requirement for wireless communication, the original extension module on the e-puck which contained peripherals including a speaker, infrared receiver, and mode selection switch, was replaced by a custom-made extension module that held an XBee radio module which connected to the serial port of the microcontroller.
Information about the e-puck can be found at http://www.e-puck.org/
e-puck code
The code on the e-puck was written in C and compiled using Microchip's MPLAB C Compiler for dsPIC DSCs (student version). The student version can be downloaded from [Microchip's website.] When you set up the project, be sure to add the linker library file (libp30F6014A-coff.a) and linker script (p30f6014A.gld) in the project.
Note that the robots will start out in 'sleep' mode. Use the 'wake' command on the visualization system to start the robots.
Description of the files:
- main.c: This contains the entry point of the code and contains the initialization routines, main loop, and interrupt service routines.
- e_epuck_ports.h: Contains I/O pin definitions.
- main.h: Contains global variables, macros, and the delay function.
- e_init_port.h/.c: Initializes the ports on the e-puck. File is from the standard e-puck library.
- e_led.h/.c: Handes LED manipulation functions. File is from the standard e-puck library.
- e_motors_swarm.h/.c: Motor control and dead reckoning functions. This is a modified version of the standard e_motors.h/.c library file, with dead reckoning functions added.
- dsPIC_XBeePackets.h: Contains functions and data structures for assembling and receiving XBee packets.
- PI_consensus_estimator: Contains functions and data structures for the PI consensus estimator.
main.c
This contains the entry point of the code and contains the initialization routines, main loop, and interrupt service routines.
main(void)
This is the entry point of the code, and contains initialization routines and the main (infinite) loop.
void __attribute__((__interrupt__,auto_psv)) _T1Interrupt(void)
This is the interrupt service routine for Timer1. This is the "system tick" and triggers every 0.2 seconds. It sets a flag to indicate that the interrupt has been triggered.
main.h
e_init_port.h/.c
e_led.h/.c
e_motors_swarm.h/.c
dsPIC_XBeePackets.h
PI_consensus_estimator:
XBee Radios
The XBee radio module is a low-cost, low-power (1mW) radio that uses the IEEE 802.15.4 standard (which specifies the physical layer and medium access control layer of the network) and operates on the 2.4GHz ISM frequency band. Each module contains both a RF transceiver and a microcontroller whose firmware provides a basic implementation of networking capabilities such as addressing, packet, and checksums. The radios together form a peer-to-peer network where each member of the network can broadcast messages to any other member of the network. The XBee module communicates with the PIC microcontroller on the e-puck via the serial port using the RS-232 serial data transfer protocol at 115200 bauds per second.
Due to the robust nature of the swarming algorithm, some packet loss was acceptable; packet recovery schemes were foregone in favor of simplicity and lower power consumption.
XBee Radio Configuration
The XBee radio has 20 input/output pins whose signals and functions can be found in section 1.5 in the user’s manual. The only pins that are of particular interest us are:
- Pin 1: 3.3V Power
- Pin 2 (output): UART Data Out
- Pin 3 (input): UART Data In
- Pin 10: Power Ground
- Pin 12 (output): CTS flow control
- Pin 16 (input): RTS flow control
The RTS and CTS signals are for flow control. When the RTS line is pulled low, the XBee module will hold any data waiting to be sent to the microcontroller in a buffer until the line is pulled high again. When the buffer is almost full, the XBee module will pull the CTS signal high.
Details about the XBee radio and its operation can be found in the user’s manual.
Two firmware options for the microcontroller are available from Digi. The first option implements a suite of networking capabilities including packets, checksums, addressing, and diagnostics; this implementation is specific to the XBee radios and not compatible with other wireless devices. The second option is a ZigBee protocol stack, which is a mesh networking standard for low data rate networks. Because routing and mesh networking capabilities were not needed for this project, the first option was used for simplicity.
The XBee module can be configured using the X-CTU terminal program from Digi, either by sending commands from the terminal or by using the configuration utility found under the “Modem Configuration” tab. For this project, each of the radios on the e-pucks were configured by typing the following commands into the terminal:
+++
atre
atmy <ID>
atap 2
atd6 1
atbd 7
atwr
where <ID> is an ID number used to differentiate the radios. The firmware on the e-puck requires that the IDs range from 0 to 31. In our case, the XBee radios on the robots were given ID numbers 1 through 8, and the base station radio was given an ID of 0.
Entering the +++ command into the terminal will make the radio enter command mode. The functions of the commands are described below:
| Command | Description |
|---|---|
| ATRE | Resets the radio parameters to their factory default. |
| ATMY <ID> | Sets the ID of the radio. |
| ATAP 2 | Enables mode 2 of the radio’s API to enable advanced features such as packets and addressing |
| ATD6 1 | Enables the RTS flow control pin. If this pin is pulled low, the XBee will hold bytes to be transmitted to the microcontroller in its buffer. |
| ATBD 7 | Sets to baud rate to 115200 bps. |
| ATWR | Writes the new setting to non-volatile memory. |
In order for the radios to be able to communicate, they must all be on the same channel and have the same network ID. If the radios experience interference from other XBee radios, the channel or network ID can be changed.
XBee Interface Extension Board
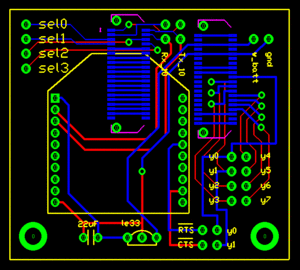
The XBee Interface Extension Board was created with Traxmaker. The extension modules plug into the e-puck via Samtec BTE-020-02-L-D-A connectors, which can be obtained directly from Samtec or one of their distributors. The Traxmaker parts library, which contains the connector and can be downloaded here: Media:Traxmaker_XBee_Lbrary.zip.
Current Version
The Traxmaker file for the current version of the XBee extension board can be downloaded here :Media:e-puck_xbee_board_v1.PCB. Note that the CTS and RTS pins were connected to the sel2 and sel3 pins (instead of y0 and y1) by soldering on jumper wires.
Board In Development
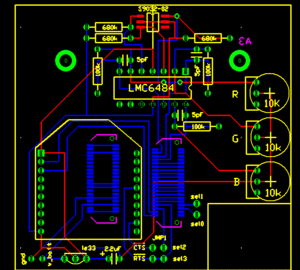
A version of the e-puck with a color sensor circuit built in can be downloaded here: Media:epuck_xbee_board_v2.PCB. This version uses a high-impedance op-amp to amplify signals from three photodiodes (for red, green, and blue), and feeds the outputs into the ADC channels formerly used by the X,Y, and Z axis accelerometers. A 10k potentiometer adjusts the sensitivity for each channel of the amplifier. The RTS flow control line on the XBee is connected to the sel3 line of the e-puck. The CTS line is not hardwired to the sel2 pin, but can easily be connected with a jumper.
Localization Vision System
A machine vision system was developed for robot localization, a la GPS. The system uses cameras and pattern recognition algorithms to track the position and orientation of various targets in a workspace, and radios the data to the respective robots. The description of the system can be found at Machine_Vision_Localization_System.

