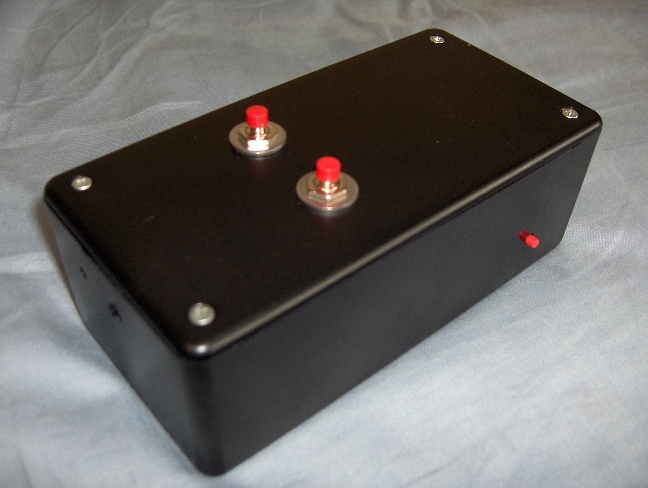
WiiMouse
The WiiMouse
Overview
Team Members
Michael Kryger
Ben Murphy
Charles Wang
Electrical Design
Components
|
Part Name |
Quantity |
Part Number / Datasheet |
|
PIC 18 Microcontroller |
1 |
|
|
20 MHz Oscillator |
1 |
|
|
Accelerometer |
1 |
|
|
XBee Module |
2 |
|
|
5V Voltage Regulator |
1 |
[ LP2954IT] |
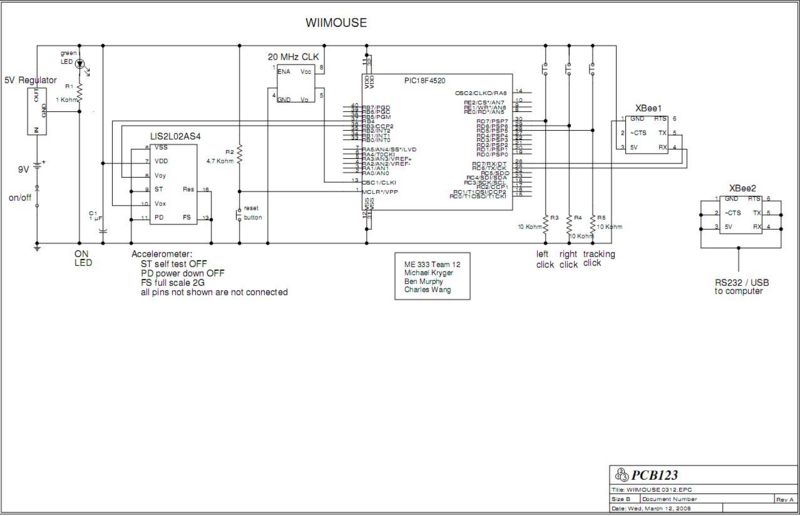
Circuit Diagram
PIC Code
#include <18f4520.h>
#fuses HS,NOLVP,NOWDT,NOPROTECT,CCP2B3
#use delay(clock=20000000)       // 20 MHz crystal on PCB
#use rs232(baud=9600, UART1, stream=MOUSE, Errors) //setup rs232
// characters tranmitted faster than the pic eats them will cause UART to hang.
#include <stdlib.h>
#include <math.h>
#use fixed_io(c_outputs=pin_C6,pin_C2) //speed up port use

unsigned int16 accvolty;
unsigned int16 accvoltx;
int16 accvoltysign;
int16 accvoltxsign;
int left;
int right;
int on;


void leftclicktest(){

     left = input_state(PIN_D7);

}
void rightclicktest(){

     right = input_state(PIN_D6);

}
void trackon(){

   on = input_state(PIN_D5);

}

void main(){

 setup_adc_ports(AN0_TO_AN11);        // Enable analog inputs; choices run from just AN0, up to AN0_TO_AN11
 setup_adc(ADC_CLOCK_INTERNAL);      // the range selected has to start with AN0

 while (TRUE) {

      set_adc_channel(9);     // there's only one ADC so select which input to connect to it; here pin AN0
      delay_us(10);           // wait 10uS for ADC to settle to a newly selected input
      accvoltx = read_adc();

      set_adc_channel(11);
      delay_us(10);
      accvolty = read_adc();

      accvoltysign = accvolty - 130;
      accvoltxsign = accvoltx - 134 ;

      leftclicktest();
      rightclicktest();
      trackon();

 printf("%Ld %Ld %i %i %i \n", accvoltxsign, accvoltysign, left, right, on);

 delay_ms(25);
 }

}
MATLAB Code
The initialization code opens up a graphical user interface with a single button, allowing the user to turn on and off mouse control. The figure that is called can be found here.
function varargout = wiimouse(varargin)
gui_Singleton = 1;
gui_State = struct('gui_Name',       mfilename, ...
    'gui_Singleton',  gui_Singleton, ...
    'gui_OpeningFcn', @wiimouse_OpeningFcn, ...
    'gui_OutputFcn',  @wiimouse_OutputFcn, ...
    'gui_LayoutFcn',  [] , ...
    'gui_Callback',   []);
if nargin && ischar(varargin{1})
    gui_State.gui_Callback = str2func(varargin{1});
end

if nargout
    [varargout{1:nargout}] = gui_mainfcn(gui_State, varargin{:});
else
    gui_mainfcn(gui_State, varargin{:});
end
% End initialization code - DO NOT EDIT


% --- Executes just before wiimouse is made visible.
function wiimouse_OpeningFcn(hObject, eventdata, handles, varargin)
handles.output = hObject;
guidata(hObject, handles);
delete(instrfind)


% --- Outputs from this function are returned to the command line.
function varargout = wiimouse_OutputFcn(hObject, eventdata, handles)
varargout{1} = handles.output;


% --- Executes on button press in pushbutton1.
function pushbutton1_Callback(hObject, eventdata, handles)		    %When button is clicked, do the following:
delete(instrfind)
if get(hObject, 'Value')						    %If button was toggled on:
    import java.awt.*;							    %Java bot that simulates mouse clicks
    import java.awt.event.*;						    %Java bot that simulates mouse clicks
    rob=Robot;		  						    %Assign Java bot functions to variable Rob
    s = serial('COM7','BAUD',9600);					    %Pick serial port sets
    fopen(s)		   						    %Open Serial port
    set(hObject, 'String', 'Stop Mouse control')			    %Change text in button to "Stop Mouse Control"
    hold_but = [0 0];                                                       %Initialize with no buttons being held down
    screen_res = get(0, 'ScreenSize');                                      %Get screen resolution
    origin = [51 35];                                                       %Pick mouse origin (when accx and accy produce min position)
    buffx = [];                                                             %Initialize position buffer in x direction
    buffy = [];                                                             %Initialize position buffer in y direction
end

%~~~Main Loop of Program~~~
while 1									    %Keep running indefinitely
    if ~get(handles.pushbutton1, 'Value');				    %If the button is toggled to off:
        set(hObject, 'String', 'Start Mouse control')			    %Change button text bacl to "Start Mouse Control"
        s = serial('COM7','BAUD',9600);                                     %Get serial port settings
        fclose(instrfind);						    %Close the serial port
        delete(instrfind);						    %Delete the serial port
        break;								    %End While loop
    end

    %~~~Get Serial Data~~~
    serial_data = fscanf(s);						    %Import serial data in the format 'Xdata Ydata LeftClick RightClick MouseMove'
    serial_data = str2num(serial_data);					    %Turn the serial data into numbers, a 5 x 1 matrix
    if length(serial_data) ~=5                                              %If bad data comes in.
        serial_data = fscanf(s);                                            %Rescan
        serial_data = str2num(serial_data);                                 %Turn into number array
    end
    pause(0.02)                                                             %Pause to allow time to loop through

    %~~~Move Mouse~~~
    if length(serial_data)~=5                                               %If good data is still didn't come through
        serial_data(5) = 0;                                                 %Make all missing values zero
    end

    if ~serial_data(5)                                                      %If the side toggle button is not pressed
        if length(buffx) <10                                                %If the buffer has not been filled yet
            buffx = [buffx serial_data(1)];                                 %Add the new serial x value to the buffer
            buffy = [buffy serial_data(2)];                                 %Add the new serial y value to the buffer
        else                                                                %If the buffer has been filled
            buffx = [buffx(2:10) serial_data(1)];                           %Delete the first point, add a new point to the end
            buffy = [buffy(2:10) serial_data(2)];                           %Delete the first point, add a new point to the end
        end
        accx = mean(buffx);                                                 %Get the average of all buffered values
        accy = mean(buffy);                                                 %Get the average of all buffered values
        lastpt = get(0, 'PointerLocation');                                 %Get te previous cursor position
        posx = 5*(accx) + origin(1);                                        %Scaling factor for x, and translation
        posy = 5*(accy) + origin(2);                                        %Scaling factor for y, and translation
        diffx = posx - lastpt(1);                                           %Get difference between last point and new point in x
        diffy = posy - lastpt(2);                                           %Get difference between last point and new point in y

        nx=0;                                                               %Reset x movement step size
        ny=0;                                                               %Reset y movement step size

        if abs(diffx)> 15                                                   %If the change in x position is large enough
            if lastpt(1) > posx                                             %If the movement is negative
                nx = -1;                                                    %Make the x step size -1
            else
                nx = 1;                                                     %If movement is positive, make x step size + 1
            end
        end

        if abs(diffy)> 15                                                   %If the change in y position is large enough
            if lastpt(2) > posy                                             %If the movement is negative
                ny = -1;                                                    %Make the y step size -1
            else
                ny = 1;                                                     %If movement is positive, make y step size + 1
            end
        end


        for i= lastpt(2):ny:posy
            set(0, 'PointerLocation', [lastpt(1) i])                        %This interpolates and moves cursor between actual acquired data
        end

        for i= lastpt(1):nx:posx
            set(0, 'PointerLocation', [i posy])                             %This interpolates and moves cursor between actual acquired data
        end
    else                                                                    %If the red side button is pressed
        accx = serial_data(1);                                              %Still save acceleration data in x
        accy = serial_data(2);                                              %Still save acceleration data in y
        origin(1) = posx - 5*accx;                                          %Set the new origin based on new position, and current acceleration value
        origin(2) = posy - 5*accy;                                          %Set new origin in y direction
        buffx = [];                                                         %Reset the buffer
        buffy = [];                                                         %Reset the buffer
    end

    %~~~Handle Left and Right Mouse Clicks~~~
    if serial_data(3) && ~hold_but(1)					    %If a left click is detected, and the left button is not already down
        rob.mousePress(InputEvent.BUTTON1_MASK);  			    %Using Java bot, left click down
        hold_but(1) = 1;                                                    %Remember that the left click is down
    elseif ~serial_data(3) && hold_but(1)                                   %If the left click is not detected, and the left button was previously down
        rob.mouseRelease(InputEvent.BUTTON1_MASK); 			    %Using Java bot, left click up
        hold_but(1) = 0;                                                    %Remember that the left click is up
    elseif serial_data(4) && ~hold_but(2)                                   %If the right click is detected, and it is not already down
        rob.mousePress(InputEvent.BUTTON3_MASK);		  	    %Using Java bot, right click down
        hold_but(2) = 1;                                                    %Remember that the right click is down
    elseif serial_data(4) && hold_but(2)                                    %If the right click is no longer detected, and the button was previously down
        rob.mouseRelease(InputEvent.BUTTON3_MASK);			    %Using Java bot, right click up
        hold_but(3) = 0;                                                    %Remember that the right click is up
    end
end
Design Challenges
Wireless Communication
Initially, we sought out to use a bluetooth transmitter to interface with the computer. We discovered that bluetooth modules can be extremely expensive, compounded by the fact that we were not buying them by the thousands. The less expensive modules are extremely difficult to solder, as they are surface mount. The module we purchase had grooves on the side that fit wires nicely, however would not stick when soldered. This was part #497-5791-ND on the Digikey website. Thus, our experience with bluetooth was shortlived, and was limited to hardware only.
Xbee ended up being a very straightforward way of transmitting data by using the printf function discussed in this wiki page. Coupled with the the ttl232r USB to Serial cable, this provided an elegant way of displaying information from a COM port in windows.
Mouse Control in Windows
For the most robust mouse control, writing a driver is your best bet, however this can be very challenging. We found that there was not enough time, or resources to be able to write a device driver.
We also attempted to create an executible in Visual C++. In this case, we were able to achieve mouse control using the function SendInput to mimick mouse movement and clicks. Read about SendInput more in the msdn guide.
In Matlab, there is a command for setting a position:
set(0,'PointerLocation', [x y]);
However, this command is only activated when a figure is open. To activate the command, and simplify the programming, a graphical user interface was created using Matlab's Guide software. (Type 'guide' in the command window and press enter).
Mouse clicks were more tricky, as there is native method to control mouse down and up in matlab, unless it is limited to the figure that is created. For Windows mouse clicks, a Java robot was used. Refer to the Matlab code for references to these bots. These allowed for right and left button down and button ups, based on the serial data stream.
Serial Communication
We were able to print strings of text fairly easily using the information from the Serial Communication wiki. When we originally intended to use a Visual C program, we examined the format of rs232 data for standard windows serial mice:
        D7      D6      D5      D4      D3      D2      D1      D0

Byte 1  X       1       LC      RC      Y7      Y6      X7      X6
Byte 2  X       0       X5      X4      X3      X2      X1      X0
Byte 3  X       0       Y5      Y4      Y3      Y2      Y1      Y0


LC = Left click
RC = Right click

Note that each packet of data included the previous 7 x and y positions.
The PIC command that we believed would transfer data byte by byte was putc, however we never were able to get it to work properly.
In the end, we simply printed a string with 5 pieces of information: X Acceleration, Y Acceleration, Left Button status, Right Button Status, Side Button status. In matlab, the string was converted back to numerical values.
Position from Accelerometers
There are a number of ways that we could have used accelerometer data. Position data could be garnered from translational movement of the arm or rotational movement of the wrist.
We examined a few algorithms that would take data from translational position. Theoretically, it would be a simple matter of integrating acceleration to get velocity. Velocity information could have been used to determine mouse movement. Or, velocity could have been integrated to get a relative position. In practise, it turns out that this method is difficult to use with our configuration. Accelerometer data did not have enough resolution, neither in acceleration nor in time, to be able to achieve meaningful integration values.
We later discovered that accelerometers in general are not condusive to determining a position. This is the main reason why the Nintendo WiiMote has both accelerometers and IR sensors- the IR sensors are used to deduce position.
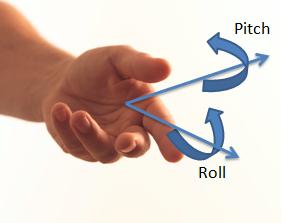
The only reliable method to garner position from acceleration data was using wrist rotation to infer pitch and roll. Pitching or rolling the remote lined up the accelerometers y axis and x axis respectively with gravitational acceleration, giving us a measure of the angle rotated.
Even using the accelerometer like this, there was still a very narrow range of values that the PIC received. The values were signed 8-bit binary digits from -128 to 128. Realistically, it only displayed values from -50 to 50. (Perhaps using an accelerometer with a lower maximum acceleration would have been better in our case). With 80% of users displaying a resolution of 1024 x 768 and above nowadays, this is insufficient for simply assigning a binary value to a screen position; the cursor would only be able to move in less than 1/4 of the screen. However, simply stretchng out values to the screen resolution caused the mouse to jump multiple pixels each time, which was also unwanted. A balance had to made between getting a large area of cursor control and not having a jumpy cursor.
To solve the problem, the accelerometer values were scaled up by a factor of five. A buffer of ten data points was then used to move the cursor. Also, the cursor does not just move from position 1 to position 2. It enterpolates the positions in between to make a seemingly smoother mouse movement.
Because the cursor coverage still did not span the entire screen, a button was added that allowed the user to freeze the mouse position, while returning the device to a neutral position. This basically created a new origin of mouse movement, allowing for coverage of the entire screen.
Finally, a threshold was set so that when the device is more or less stationary, the cursor would not hop between two values.


