LED Drivers
Overview
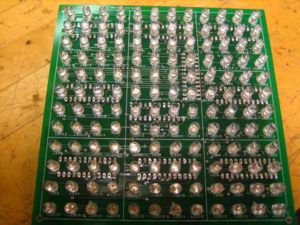
Large numbers of LEDs in an array (of any size) can be controlled efficiently with the use of LED drivers and demultiplexers.
LED Drivers
[LED displays can be created using Serial-Input Constant-Current Latched LED Drivers (Made by Allegro, A6278 or A6279). The A6278 outputs to 8 LEDs using 8 NPN constant-current sink drivers, while 16 drivers in the A6279 can control 16 LEDs. Each device includes a CMOS shift register, accompanying data latches and sink drivers.
In this setup, the LEDs are tied high, (+ side connected to Vcc while the negative end is connected to the chip) and the active signal output of the chip is low, creating a voltage difference across the LED. The current through each LED is set by the selection of an external current-control resistor (REXT). The value of this resistor can be determined by formulas in the data sheet, but may also require experimentation for larger displays.
Data
Data is sent from the PIC to the LED driver via the Serial Data line. Within the LED driver data enters into a shift register, filled is then triggered sending the contents of the register to the 8 or 16 LEDs. More specifically; the Serial Data input is passed to the next significant bit in the shift register on each rising edge of the Clock input. When the Latch Enable Input is set high, the contents of the shift register are passed to the latch. If the Output Enable input is low, the contents of the latch are sent to the LED drivers.
Addressing Scheme
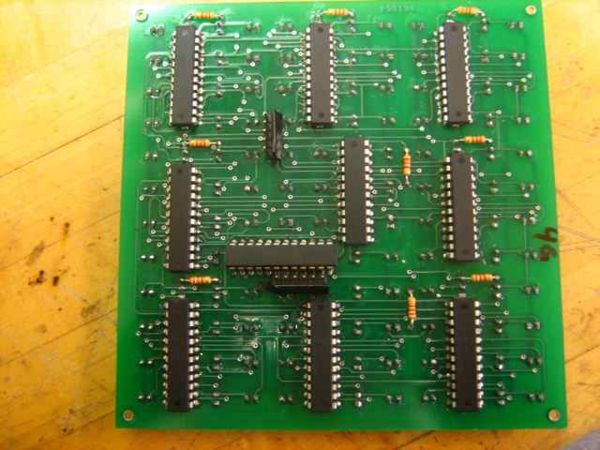
Up to 16 LED driver devices (equivalent to 256 LEDs with the A6279) can be controlled with the use of a PIC and a 4- to 16-Line Demultiplexer. Signals from the PIC: Output Enable, held low, allows the data to be passed from the latches to the drivers. The Serial Data line distributes the same data stream to each driver device. A 4-bit address for the desired driver device is sent to the demultiplexer to determine which driver is controlled. The output signal from the demultiplexer to each driver device acts as its Clock input. A clock pulse is sent from the PIC to enabling the demultiplexer, thus the output from the demultiplexer is a clock signal which is then sent to the driver device. This clock signal allows the current Serial Data input bit to be passed to its shift register, data enters and shifts into the shift register on the rising edge of the clock. Once 16 data bits have been passed into the shift register, of the addressed driver device, the Latch Enable signal is sent from the PIC to all of the driver devices. This passes the data from the shift register to the latch and from the latch to the LED drivers, updating 16 LEDs at a time. Output Enable from the driver must be low for the data to be passed to the latch and the LEDs. The outputs of the driver devices which were not being addressed (through the demultiplexer) will remain unchanged, as the data in their shift registers was not updated. Hence, 16 LEDs (one driver device) are updated at a time.
One way to further increase the number of LEDs controlled by the PIC is to employ a 3- to 8-Line Demultiplexer between the PIC and the 4-16 Demultiplexers. Thus, it is possible to control up to 8, 4-16 demultiplexers, which each control up to 16 LED drivers. An additional 3 address bits must be sent by the PIC to this primary demultiplexer to enable one of the (up to) 8 4-16-Line demultiplexers. This scheme allows for the control of up to 2048 LEDs. A sample circuit diagram is shown below.
Robot Snake Motion
Real snake motion does not follow specified equations. However, research has proven that the serpentine motion of a snake can be modeled with the following equations (Saito etal, 72-73):
where the parameters a, b, and c determine the shape of the serpentine motion. The graph shows how the parameters influence the serpentine curve. Basically, a changes the appearance of the curve, b changes the number of phases, and c changes the direction.
The serpentine curve can be modeled with a snake like robot by changing the relative angles between the snake robot segments using the following formula with the number of segments (n):
where α , β , and γ are parameters used to characterize the serpentine curve and are dependent on a, b, and c as shown below:
The equations above for φi,α,β, and γ were used in this snake like robot as shown in the code section.
Mechanical Design
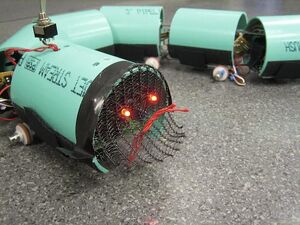
The robotic snake consists of a head segment and several body segments. The head segment houses the onboard microcontroller and xBee radio. The body segments house the servo motors and the batteries required to power each motor. As the snake is designed to be modular, there is no limit to the number of body segments. More segments will allow it to move more smoothly, while fewer segments will be easier to control. For this design, seven body segments were used due to material limitations.
Mechanically, the snake is designed to move in a serpentine motion, imitating the motion of a real snake. As discussed above, real snakes move with anisotropic coefficients of friction. It is difficult to locate materials with this property, but passive wheels satisfy the friction requirements. The friction will be lower in the direction of rolling, thus providing the required difference in friction. The only problem with this approach is that the wheel may slide in the normal direction if the weight applied to the wheel is not sufficient.
Parts List
- Motors: Futaba S3004 standard ball bearing RC servo motor, Tower Hobbies LXZV41 $12.99
- Wheels: McMasterCarr Acetal Pulley for Fibrous Rope for 1/4" Rope Diameter, 3/4" OD McMasterCarr 8901T11 $1.66
- O-Rings (Tires): McMasterCarr Silicone O-Ring AS568A Dash Number 207, Packs of 50 McMasterCarr 9396K209 $7.60/50
- PVC Pipe: McMasterCarr Sewer & Drain Thin-Wall PVC Pipe Non-Perforated, 3" X 4-1/2' L, Light Green McMasterCarr 2426K24 $7.06
- 1/8th inch plastic for chassis: (Shop Stock) or McMasterCarr Polycarbonate Sheet 1/8" Thick, 12" X 12", Clear, McMasterCarr, 8574K26 $6.32
- Dowel Pins: 1" long, 1/4" diameter
- Sheet Metal: For the connecting segments
- Fasteners: Screws for the servos and chassis, washers for the standoffs
- Standoffs: Used 1" and 1/2" to achieve a level snake
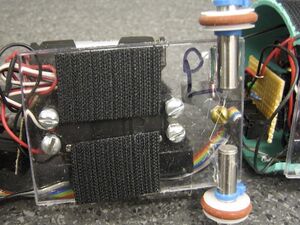
- Velcro: To attach battery packs and housing to the chasis
- Ball caster: For the head
The Body Segments
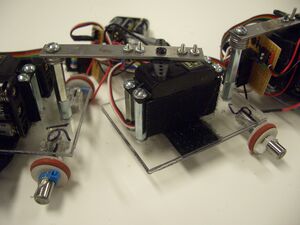
Each of the body segments are identical and includes a chassis, a servo, a connector, standoffs and two passive wheels as can be seen in the picture.
Video of 3 body segments moving
Chassis
The base of the chassis is made from a thin (approx. 1/8th inch) piece of polycarbonate. The chassis must be wide enough to hold a servo motor with a AAA battery pack on each side and long enough for the servo and a standoff (the connection for the previous segment). The polycarbonate was cut into a rectangle to meet the specifications for our servo motor. Five holes were then drilled in the rectangle, four to mount the servo and one for the standoff. The holes are drilled to allow the servo to be located in the center of the chassis.
Connector
A connector was machined to attach to the servo horn of one body segment and to attach to the next segment's standoff. The length of this connector is about 3 inches and is just long enough to prevent collision between segments. A shorter beam allows for greater torque. This connection needs to be as tight as possible and the beam must be mounted perpendicular to the chassis.
Standoffs
Standoffs were used to attach the servo to the chassis and to attach the connector to the chassis. Two standoffs (1 in and 1/2 in) and several washers were used to make the connector parallel to the ground.
Passive Wheels
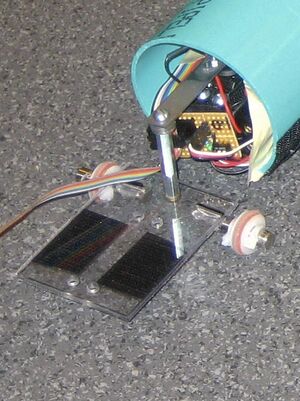
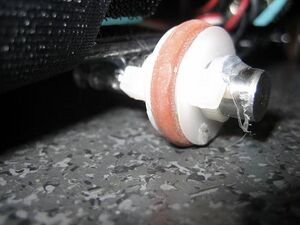
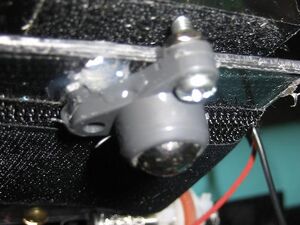
Passive wheels were mounted to the bottom of the chassis. Each wheel was made of a 3/4 inch pulley and an o-ring. The o-ring was used to increase friction with the ground. The wheels have been set on polished metal dowel pins which allow the wheels to rotate more freely than when placed on wooden dowels. The dowel pin axles were mounted (hot glue works but is not very strong) in the center of the segment. The center of the segment is not the center of the polycarbonate rectangle. Instead, the entire segment length is the distance from the standoff on one chassis to the center of the servo horn on the other. In this project, the length of the connector was made to be about half the length of the segment. Therefore, the wheels were placed at the same location as the stand off as can be seen in the image. The wheels are held in place with zip ties.
Fully Assembled Body Segment
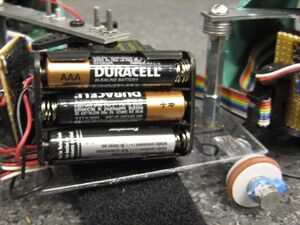
A fully assembled chassis has a mounted servo and is connected to a segment on either side. AAA batteries packs were attached to the sides of the motor with velcro to allow easy removal. The small electronic circuit board for each segment was mounted on the front of the motor to allow easy access to the switch. (See Electronic Design for more information on the circuit board and batteries)
The Head Segment
The head segment is similar to the body segments except that it contains a PCB board with a PIC instead of a servo motor. The head segment is the same width but slightly longer than the body segment. A ball caster was added to the front of the segment to help support the extra length and help the wheels stay on the ground.
Protection and Visual Appeal
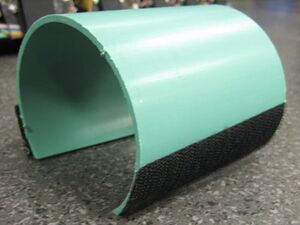
As a final step, housing for each segment was created from 3" PVC pipe. The pipe was cut into segments the same length as the chassis. The bottom of the pipe was cut off, allowing it to sit flat on the chassis. The housing provides a protective covering for the servo, batteries and electronics. The pipe was attached with velcro straps which mounted under the chassis. This housing can be easily removed to debug and to change batteries.
Mechanical Debugging
Wheels come off the ground: Add washers to the standoffs to force the chassis to be parallel to the ground.
Wheels slide, but do not roll: Increase frictionby either adding weight to the segment or changing the "tires" (the o-ring).
The segments slip when the servo rotates: Tighten the screws for the connector standoffs, both above the beam and below the chassis.
Electronics
Parts List (Digikey Part Number)
- PIC: PIC18F4520
- Oscillator: 40MHz Oscillator (X225-ND)
- RC Servo (see mechanical design) preferably high-torque
- 10 wire IDC ribbon cable
- 10 pos IDC cable socket (ASC10G): 1 per segment
- 10 pos IDC cable header (A26267-ND): 1 per segment
- 3 pos AAA battery holder (BH3AAA-W-ND): 1 per segment
- 2 pos AAA battery holder (BH2AAA-W-ND): 1 per segment
- 475 Ohm resistors (transmission line termination)
- Various switches to turn power electronics and the motors on/off
- Standard Protoboard, to mount connector from ribbon cable, and switches for each motor
- Xbee radio pair and PC
Electronics in Each Body Segment
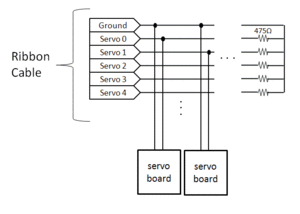
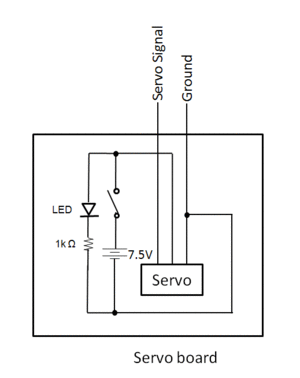
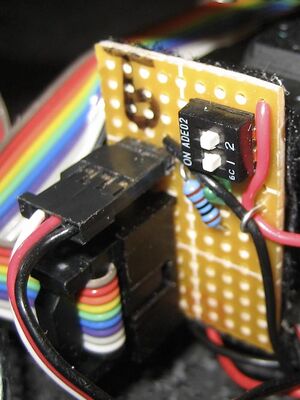
The each segment of the snake contains a Futaba Standard RC Servo. Each servo has 3 wires: power, ground, and signal. The signal generated by the microcontroller is carried by the IDC ribbon cable, and each servo board taps into a single signal line and the reference ground line as shown in the ribbon cable schematic. Each segment of the snake contains a small circuit board (ServoBoard Schematic) which has a connector for the ribbon cable, a switch to control the power, and a power indicator LED. Because of the length of the ribbon cable, each signal line must be terminated with a 475 ohm resistor to prevent reflected "ghost" signals from interfering with the original signal.
Each servo board also has its own power supply of 5 AAA cells, which gives each servo 7.5V. Although the servos are only rated for 6V, 7.5V was used because more torque was needed. The current drain (up to 500mA) caused the voltage across the cells to drop due to the high internal resistance of the alkaline cells. NiMH rechargeable cells are more capable of handling high current draw applications, but are also much more expensive and can take several hours to charge.
The robot snake can run for about 1 hour on the alkaline cells, after which the servos no longer have enough torque to generate the serpentine motion.
Electronics in The Head Segment
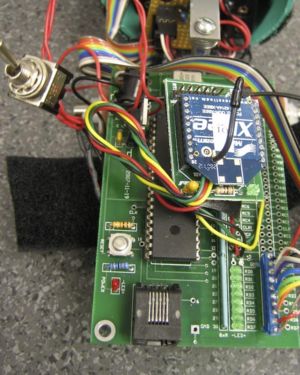
The PIC18F4520 Prototyping Board designed by Professor Peshkin was used. Schematics of the board can be found here: 18F4520_prototyping_board. The only change applied to the board was to replace the 20MHz clock with a 40MHz clock. This allowed the microcontroller to perform calculations faster, improving the resolution of the servo signal. The ribbon cable was connected to the ground and port D pins on the PIC.
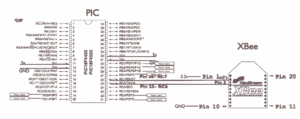
An XBee radio was used to communicate between the microcontroller and the PC. The wiring diagram shows a schematic for the Xbee connection with the PIC. The XBee Interface Board was used to provide a robust mechanical mount for the radio, as well as supply the 3.3V needed by the XBee. On the PC side, another XBee interface board was plugged into the FTDI USB-Serial converter. Other than this, no special electronics were needed for the XBee radio. The radio simply acted as a serial cable replacement The snake was controlled by sending commands with a terminal program.
PIC Code
There are two PIC files used in this robotic snake, SnakeServos.c and main.h, which are shown below. main.h sets up the default parameters used in SnakeServos.c. The microcontroller controls the RC servos and receives data from a computer via serial communication.
The main purpose of SnakeServos.c is to calculate the motion profile of the servos, and send a corresponding signal to each of the servos every 20 ms. The code for this is found in the ISR_20MS function in the code which is run every 20ms.
A secondary function is to update the parameters that affect the motion of the snake. The code for this can be found in the ISR_USART_RX function, which is run every time a byte is received on the USART's receive buffer.
Servo Control Details
The main function of the PIC microcontroller is to control multiple RC servos (seven in our case). See RC Servo Theory for a discussion of the control signal for an RC servo. The RC servo expects a pulse every 20ms, so a timer called Timer1 is set up to overflow every 20 ms and trigger an interrupt. When the interrupt is triggered, the counter for Timer1 is set to the value held by the constant TMR1_20MS (defined as 15536), which will cause Timer1 to overflow 20 ms later and re-trigger the interrupt.
As shown in the RC Servo Theory, the width of the high pulse determines the angle of the servo. As a result, the pulse width corresponding to the desired angle for each servo motor is calculated and the corresponding timer value is stored in an array called RCservo. At the beginning of the interrupt, all the pins connected to the servos are set high. For the RC servos used in this project, the maximum pulse width can be 2.25 ms; therefore, Timer1 only needs to be polled for 2.25 ms. TMR1_2point25MS is a constant corresponding to the value of Timer1 2.25 ms after the interrupt begins and is defined as 15536 + 6250. While Timer1 is less than this variable, the counter is compared sequentially to the values in the RCservo array plus 15536 (15536 must be added because the Timer1 started counting at 15536 instead of 0). Since the RCservo array corresponds to the pulse widths of the servos, when the value of Timer1 is greater than a value in RCservo plus 15536, the corresponding pin is set low. After the sequence is complete, Timer1 is polled again and the process repeats until 2.25 ms have elapsed, which corresponds to when Timer1 is greater than TMR1_2point25MS. After all the servo signals have been sent, the values in the RCservo array are updated to prepare for the next 20ms interrupt.
Although polling the timer to control the length of a pulse has a lower resolution than using an interrupt (see RCservoSoft.c), it allows one to add and remove servos more easily and not have to decrease the frequency of the servo signal pulse train. With a 40MHz clock and seven servos, the resolution for the pulse was about 8us, which was sufficient for this project.
Serial Communication Details
The PIC communicates serially with a XBee radio to a PC with a XBee radio. As shown in the code, the serial communication allows the user to change the speed, the amplitude and period of the sine wave, and the direction (forward, reverse, left and right) of the robotic snake. When a byte is received in the UART receive buffer, a high-priority interrupt is triggered. The received byte is put into a switch-case statement, and the corresponding parameters are updated.
SnakeServos.c
/*
Andy Long, Clara Smart, and Michael Hwang's snake robot code.
*/


#include <18f4520.h>
#device high_ints=TRUE        // this allows raised priority interrupts, which we need
#fuses HS,NOLVP,NOWDT,NOPROTECT
#use delay(clock=40000000)
#use rs232(baud=9600, UART1)

#include <main.h>
#include <math.h>

/*
Put your desired high duration here;
3200 is center
1000 is 90 deg right
5400 is 90 deg left
*/
int16 RCservo[7];

//use volatile keyword to avoid problems with optimizer
volatile float a = A_DEFAULT;
volatile float b = B_DEFAULT;
volatile float c = C_DEFAULT;

volatile float alpha;
volatile float gamma;
volatile float beta;
volatile float speed = 0;
volatile float prev_speed = SPEED_DEFAULT;
float t = 0;

#INT_TIMER1 // designates that this is the routine to call when timer1 overflows
//generates servo signals
void ISR_20MS(){
   volatile unsigned int16 time;
   set_timer1(TMR1_20MS);		//set timer to trigger an interrupt 20ms later
   SET_ALL_SERVOS(0b11111111);	//begin pulse for servo signal
   time=get_timer1();			//poll timer
   while(time < TMR1_2point25MS){	//end this loop after 2.25 ms
      if (time > (RCservo[0] + TMR1_20MS)){
         output_low(SERVO_0);	//end the pulse when time is up
      }
      if (time > (RCservo[1] + TMR1_20MS)){
         output_low(SERVO_1);
      }
      if (time > (RCservo[2] + TMR1_20MS)){
         output_low(SERVO_2);
      }
      if (time > (RCservo[3] + TMR1_20MS)){
         output_low(SERVO_3);
      }
      if (time > (RCservo[4] + TMR1_20MS)){
         output_low(SERVO_4);
      }
      if (time > (RCservo[5] + TMR1_20MS)){
         output_low(SERVO_5);
      }
      if (time > (RCservo[6] + TMR1_20MS)){
         output_low(SERVO_6);
      }
      time=get_timer1();	//poll timer
   }
   SET_ALL_SERVOS(0);	//set all servos low in case some pins are still high

    //3200 is center  //1000 is 90 deg right // 5400 is 90 deg left
   /*
   add value of sine wave with phase offset ((alpha*sin(t + X*beta),
   3200 for servo center position,
   an adjustment value to compensate for offsets when mounting servo horn (SERVO_X_ADJ),
   and bias (gamma) for turning.
   */
   RCservo[0]=(int16)(alpha*sin(t) + 3200 + SERVO_3_ADJ + gamma);
   RCservo[1]=(int16)(alpha*sin(t + 1*beta) + 3200 + SERVO_4_ADJ + gamma);
   RCservo[2]=(int16)(alpha*sin(t + 2*beta) + 3200 + gamma + SERVO_5_ADJ);
   RCservo[3]=(int16)(alpha*sin(t + 3*beta) + 3200 + gamma + SERVO_6_ADJ);
   RCservo[4]=(int16)(alpha*sin(t + 4*beta) + 3200 + gamma + SERVO_7_ADJ);
   RCservo[5]=(int16)(alpha*sin(t + 5*beta) + 3200 + gamma + SERVO_8_ADJ);
   RCservo[6]=(int16)(alpha*sin(t + 6*beta) + 3200 + gamma + SERVO_9_ADJ);

   t+= speed;	//increment time, wrap around if necessary to prevent overflow
   if (t > 2*pi){
      t = 0;
   }
   else if (t < 0){
      t = 2*pi;
   }
}


#INT_RDA HIGH    //High-Priority Interrupt triggered by USART Rx
//parameter update
void ISR_USART_RX(){
   char input;
   if (kbhit()){
      input = getc();
      switch(input){
         case 'w': //accelerate
            speed += 0.002;
            break;
         case 's': //decelerate
            speed -= 0.002;
            break;
         case 'x': //pause motion
            prev_speed = speed;
            speed = 0;
            break;
         case 'z': //resume motion
            speed = prev_speed;
            break;
         case 'c': //reverse speed
            speed = -speed;
            break;
         case 'a': //increase left turn rate
            c -= 1000;
            gamma=-c/num_segments;
            break;
         case 'd': //increase right turn rate
            c += 1000;
            gamma=-c/num_segments;
            break;
         case 'f': //set turn rate to 0
            c = C_DEFAULT;
            gamma = 0;
         case 't': //increase amplitude
            a += 10;
            alpha=a*abs(sin(beta));
            break;
         case 'g': //decrease amplitude
            a -= 10;
            alpha=a*abs(sin(beta));
            break;
         case 'y': //increase phases in body
            b += 0.1;
            beta=b/num_segments;
            alpha=a*abs(sin(beta));
            break;
         case 'h': //decrease phases in body
            b -= 0.1;
            beta=b/num_segments;
            alpha=a*abs(sin(beta));
            break;
         case '1': //preset 1
            a = A_DEFAULT;
            b = B_default;
            c = C_default;
            gamma=-c/num_segments;
            beta=b/num_segments;
            alpha=a*abs(sin(beta));
            speed=SPEED_DEFAULT;
            break;
         case '2':  //preset 2
            a = 1400;
            b = 2*pi;
            c = C_DEFAULT;
            gamma=-c/num_segments;
            beta=b/num_segments;
            alpha=a*abs(sin(beta));
            speed=SPEED_DEFAULT;
            break;
         case '3':  //preset 3
            a = 1000;
            b = 5*pi;
            c = C_DEFAULT;
            gamma=-c/num_segments;
            beta=b/num_segments;
            alpha=a*abs(sin(beta));
            speed=SPEED_DEFAULT;
            break;
         default:
      }
   }
   return;
}

void main() {
	//load default values
   a = A_DEFAULT;
   b = B_default;
   c = C_default;
   gamma=-c/num_segments;
   beta=b/num_segments;
   alpha=a*abs(sin(beta));
   speed=0;

   setup_timer_1(T1_INTERNAL | T1_DIV_BY_4 );
   set_timer1(0);

   enable_interrupts(INT_TIMER1);	//enable Timer1 interrupt
   enable_interrupts(INT_RDA);		//enable USART receive interrupt
   enable_interrupts(GLOBAL);

   while (TRUE) {

   }
}
main.h
#ifndef __MAIN_H__
#define __MAIN_H__

#define SET_ALL_SERVOS(x) output_d(x)

/*
This chart matches the pin on the PIC to the wire on the ribbon cable
PIN WIRE IN USE
--- ---- -------
RD0  2
RD1  3      *
RD2  4      *
RD3  5      *
RD4  6      *
RD5  7      *
RD6  8      *
RD7  9      *

*/
#define SERVO_3_ADJ 0
#define SERVO_4_ADJ 300
#define SERVO_5_ADJ (-150)
#define SERVO_6_ADJ 75
#define SERVO_7_ADJ (-200)
#define SERVO_8_ADJ 100
#define SERVO_9_ADJ (-150)

#define SERVO_0 PIN_D1
#define SERVO_1 PIN_D2
#define SERVO_2 PIN_D3
#define SERVO_3 PIN_D4
#define SERVO_4 PIN_D5
#define SERVO_5 PIN_D6
#define SERVO_6 PIN_D7

#define A_DEFAULT 1300
#define B_DEFAULT 3*pi
#define C_DEFAULT 0

#define SPEED_DEFAULT 0.05
#define OMEGA_DEFAULT 1
#define num_segments 8

#define TMR1_20MS 15536
#define TMR1_2point25MS 15536 + 6250
#endif
Results
Overall, the robotic snake was successful.
Initially, the mechanical design included a single wheel mounted in the center of the pvc pipe. However, the motion of the snake was very difficult to control because the robotic snake became unstable very easily. As a result, the chassis was built to include two wheels, as discussed in the mechanical design section, in order to provide stability which made the robot easier to control.
Wireless control from a laptop allowed easy demonstration of the snakes capabilities, and allowed others to easily control its movement.
The final robotic snake can be seen in action here.
Video of the robot snake without housing
Video of the robot snake with housing
Next Steps
The robotic snake was developed within five weeks, and proved to be a very successful demo. There are many options that could be researched and developed to add to this robot and discussed below.
Position Sensors
Sensors could be added to the robot to allow it to know its position. This could be accomplished with a combination of encoders on a segment. Most likely, the middle segment should be used since it would be the approximate center of gravity. Knowledge of the position of the center of gravity would potentially the robotic snake to be sent to different locations or navigate (using dead reckoning) through a pre-determined obstacle course or maze. The information from encoders could be sent to a computer to observe different snakelike motions with different parameters.
Obstacle Avoidance
With optical sensors on the head of the snake, the robot would be able to sense an obstacle and either overide the wireless command and avoid it, or stop completely, and wait for further commands.
Power Supply
Currently, 5 AAA batteries are required for each servo, meaning that this robot requires many batteries. As a result, a different power supply could be investigated.
High Torque Servos
The servos in the snake have a large load but do not need to move very quickly, so high torque servos could be used instead of standard servos. This would also prolong the battery life because the servos would be operating in a more efficient range.
References
Ma, Shugen. "Analysis of creeping locomotion of a snake-like robot." Advanced Robotics Vol 15, No 2 (2001): 205-6.
Saito, Fukaya, Iwasaki. "Serpentine Locomotion with Robotic Snakes". IEEE Control Systems Magazine (Feb 2002): 66, 72-73.
