Differential Drive Mobile Robot
Introduction
The goal of this project was to create a low cost replacement for the popular E-Puck robot that was better suited to the needs of the current research projects here at Northwestern. The project also entailed developing a control library that would allow future users to easily interface with the robot and integrate it into their research. Specifically, the robot was to meet the following criteria:
Mechanical Goals:
- Be of a similar size to the E-Puck
- Be significantly less expensive than the E-Puck
- Use stepper motors
- Be easy to manufacture
- Have an approximate run time of 1 hour
Software Goals:
- Use the NU32 board for control logic
- Support wireless communication
- Develop a control library that can easily be included in a users code
- Allow the user to specify a velocity vector for the robot to follow
- Allow the user to specify the robot's configuration, (x,y,θ), in a global frame
- Allow the user to directly control the robot's wheel speeds
Mechanical
As previously stated, the robot needed to be easy to manufacture, inexpensive to make, and relatively small. These three goals guided each decision made in the mechanical design. The following sections will outline the design process for each mechanical component.
Motors:
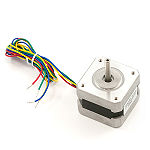
The motor choice was the most significant design decision in this project. Accordingly, much thought and research went into picking the hybrid stepper motors we ended up with. The stepper motor used in this project is a NEMA 17, bipolar (4 wire), hybrid stepper. An image of this can be seen on the right.
- Standard Size:
- Very early in the motor search, it was decided that because this project was to be the foundation of future work, finding a motor that was readily available was a top priority. It quickly became clear that using a stepper motor that followed NEMA's motor standards would accomplish this. In doing so, any future project or research group that decides to use this project as a starting point will not need to locate the exact motor used here, but only a size 17 NEMA stepper motor.
- Hybrid Stepper:
- Although there are many types of stepper motors, we decided to use the hybrid stepper motor for this project. Aside from the fact that hybrid stepper motors are the most common type, they also have a higher resolution compared to a standard permanent magnet stepper motor. Both wikipedia and NMB's website have some good resources on stepper motor theory and operation.
- Bipolar:
- Although there are several possible winding configurations stepper motors can take, we chose a bipolar motor. This configuration demands the use of an H-bridge in the driving circuit, but allows for higher torque than a unipolar configuration.
- No Gearhead:
- The decision not to use a gearhead was a significant departure from the design of the E-puck. Although a gearhead allows for lower current draw, smaller motors (lighter robot) for any given torque, the gearheads themselves are often composed of fragile plastic components that break easily. Another drawback of geared stepper motors is their higher cost. The benefits and drawbacks of our decision are evident in the final design through its significantly higher weight and improved top speed.
- Cost:
- An average hybrid stepper motor from an established supplier like NMB, Lin Engineering, or Annaheim Automation costs around $40. Although the motors purchased from these companies may provide superior performance, the motors used in this project were purchased from SparkFun for $13 each and provide enough torque to propel our hefty robot at four times the speed of an E-Puck.
Chassis:
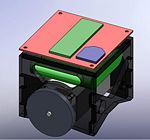
The focus of the chassis design was ease of manufacture. In order to achieve this, the chassis (and wheels) was designed so that it could be cut out of a single sheet of acrylic and simply glued together. The 6mm acrylic used came from McMaster-Carr. In order to minimize the amount of acrylic needed, it was assumed that the circuit board would act as the top of the robot and the front and back were left as short as possible without compromising strength. The final chassis dimensions are W:90mm, L:90mm, H:75mm. As can be seen below, the batteries rest on the motors themselves, and, therefore, do not require any additional mounting structure.
Wheels:
In order to allow for wheel size adjustments throughout the design and development process, the robot's wheels were made out of acrylic and cut on the laser cutter. The center hole was cut to have a 0.005" clearance so that the motor shaft would fit snugly and act to center the wheel. These shaft collars were super glued to the acrylic wheel and used to fix the wheel to the shaft.
Note: If you are going to cut your own wheels on the laser cutter be mindful that the laser has a tendency to taper the edges of the wheels and does not cut a perfectly round circle due to the resolution of the carriage.
Casters:
Because the robot has two wheels, it needed supports on both the front and back to prevent it from rocking back and forth or scraping the chassis on the floor. These casters were used in order to reduce friction and allow for simple shim height adjustment.
Note: Although the stainless steel ball in these casters will last longer, they make quite a bit of noise rattling around in their cage. The solution to this would be either to have them perfectly shimmed so they no longer are able to move, or order the equivalent caster with a plastic bearing.
Download:
The SolidWorks CAD files can be found here.
Electrical
Circuit:
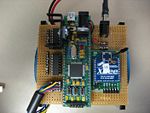
The circuit for the robot consists of the NU32 board, two L293D h-bridges (Digi-Key part number 497-2936-5-ND), an XBee wireless chip, connectors for the motors, and a power jack. A circuit diagram of the final version can be found to the right, as well as pictures of the initial breadboard version and final proto-board version.
Batteries:
This project used Lithium Iron Phosphate (LiFePO4) batteries. These are essentially the next generation of Li-Ion batteries. Like Li-Ion cells, they have a high discharging current, but they are also non-explosive when charged improperly. A drawback is that their energy density is slightly less than a good Li-Ion cell. More information about this type of battery can be found here
For this project we used a battery pack that consisted of 4 3.2V A123Systems cells with its own integrated management circuit that prevents the user from charging/discharging the cells past a safe level and regulates the output current above a certain point.
Specifically, we used a 12.8V, 1500mAh, 4A max battery pack that can be purchased here.
Wireless:
One of the main goals of the robot was to have the ability to communicate wirelessly. The XBee wireless chip was used to fill this requirement. The XBee is a device that allows simple serial communication over a 2.4 GHz connection. By connecting the chip to ground, power, a transmit pin, and a receive pin, one is able to perform standard serial communication between two properly configured XBee chips. More information about the XBee can be found here.
Software
code and description
Graphical User Interface
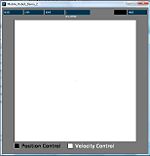
A GUI was created in processing in order to demonstrate the functionality of the control software and facilitate testing.
An image of the GUI as it appears when it is first opened can be seen on the right.
Modes of Operation:
The program has two modes of operation that can be selected with the "mode" button.
Note: The current mode can be discerned by looking at the white/black box next to the mode button and comparing with the legend at the bottom of the GUI
First, there is a position control mode that allows the user to send the robot to a point in a global frame. This is done by clicking in the white box that takes up the majority of the screen space. Once designated, the new position will appear with a number above it which marks its order relative to all the other requested positions. The white area maps to the surface that the robot is sitting on, and the x-axis, which the robot is aligned with, goes to the right of the screen from the origin at the center. The y-axis originates from the same location and goes upward. Both the location of the origin on the screen and the physical dimensions of the space that the screen area maps to are easily adjustable in the code.
Second, there is a velocity control mode that allows you to specify a velocity vector that the center of the front face of the robot must follow. As before, this vector is created by clicking in the white box at the center of the GUI. The robot is, once again aligned along the x-axis, and the magnitude of the velocity vector is specified by the distance from the origin to the point clicked.
Some other features include the ability to:
-stop the robot with the "stop" button
-move the origin to the robot's current position with the "reset" button
-send the robot back to its starting position with the "home" button
-specify the robot's wheel speed with the "speed" textbox
Download:
You can download the processing project here.
Wii Demonstration
This demo involved allowing a user to drive the robot using a Nintendo Wii remote (Wiimote). The user holds the Wiimote sideways in both hands such that the four arrows of the d-pad are in the left hand. This grip is similar to one used for many Wii games (and a lot like the original Nintendo Entertainment System controller). Holding different combinations of the "1" and "2" buttons then change how fast the robot moves when arrows are also being held. At any point in time, the user can hold the home button to send the robot back to its initial configuration. More details on this operation can be found in the WiiMain.c code included below.
The software relies on the wiiuse library. The file linked below includes the important files from the wiiuse package (a header file, a lib file, and a dll file). The Wiimote is connected to a PC (must be running Windows) via bluetooth, and the wiiuse library is used to interpret the data sent to the PC. Once the data has been interpreted, it is sent to the robot over XBee.
In the file below, there is also an exe file of the WiiMain.c code. In order to execute this file, the wiiuse.dll must be in either the same directory as the executable, or in another directory that is included in Window's search path. To see Window's search path, simply type "echo %PATH%" into a command prompt. Additionally, this executable is assuming that the XBee chip is connected to the computer via "COM3". If a different port must be used, the exe file will need to be re-compiled after editing the pertinent lines in WiiMain.c.
A zip file with the necessary components to run this demo can be found here.
Future Work
new wheels
pcb
1 timer motor control
forward, reverse, rotate functions
other functions to shorten code
Team
This project was created by John (Jake) Ware and Jarvis Schultz. Both are mechanical engineering PhD students at Northwestern University.
Contact:
"Jarvis Schultz" <jarvisschultz2012@u.northwestern.edu>
"John Ware" <johnware2015@u.northwestern.edu>


