ME 449 Assignment 1
Introduction
In the next chapter, we will study the forward kinematics problem for open-chain robots: finding the configuration of the robot's end-effector given the vector of joint positions . The forward kinematics problem is easy to solve using a formula called the "product of exponentials," which uses the matrix exponential of this chapter. In this project, CoppeliaSim will solve the forward kinematics for you.
The goal of this project is to test your understanding of the matrix log for rotations, to give you a little practice using the MR library of functions, and to familiarize you with CoppeliaSim.
You will submit a single pdf file to Canvas. The file name should be FamilyName_GivenName_asst1.pdf (for me, it would be Lynch_Kevin_asst1.pdf). You will have to concatenate all your responses into a single pdf file.
All assignments will be graded based on correctness, how clearly you organize your homework (the grader should easily find all of your solutions), and how well you follow the instructions. You will lose points if you don't follow the instructions or if the assignment is difficult for the grader to grade.
Part 1: CoppeliaSim Simulation and Exploration
Open Scene 1 for interactive manipulation of the Universal Robots UR5 robot, a popular 6R robot. (See the instructions about CoppeliaSim in the first module of week 1, or go directly to CoppeliaSim Introduction and download Scene 1.)
When you run this scene you will see a window with 2 tabs: "Enter Config and SE(3) Value" and "Joint Angle Sliders". Go to the "Joint Angle Sliders" tab, move the sliders corresponding to the six joints, and watch how the robot moves.
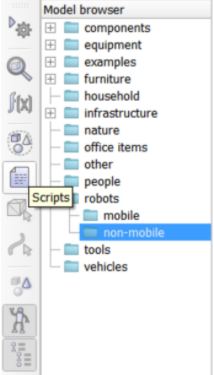
Click the "Scripts" button on the toolbar on the left side of the screen (shown below) to see the scripts being run by the scene.
The main script and any child scripts will be displayed. There is a default main script that controls the simulation loop, and this main script should not be edited. At each simulation step, the main script calls (1) "actuation" functions that simulate the motion of the system and (2) "sensing" functions that simulate the sensors.
Each object in the scene has an associated child script. The child script contains actuation and sensing functions for the object, written in the Lua programming language. Child scripts can be non-threaded or threaded. Non-threaded child scripts contain system callback functions that are called by the main script. A threaded child script creates a new computation thread, and threaded child scripts are typically discouraged relative to non-threaded scripts that are controlled by the main script.
More information can be found at Coppelia's webpage on main and child scripts.
Note that the simulation must be stopped before you can open a script.
For Scene 1, we will be looking at the "Non-threaded child script (UI_Script)." Double-click this script and another window containing the code will pop up. You might notice some of the functions look similar to functions written in the Modern Robotics Library. For example, so3andp2se3(R,p) in this script resembles RpToTrans(R,p) in the Modern Robotics Library. The code for the Custom UI that appears when the simulation starts is written in XML and starts on line 251. This XML code controls the appearance of the Custom UI, including the layout and content of text boxes, sliders, tab titles, and font size. The XML syntax can be found at Custom UI Plugin XML Syntax. For this specific scene, the different text boxes and sliders are arranged in different groups. Each group has a layout which determines how the objects inside the group will be displayed and label text which determines what text will be displayed and how it will be displayed. Consult the XML syntax for the attributes each element can have.
More information on CoppeliaSim can be found in the CoppeliaSim User Manual. There is also a CoppeliaSim forum. You can take a look at the scripts of the included example scenes and demos to see how their functions and UIs were defined and to get a better idea of how the scripts control the simulation.
Your task: Modify the non-threaded child script (UI_Script) to change an aspect of the scene. For example, you can choose to change the Custom UI layout, change the titles and words of the Custom UI, or change font sizes in the Custom UI. Some example changes include:
- Changing the layout: consult the XML syntax and change <group layout="vbox"> to another type (hbox,form, grid, none). Using line 257, changing <group layout="vbox"> to <group layout="hbox"> changes the orientation of the items in the group containing "Configuration Entry", "Current configuration", and "Messages" on the "Enter Config and SE(3) Value" tab of the Custom UI from vertically arranged to horizontal.
- Changing the words: Find the text you want to change in the XML code. The text will be surrounded by quotation marks and have <big> and </big> on its sides. For example, line 258 "label text="<big> Configuration Entry:</big>" controls the text "Configuration Entry" on the "Enter Config and SE(3) Value" tab of the Custom UI. Change the words "Configuration Entry" to change the text displayed in that specific section.
- Changing the font: Using line 258 label text="<big>Configuration Entry:</big>"
- The font can be changed to small using: label text="<small>Configuration Entry:</small>"
- The font can be changed to a specific size using: label text="<font size=20>Configuration Entry:</font>", where 20 is the desired font size.
Your submission will include a screenshot of the changed UI and a screenshot of the changed code in the script.
Part 2: Joint Angle Calculations
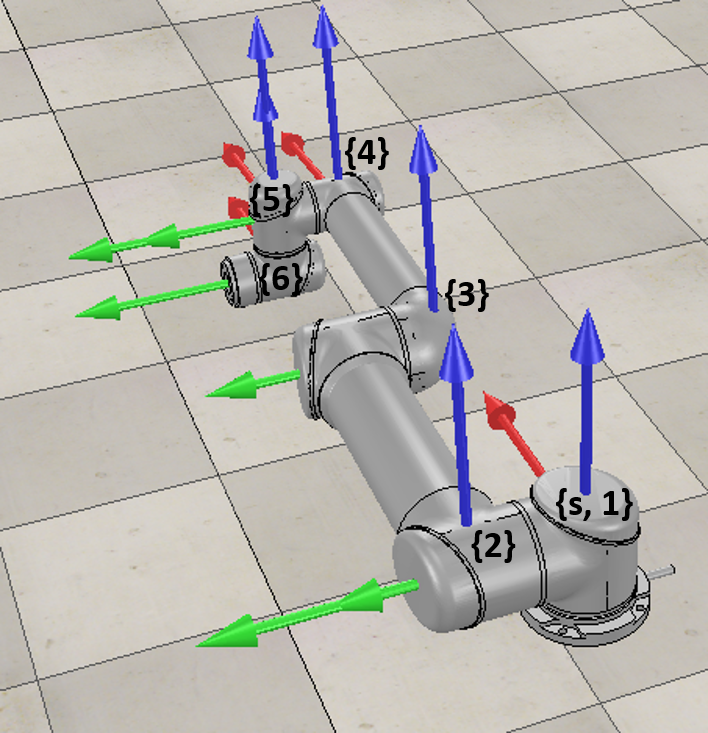
The 6R UR5 robot is shown below at its home configuration. Seven frames are defined: the fixed frame {s} at the base and frames {1} through {6} on links 1 through 6. The red arrow is the x-axis, the green arrow is the y-axis, and the blue arrow is the z-axis. All frames are aligned when the robot is at its home configuration, i.e., each rotation matrix (where could be or any number 1 through 6) is the identity matrix.
The rotation axes for joint , defined in frame {}, are .
For some set of joint angles , we have the following relations between the orientations of the joint frames:
- R13 = [[0, 0, -1]; [0, 1, 0]; [1, 0, 0]]
- Rs2 = [[0, -1, 0]; [-0.5, 0, -0.866]; [0.866, 0, -0.5]]
- R15 = [[-0.3536, -0.3536, 0.866]; [-0.7071, 0.7071, 0]; [-0.6124, -0.6124, -0.5]]
- R12 = [[-0.5, 0, -0.866]; [0, 1, 0]; [0.866, 0, -0.5]]
- R34 = [[-0.866, 0, -0.5]; [0, 1, 0]; [0.5, 0, -0.866]]
- Rs6 = [[-0.3536, -0.7071, 0.6124]; [-0.5732, -0.3536, -0.7392]; [0.7392, -0.6124, -0.2803]]
- R6e = [[-1, 0, 0]; [0, 0, 1]; [0, 1, 0]]
where e corresponds to an end-effector frame fixed relative to link 6 and is not shown in the figure.
Your task:
- Find the six joint angles given the . (Use the MR library, e.g., MatrixLog3.)
- Enter the joint angles you found into Scene1_UR5 in CoppeliaSim to see the configuration of the robot.
- Calculate Rse and verify your results (including your joint angles) are correct by comparing to Tse calculated by the scene under the "Enter Config and SE(3) Value" tab.
What to turn in to Canvas: A single pdf file. The file name should be FamilyName_GivenName_asst1.pdf (for me, it would be Lynch_Kevin_asst1.pdf). This file should have:
- Your list of the six joint angles you calculated.
- A screenshot of the scene, clearly showing the modified UI, the SE(3) calculation, and the robot at the correct configuration.
- A screenshot of your changed code in the child script.
If you do not know how to take a screenshot, you can use one of the following: Mac: Cmd-Shift-3 and look for the screenshot on your desktop. Windows: Use the PrtScn button (or Windows Key + PrtScn or Alt _ PrtScn, etc.). You can also search for the Snipping Tool. Linux: you can use Screenshot or PrtScrn.


