Difference between revisions of "4520 Board intro"
| Line 24: | Line 24: | ||
[[Image:4520board_pcb.gif|right]] |
[[Image:4520board_pcb.gif|right]] |
||
<b>Layout of the 4520 PCB</b> |
|||
Most of the 40 pins of the PIC are brought out to labeled connection points. |
Most of the 40 pins of the PIC are brought out to labeled connection points. |
||
Revision as of 11:59, 26 December 2007
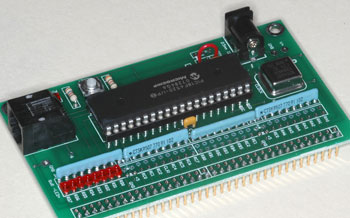
The 4520 board was developed at NU as a versatile prototyping platform for incorporating PICs. It offers a bare minimum environment for getting a PIC running, plus space for your circuits. In a few minutes you can assemble a 4520 board, and be ready to start programming it. Shown here is the version that plugs into a solderless breadboard, for prototyping.
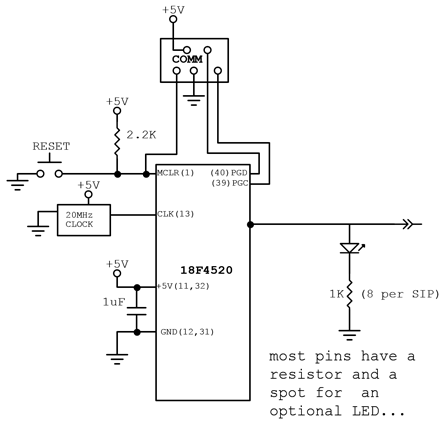
Circuit diagram of the 4520 prototyping board
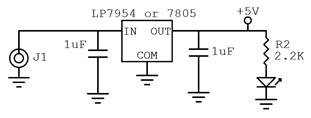
The circuitry on the board includes an optional voltage regulator, a reset button, a programming port, and power indicator light.
Also built in are the current limiting resistors for up to 32 LEDs, and places to put LED indicators on as many of those lines as you wish. These are intended to be used as diagnostics. The current limiting resistors are compactly packaged in a 9-pin SIP, containing 8 resistors and a common ("bussed") pin, which we ground.
When a line is used as a digital input or output you probably want to insert an LED to show its state. When a line is used as an analog input you probably do not want to load it down with an unnecessary LED.
Regulator or no regulator?
If you are going to use a regulated +5V supply, you don't need the regulator chip: just jumper pin 1 to pin 3 instead of inserting the regulator. If you use a supply not much greater than +5V you will choose the LP7954it regulator, which needs only a small voltage headroom (excess of input voltage over desired output voltage) but handles only a maximum of 0.25A. The 7805 series regulators require ~2 volts of headroom but can handle up to 1.5A. In either case you may find that a heatsink is needed.
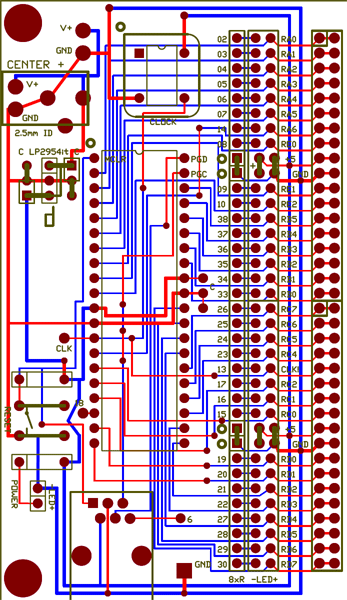
Layout of the 4520 PCB
Most of the 40 pins of the PIC are brought out to labeled connection points.
The corresponding pin number of the PIC is shown (01-40) and also the name of the pin (e.g. RA1). Most pins have many uses and thus many names, but only one name is shown.
You can solder to these connection points, or insert a dual-row connector for a ribbon cable header, or a single-row connector to insert the board into a solderless breadboard, or you can solder terminal strips onto the board.
here is a full size gif of the board , also showing the prototyping area.
The board is intended to be cut in half, providing one part for insertion into a solderless breadboard, and another half for more reliable solderboard construction
The next step better still is to to make a printed circuit board with your circuit on it as well as the PIC. If starting with the protoboard's layout is useful to you, you can find it here: 4520 board in traxmaker format
Assembling the 4520 board
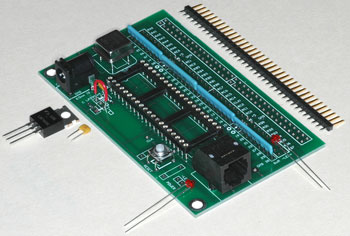
Shown is the smaller version of the 4520 PCB, with most of the parts laid out in proper orientation for assembly. larger Image
Note:
- The regulator chip can be replaced by a jumper (red wire) if you are using a 5V regulated power supply
- The anode (positive) side of an LED is usually the longer lead. + and - are marked on the PCB
- A vertical-insertion 6-6 modular jack can also be used; just cut off the plastic tabs.
- A 20MHz oscillator is soldered directly to the board, bu the PIC18F4520 chip is socketed.
- The marked pin (dot) on the 9-pin SIPs is the common bus for all eight 1K resistors inside. The proper insertion for the SIP is indicated by a dot on the PCB. The SIPs go in with altenating orientation (two each way).
- Ceramic capacitors are non-polarized and can be insterted either way.
- The resistor near the reset switch is 4.7K (or whatever) and the resistor near the LED is 1K (or whatever).
- The 36-pin SIP header is intended to insert into a solderless breadboard. It's under the PCB, with the longer gold-plated pins downward.
Barrel plug conventions
As noted above you can use a regulator or not, depending if you are planning to use a >5V power supply which needs reglauting down to 5V, or if you are planning to use an already-well-regulated 5V supply.
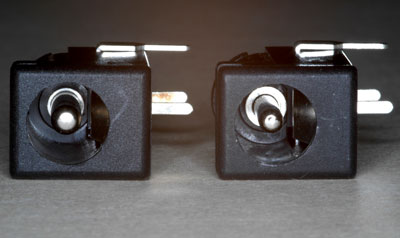
We are trying to stick to a convention of using a 5.5mm/2.5mm barrel plug & jack for 5V, and a 5.5/2.1mm barrel plug & jack for >5V.
It's very hard to distinguish these visually, but you'll find that the 2.1 plug won't fit into the 2.5 jack, thus preventing the more unfortunate error.
You can distinguish the jacks by looking straight inside. In the photo, the 2.5 is on the left, and the 2.1 on the right.
