Difference between revisions of "RGB LEDs"
From Mech
Jump to navigationJump to searchJaneMiller (talk | contribs) |
JaneMiller (talk | contribs) |
||
| Line 16: | Line 16: | ||
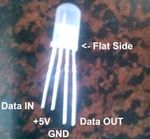
'''Wire Up Your LEDs'''[[image:RGB_LEDs_Wiring.jpg|thumb|150px|[https://cdn.sparkfun.com/datasheets/Components/LED/COM-12877.pdf RGB LEDs Datasheet]|right]] |
'''Wire Up Your LEDs'''[[image:RGB_LEDs_Wiring.jpg|thumb|150px|[https://cdn.sparkfun.com/datasheets/Components/LED/COM-12877.pdf RGB LEDs Datasheet]|right]] |
||
[[image:RGB_LEDs_Wiring_Diagram.jpg|medium|150px|Wiring up Two LEDs|center]] |
|||
*Diagram of how to wire 2 RGB LEDs together goes here |
|||
Revision as of 18:10, 27 March 2015
WS2812 Addressable RGB LEDs (NeoPixels)
Install the NeoPixels Library
- Download ZIP of all library files here
- Unzip the ZIP file when it's done downloading
- Put all of the files from the folder into a new folder called "Adafruit_NeoPixels"
- Put this new folder into your Adruino Libraries folder (usually located at (home folder)/Documents/Arduino/Libraries)
- If you don't have a "Libraries" folder in Arduino/Libraries, create one and put the Adafruit_NeoPixels folder in it
- Restart the Arduino IDE if it's already running
- Open up a new Arduino sketch (program) and check to see if the Adafruit NeoPixels library is installed by going to Sketch-->Import Library and seeing if the NeoPixels library is listed.
Wire Up Your LEDs
- Write code
- Applications


