Difference between revisions of "PIC32MX: Inverse FFT"
| Line 7: | Line 7: | ||
Much of this circuit is the same as the one found in the [[PIC32MX: FFT of Analog Input]] page. Here is a recap: |
Much of this circuit is the same as the one found in the [[PIC32MX: FFT of Analog Input]] page. Here is a recap: |
||
"Beyond simple inputs and outputs, there is no special circuitry required for computing FFTs. The signal is inserted into pin B4 on the PIC and must be below VREF on the PIC (currently *configured to 3.3 V). For data output, the PIC uses RS-232 communication. Three connections need to be made with the RS-232: |
|||
* RS-232 Tx to pin F4 on the PIC (orange connection in diagram) |
|||
* RS-232 Rx to pin F5 on the PIC (yellow connection in diagram) |
|||
* Black RS-232 wire to ground |
|||
The remaining connection is not essential for FFT caclulation but allows the user to monitor the calculation time. Pin A14 goes high during calculation and goes back low when the calculation is completed. This feature lets the calculation time be monitored on an oscilloscope. |
|||
The following circuit diagram illustrates the signal generator to PIC connection, the RS-232 connections, and the optional oscilloscope connection." |
|||
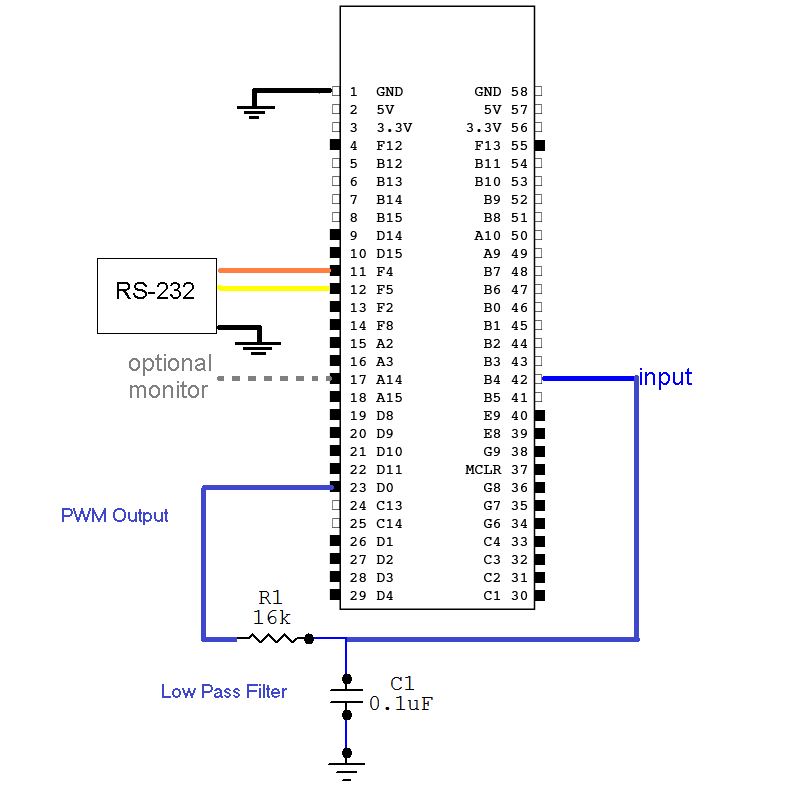
The only thing different about this circuit is that it includes a low pass filter. This filter integrates the PWM signal that is output from pin D0 and creates a continuous, analog signal. |
The only thing different about this circuit is that it includes a low pass filter. This filter integrates the PWM signal that is output from pin D0 and creates a continuous, analog signal. |
||
Revision as of 12:38, 18 April 2010
Overview
An inverse FFT is a function that converts a frequency domain signal into a time domain signal. Inverse FFTs actually use the same algorithm as FFTs except with some scaling and conjugation or time reversal (depending on the algorithm). FFT information can be found at PIC32MX: FFT of Analog Input. The following circuit and code implements a program on the PIC32 that creates an analog signal, takes the FFT of that signal, and then takes the inverse FFT of the result to try and obtain the original waveform back. The data is all sent to MATLAB via RS232 and compared to MATLAB's computational results for accuracy.
The code for both MATLAB and the PIC32 can be found here.
Circuit
Much of this circuit is the same as the one found in the PIC32MX: FFT of Analog Input page. Here is a recap:
"Beyond simple inputs and outputs, there is no special circuitry required for computing FFTs. The signal is inserted into pin B4 on the PIC and must be below VREF on the PIC (currently *configured to 3.3 V). For data output, the PIC uses RS-232 communication. Three connections need to be made with the RS-232:
   * RS-232 Tx to pin F4 on the PIC (orange connection in diagram)
   * RS-232 Rx to pin F5 on the PIC (yellow connection in diagram)
   * Black RS-232 wire to ground
The remaining connection is not essential for FFT caclulation but allows the user to monitor the calculation time. Pin A14 goes high during calculation and goes back low when the calculation is completed. This feature lets the calculation time be monitored on an oscilloscope.
The following circuit diagram illustrates the signal generator to PIC connection, the RS-232 connections, and the optional oscilloscope connection."
The only thing different about this circuit is that it includes a low pass filter. This filter integrates the PWM signal that is output from pin D0 and creates a continuous, analog signal.
Code
The code for both MATLAB and the PIC32 can be found here. The code is very similar to the code found in the PIC32MX: FFT of Analog Input page. There are two main differences:
1. There is now an "analog output." This is basically a PWM that is filtered through a low pass filter. The pulse widths are modified very quickly, with the width of the pulse directly related to the amplitude of the output. Thus, a very short pulse is the same as the trough of the sine wave and a long pulse is the same as the peak of the wave.
2. This is more of a tip, but after the analog inputs are stored in the sample array, they are scaled up by a factor, in this case, 256. All this does is increase the range of the values. I found this to give results that align much better with MATLAB's results. The reason for this is that the mips_fft16 algorithm accepts int16 and int32 data the best. However, int data types can lose information since they round to the nearest integer. Thus, we can scale all the inputs to make them larger, thus yielding more accuracy (it is as if we added a few more decimal places).
Example Plot
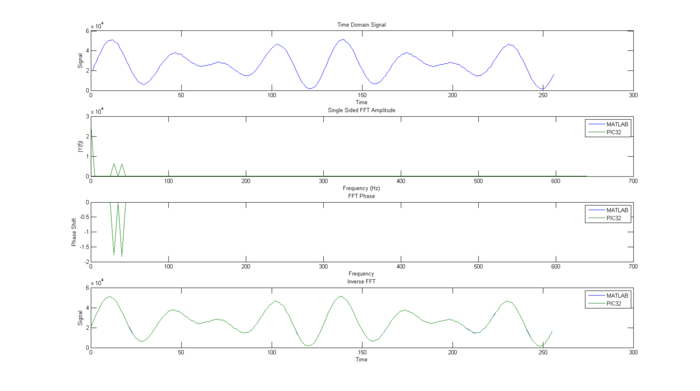
This waveform is a 30Hz sine wave superimposed on a 40Hz sine wave with the same amplitude and phase. As one can see, the FFT amplitude line up almost exactly. The phase graph has some discrepancy, but this can be easily fixed by changing the FFT phase vector to float, rather than int16. It is ok to use int16 here because the vector is not being inputted into the mips_fft algorithm. And finally, the inverse FFT matches up very nicely with the original signal, very little information is lost.

