Difference between revisions of "Using Solderless Breadboard"
| Line 7: | Line 7: | ||
There are four long rails, with all connection points in each rail mutually connected. (Some breadboards break these rails up into smaller connected chunks.) It's common to use the red ones as +5 rails and the blue ones as ground rails, though you can use them for anything if you don't get confused. The two red ones are not connected to each other, nor are the blue ones, unless you jumper them. |
There are four long rails, with all connection points in each rail mutually connected. (Some breadboards break these rails up into smaller connected chunks.) It's common to use the red ones as +5 rails and the blue ones as ground rails, though you can use them for anything if you don't get confused. The two red ones are not connected to each other, nor are the blue ones, unless you jumper them. |
||
Tips for solderless breadboards: |
<b>Tips for solderless breadboards:</b> |
||
* Don't use stranded wire |
* Don't use stranded wire |
||
| Line 16: | Line 16: | ||
* Don't expect high gain or very sensitive circuits to work |
* Don't expect high gain or very sensitive circuits to work |
||
* Move your circuits off of breadboard as soon as you can |
* Move your circuits off of breadboard as soon as you can |
||
<b>Keep it neat</b> |
|||
Neatness really counts. If you invest some effort in neat wiring it will pay off in easy debugging. If you don't, what you think are electronics problems will turn out to be frustrating wiring problems. |
|||
[[Image:555square.jpg|right]] |
|||
At right is a nicely wired triangle and square wave generator using a 555 timer chip. |
|||
* Use only solid wire. |
|||
* Cut wire to the right length, with 3/8" of exposed conductor. When the end gets kinked, throw it out. |
|||
* Cut component leads down. Use insulated jumpers (wires) rather than uninsulated component leads, to span distances. |
|||
<b>Take advantage of ribbon cable</b> |
|||
Whenever a number of conductors are involved, take advantage of ribbon cable and header strips. Not only does this keep your wiring neat, it makes it easy to connect and disconnect components, or move them from solderless breadbaord to solderboard |
|||
Every sensor and actuator is going to need a long (off board) cable running to it. This should be stranded wire, not solid wire, because solid wire breaks if it gets flexed too much. |
|||
At right I have used a 2x3 chunk of header to connect to the Faulhaber Minimotor's built in connector, then soldered 6-wide ribbon cable from there to a 1x6 header which can plug into solderless breadboard. For ease of identification I used the rainbow colors (brown=1 ... blue=6) to correspond to the standard numbering of the pins. Later I can move the same 1x6 header to solderboard. |
|||
[[Image:RibbonMotor|right]] |
|||
Revision as of 11:08, 18 January 2008
Solderless breadboard is quick and convenient for prototyping. Connections tend to come loose, especially if used in a mobile application, and they also can create electrical noise and other problems which contribute to unreliability. For these reasons it's recommended that circuit fragments be debugged on solderless breadboard and then transferred to Solderboard or to Printed Circuit Board (PCB)
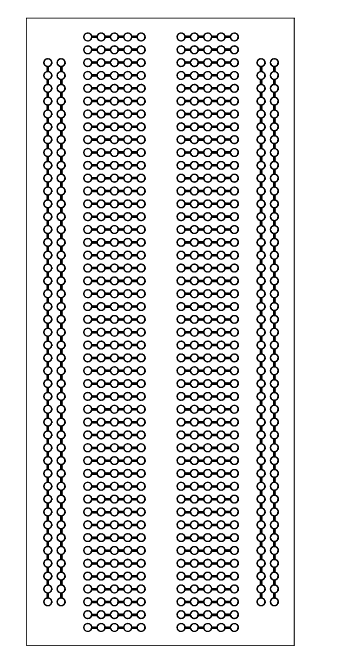
The solderless breadboard recommended (and provided for DC2008) is configured as shown at right. Insertion points are connected in groups of 5. Solid conductor wire or component leads work well in the insertion points. Stranded wire will be unreliable. Most IC chips can span the central gutter so that each IC pin is accessible as a group of 5 insertion points, only one of which is used up by the chip.
There are four long rails, with all connection points in each rail mutually connected. (Some breadboards break these rails up into smaller connected chunks.) It's common to use the red ones as +5 rails and the blue ones as ground rails, though you can use them for anything if you don't get confused. The two red ones are not connected to each other, nor are the blue ones, unless you jumper them.
Tips for solderless breadboards:
- Don't use stranded wire
- Don't use alligator clips; instead run a length of solid wire out from the test point in question, to your clip.
- Use color coded wire: red for +V, green for ground, blue for -V, yellow etc for signals...
- Don't try to get too complex on breadboard
- Don't expect high frequency circuits to work
- Don't expect high gain or very sensitive circuits to work
- Move your circuits off of breadboard as soon as you can
Keep it neat
Neatness really counts. If you invest some effort in neat wiring it will pay off in easy debugging. If you don't, what you think are electronics problems will turn out to be frustrating wiring problems.
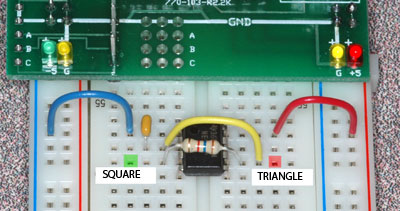
At right is a nicely wired triangle and square wave generator using a 555 timer chip.
- Use only solid wire.
- Cut wire to the right length, with 3/8" of exposed conductor. When the end gets kinked, throw it out.
- Cut component leads down. Use insulated jumpers (wires) rather than uninsulated component leads, to span distances.
Take advantage of ribbon cable
Whenever a number of conductors are involved, take advantage of ribbon cable and header strips. Not only does this keep your wiring neat, it makes it easy to connect and disconnect components, or move them from solderless breadbaord to solderboard
Every sensor and actuator is going to need a long (off board) cable running to it. This should be stranded wire, not solid wire, because solid wire breaks if it gets flexed too much.
At right I have used a 2x3 chunk of header to connect to the Faulhaber Minimotor's built in connector, then soldered 6-wide ribbon cable from there to a 1x6 header which can plug into solderless breadboard. For ease of identification I used the rainbow colors (brown=1 ... blue=6) to correspond to the standard numbering of the pins. Later I can move the same 1x6 header to solderboard.

