Difference between revisions of "IR Tracker"
| (28 intermediate revisions by 2 users not shown) | |||
| Line 1: | Line 1: | ||
| ⚫ | |||
=="Spot" the IR Tracker== |
|||
| ⚫ | |||
==Team Members== |
==Team Members== |
||
| Line 31: | Line 28: | ||
==Mechanical Design== |
==Mechanical Design== |
||
===Primary Components=== |
|||
The primary components used in this device are: |
The primary components used in this device are: |
||
| Line 41: | Line 40: | ||
* Mirror |
* Mirror |
||
* Plexiglas |
* Plexiglas |
||
[[image:Mechanical_Design.jpg|center|Mechanical Design|700px]] |
[[image:Mechanical_Design.jpg|center|Mechanical Design|700px]] |
||
| Line 48: | Line 48: | ||
[[image:Detecting_Component.jpg|right|Detecting Component|thumb|300px]] |
[[image:Detecting_Component.jpg|right|Detecting Component|thumb|300px]] |
||
===Detecting Component=== |
|||
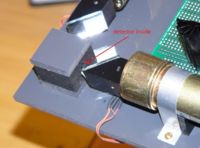
On the main plane of the device, two encoders are placed perpendicular to each other (able to track on two axises). Mirrors are placed on the output shafts of the two encoders at 45 degree angles. Two infrared detectors are placed in line with the encoders. While the encoders are constantly spinning, the mirrors detect light from the IR emitter and bounce the light to the IR detectors. |
|||
<br clear=all> |
<br clear=all> |
||
| Line 55: | Line 55: | ||
[[image:Rotating_Component.jpg|right|Rotating Component|thumb|300px]] |
[[image:Rotating_Component.jpg|right|Rotating Component|thumb|300px]] |
||
===Rotating Component=== |
|||
Below the main plane of the device, two servos are used to rotate the entire device to align the main plane to be normal to the emitter. The main plane is attached to a block of Plexiglas that surrounds a cylindrical bearing. This bearing allows the main plane to rotate along the y-axis. This block of Plexiglas is mounted on a turntable which allows the main plane to rotate along the x-axis. |
|||
<br clear=all> |
<br clear=all> |
||
==Electrical Design== |
==Electrical Design== |
||
===Primary Components=== |
|||
The primary components used in this circuit are: |
The primary components used in this circuit are: |
||
| Line 67: | Line 69: | ||
* 2 IR Detector / Emitter Pairs |
* 2 IR Detector / Emitter Pairs |
||
* 2 Hall Sensors & Small Magnets |
* 2 Hall Sensors & Small Magnets |
||
* 2 MOSFETs |
|||
* 1 H-Bridge (L298) |
|||
* 1 Inverting Schmidt Trigger (74HC14) |
* 1 Inverting Schmidt Trigger (74HC14) |
||
[[image:Circuit_Diagram.jpg|left|IR Tracker Schematic|thumb|500px]] |
[[image:Circuit_Diagram.jpg|left|IR Tracker Schematic (includes original H-Bridge in design --> use MOSFETs instead)|thumb|500px]] |
||
[[image:Circuit_Top_View.jpg|right|IR Tracker Top View|thumb|500px]] |
[[image:Circuit_Top_View.jpg|right|IR Tracker Top View|thumb|500px]] |
||
| Line 79: | Line 81: | ||
[[image:IR_Detector_Emitter.jpg|left|IR Detector|thumb|200px]] |
[[image:IR_Detector_Emitter.jpg|left|IR Detector|thumb|200px]] |
||
===IR Detector / Emitter Pairs=== |
|||
The IR Detector detects the intensity of IR light coming from the IR Emitter. Over each revolution of the encoder's output shaft, the location of the maximum IR intensity is recorded. This information is given to the PIC to determine the servo's next position. |
|||
<br clear=all> |
<br clear=all> |
||
| Line 87: | Line 89: | ||
[[image:Hall_Sensors.jpg|left|Hall Sensors|thumb|200px]] |
[[image:Hall_Sensors.jpg|left|Hall Sensors|thumb|200px]] |
||
===Hall Sensors=== |
|||
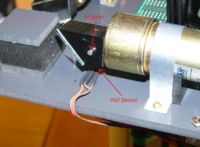
The Hall Sensors are used as a position marker for the encoders. They are located just below the output shafts of the encoders. A small magnet is placed on the side of the output shafts. As both encoder shafts spin, the Hall Sensor detects the location of the magnet. The purpose of the Hall Sensors is to use this information to sync the rotations of the two encoder shafts. |
|||
<br clear=all> |
<br clear=all> |
||
<b>PIC </b> |
|||
| ⚫ | |||
* PIC |
|||
| ⚫ | |||
<b> MOSFETs </b> |
|||
* H-Bridge |
|||
| ⚫ | |||
| ⚫ | |||
| ⚫ | |||
| ⚫ | |||
| ⚫ | |||
| ⚫ | |||
==Code== |
==Code== |
||
[[media:IR_Tracker_Code.c|See full code here]] |
[[media:IR_Tracker_Code.c|See full code here]] |
||
===Outline of Code=== |
|||
Here is a general outline of what the IR Tracker does: |
Here is a general outline of what the IR Tracker does: |
||
| Line 116: | Line 122: | ||
# Repeat steps 2-6 |
# Repeat steps 2-6 |
||
===main()=== |
|||
This is the main function of our code: |
This is the main function of our code: |
||
| Line 137: | Line 145: | ||
===runsetup()=== |
|||
The interrupts for both servos and Hall sensors are set, and motors begin to spin at full velocity. This function is only called once at the beginning of the main function. |
The interrupts for both servos and Hall sensors are set, and motors begin to spin at full velocity. This function is only called once at the beginning of the main function. |
||
| Line 177: | Line 185: | ||
</pre> |
</pre> |
||
===encodersave()=== |
|||
This records the current servo positions in the both the x and y direction. |
This records the current servo positions in the both the x and y direction. |
||
| Line 192: | Line 200: | ||
</pre> |
</pre> |
||
===positioncount()=== |
|||
This uses LEDs to represent where in the rotation the mirrors are, with one LED for each axis. The LEDs are on for half of the rotation and off for the other half. |
This uses LEDs to represent where in the rotation the mirrors are, with one LED for each axis. The LEDs are on for half of the rotation and off for the other half. |
||
| Line 218: | Line 226: | ||
</pre> |
</pre> |
||
===ircheck()=== |
|||
This finds the location of maximum infrared light in both the x-axis and y-axis. This information is originally collected as an encoder position count value, is converted into an angle in degrees and is then converted again into servo position count value, so that the servo can move to the appropriate location. |
This finds the location of maximum infrared light in both the x-axis and y-axis. This information is originally collected as an encoder position count value, is converted into an angle in degrees and is then converted again into servo position count value, so that the servo can move to the appropriate location. |
||
| Line 304: | Line 312: | ||
</pre> |
</pre> |
||
===equalize()=== |
|||
This syncs the speed and direction of the rotation of the two encoder motors. |
This syncs the speed and direction of the rotation of the two encoder motors. |
||
| Line 324: | Line 332: | ||
</pre> |
</pre> |
||
===servotrack()=== |
|||
While this function isn't in the main function, it is called in one of the interrupts. Its purpose is to slowly move the servos from their current location to its destination. |
While this function isn't in the main function, it is called in one of the interrupts. Its purpose is to slowly move the servos from their current location to its destination. |
||
| Line 378: | Line 386: | ||
==Results== |
==Results== |
||
===Final Design=== |
|||
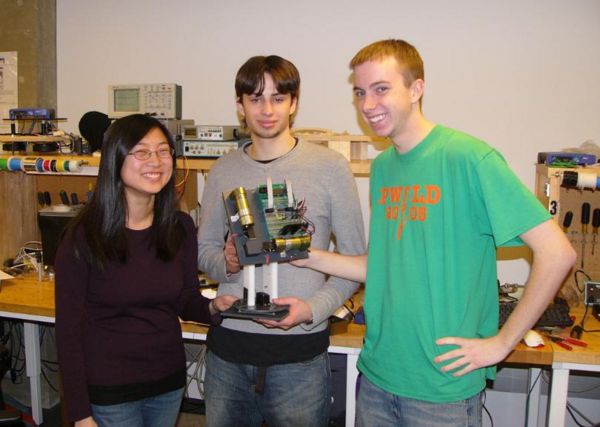
Our final design: |
|||
[[image:Final_Design.jpg|600px|center]] |
[[image:Final_Design.jpg|600px|center]] |
||
===Video=== |
|||
"See Spot Run": Click [http://depot.northwestern.edu/mht363/public_html/IR%20Track/Mar%2019%20IR%20tracker.mp4 here] to see a movie of our final project. |
|||
==Reflections== |
==Reflections== |
||
| Line 389: | Line 399: | ||
Overall, our team is very satisfied with our end result. |
Overall, our team is very satisfied with our end result. |
||
===Objectives Met=== |
|||
* Ability to locate the position of an IR emitter on two axises. |
|||
* Ability to rotate to align its plane to be normal to an IR emitter. |
|||
* Ability to continuously track an IR signal. |
|||
===Problems Encountered=== |
|||
* (Mechanical) Initially, the device had very shaky movements. We added additional screws to make the device more stable. |
|||
* (Electrical) We added Schmidt Triggers to clean up the noisy signals from the servo motors to the PICs. |
|||
* (Code) Originally coded to track direction of change of the IR emitter and supposed to move accordingly. We encountered a lot of noise. We changed the code to find the exact position of the IR emitter instead. |
|||
* (Electrical) The L298N H-bridge ended up heating up the entire circuit. In our final design, we chose to use MOSFETS in their place. |
|||
===Future Work=== |
|||
* More powerful servos and a more accurately calculated counterweight would help smooth the movement of the device. |
|||
* A more sensitive IR detector could track lower intensities of IR light in a room, instead of specifically an IR emitter. |
|||
* With more precise measurements of the relationship between the encoder and servo values, the IR Tracker could more accurately determine the position of an IR signal. |
|||
Latest revision as of 04:24, 21 March 2008
Team Members
- Mark Straccia (Mechanical Engineering, Class of 2009)
- Matt Turpin (Mechanical Engineering, Class of 2009)
- Alice Zhao (Electrical Engineering, Class of 2008)
Overview
The goal of this project was to create a device that would follow a moving infrared light. The IR Tracker does this by continuously detecting the position of an infrared emitter in two axises, and then tracking the emitter with a laser.
The IR Tracker follows two major steps: (1) Identify the position of the IR emitter (2) Rotate the device to align itself with the IR emitter.
- The IR Tracker finds the location of the maximum infrared intensity in both the x-axis and y-axis. Two encoders continuously record the position of the IR emitter based on intensity levels detected by two IT detectors.
- Given the information about the location of the IR emitter, the device rotates itself in two dimensions to adjusts its plane to be normal to the IR emitter. At this point, the laser should point to the IR emitter.
We will discuss the mechanical design, electrical design, PIC code, resulting project and our team reflections.
Mechanical Design
Primary Components
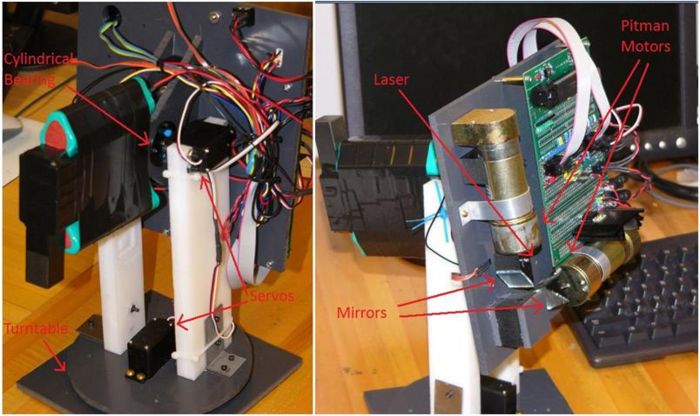
The primary components used in this device are:
- 2 Pitman Motors
- 2 RC Servos
- 1 Turntable (6031K17, McMaster-Carr, $2.20, readily available)
- 1 Cylindrical Bearing
- 1 Laser
- Mirror
- Plexiglas
Detecting Component
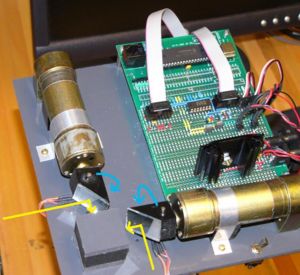
On the main plane of the device, two encoders are placed perpendicular to each other (able to track on two axises). Mirrors are placed on the output shafts of the two encoders at 45 degree angles. Two infrared detectors are placed in line with the encoders. While the encoders are constantly spinning, the mirrors detect light from the IR emitter and bounce the light to the IR detectors.
Rotating Component
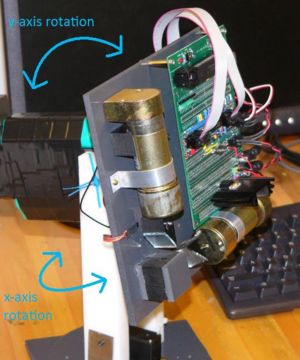
Below the main plane of the device, two servos are used to rotate the entire device to align the main plane to be normal to the emitter. The main plane is attached to a block of Plexiglas that surrounds a cylindrical bearing. This bearing allows the main plane to rotate along the y-axis. This block of Plexiglas is mounted on a turntable which allows the main plane to rotate along the x-axis.
Electrical Design
Primary Components
The primary components used in this circuit are:
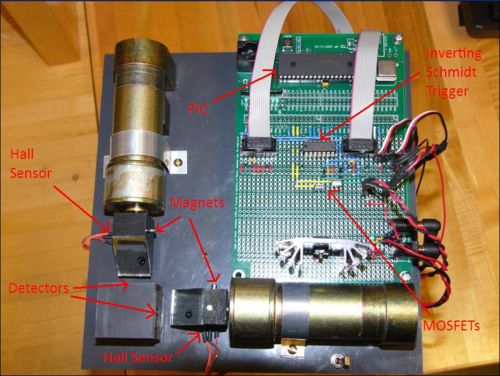
- 1 PIC (18F4520)
- 2 IR Detector / Emitter Pairs
- 2 Hall Sensors & Small Magnets
- 2 MOSFETs
- 1 Inverting Schmidt Trigger (74HC14)
IR Detector / Emitter Pairs
The IR Detector detects the intensity of IR light coming from the IR Emitter. Over each revolution of the encoder's output shaft, the location of the maximum IR intensity is recorded. This information is given to the PIC to determine the servo's next position.
Hall Sensors
The Hall Sensors are used as a position marker for the encoders. They are located just below the output shafts of the encoders. A small magnet is placed on the side of the output shafts. As both encoder shafts spin, the Hall Sensor detects the location of the magnet. The purpose of the Hall Sensors is to use this information to sync the rotations of the two encoder shafts.
PIC
The PIC is the central controller of the IR Tracker.
MOSFETs
The MOSFETs are used as intermediate components between the PIC and the servo motors. It allows the Pittman motors to run in one direction.
Inverting Schmidt Trigger
The Schmidt Trigger acts as an intermediate between both the PIC to the encoders on the motors and the PIC to the Hall Sensors. It helps filter out noisy signals and invert signals to be readable for the PIC.
Code
Outline of Code
Here is a general outline of what the IR Tracker does:
- Spin encoder shafts
- Record current position of the servo
- Determine location of the maximum IR intensity detected
- Convert encoder position to servo position
- Rotate the main plane to the new servo position
- Sync rotations of the two encoder shafts
- Repeat steps 2-6
main()
This is the main function of our code:
void main()
{
   runsetup();

   while (TRUE)
   {
      encodersave();
      positioncount();
      ircheck();
      equalize();
   }
}
The five functions it encompasses are described in detail below.
runsetup()
The interrupts for both servos and Hall sensors are set, and motors begin to spin at full velocity. This function is only called once at the beginning of the main function.
void runsetup()
{
   setup_timer_0(RTCC_EXT_L_TO_H | RTCC_DIV_1);       //External input from quadrature encoder 0
   setup_timer_1(T1_EXTERNAL | T1_DIV_BY_1);          //External input from quadrature encoder 1
   setup_timer_2(T2_DIV_BY_4, 255, 5);                //Servo incrememnting timer at 1 kHz
   setup_timer_3(T3_INTERNAL | T3_DIV_BY_4);          //Servo reseting timer

   enable_interrupts(INT_TIMER2);                     //Enable ISR2 for servo
   enable_interrupts(INT_TIMER3);                     //Enable ISR3 for servo
   enable_interrupts(INT_EXT);                        //Enable Interrupt for Hall sensor X
   enable_interrupts(INT_EXT1);                       //Enable Interrupt for Hall sensor Y
   enable_interrupts(global);

   setup_ccp1(ccp_pwm);                               //Setup PWM1
   setup_ccp2(ccp_pwm);                               //Setup PWM2

   set_timer0(0);                                     //Clear starting point of counters
   set_timer1(0);

   set_PWM1_duty(0);                                  //Motors off for startup
   set_PWM2_duty(0);

   for(ii=0;ii<3;ii++)                                //Start up flashing lights
   {
      output_d(0x55);
      delay_ms(100);
      output_d(0);
      delay_ms(100);
   }

   set_PWM1_duty(1023);                               //Motors start at full velocity
   set_PWM2_duty(1023);
}
encodersave()
This records the current servo positions in the both the x and y direction.
void encodersave()                                    //Counters will return the number of pulses to the inputs.
{
   PositionCountX = get_timer0();                     //Relative position of the X encoder
   delay_us(10);

   PositionCountY = get_timer1();                     //Relative position of the Y encoder
   delay_us(10);
}
positioncount()
This uses LEDs to represent where in the rotation the mirrors are, with one LED for each axis. The LEDs are on for half of the rotation and off for the other half.
void positioncount()                                  //Gives visual information about where in the rotation the mirrors are
{
   if (PositionCountX >4875)
   {
      output_high(pin_D3);
   }
   else if(PositionCountX>0)
   {
      output_low(pin_D3);
   }
   if (PositionCountY > 4875)
   {
      output_high(pin_D4);
   }
   else if(PositionCountY>0)
   {
      output_low(pin_D4);
   }
}
ircheck()
This finds the location of maximum infrared light in both the x-axis and y-axis. This information is originally collected as an encoder position count value, is converted into an angle in degrees and is then converted again into servo position count value, so that the servo can move to the appropriate location.
void ircheck()                                        //Check to see where in the rotation
{
   if(PositionCountX<4875)                            //First half of rotation, facing up
   {
      if(input(PIN_C6)==0)                            //If IR detector is detecting encoded signal
      {
         output_high(PIN_D5);                         //Gives visual representation
         MomentX+=PositionCountX;                     //Increase moment count by position
         MomentCountX+=1;                             //Increase count of moments
      }
      else
      {
         output_low(PIN_D5);                          //Clear B5 if mirror is facing down
      }
   }
   else if((PositionCountX>=4875)&&(MomentCountX>5)) //Runs when this function is called and IR detector
   {
      AverageAngleX = (MomentX/MomentCountX);         //Average the moment to give the center of IR in terms of motor encoder counts

      if (((AverageAngleX)>650)&&((AverageAngleX)<4800))
      {
         AnglePositionX = 3647-23*AverageAngleX/34;   //Convert motor encoder counts to servo values

         if (ServoCurrent[0] + AnglePositionX < 1950) //Less than 90 degress
         {
            ServoTargetX = 400;
         }
         else if (ServoCurrent[0] + AnglePositionX> 4250) //Greater than 450 degrees
         {
            ServoTargetX = 2700;
         }
         else                                         //between 90 and 450 degrees
         {
            ServoTargetX = AnglePositionX + ServoCurrent[0] - 1550;
         }
      }
      MomentX = 0;                                    //reset moment variables
      MomentCountX = 0;
   }

   if(PositionCountY<4875)
   {
      if(input(PIN_C5)==0)
      {
         output_high(PIN_D6);
         MomentY+=PositionCountY;
         MomentCountY+=1;
      }
      else
      {
         output_low(PIN_D6);
      }
   }
   else if((PositionCountY>=4875)&&(MomentCountY>5))
   {
      AverageAngleY = (MomentY/MomentCountY);

      if (((AverageAngleY)>650)&&((AverageAngleY)<4800))
      {
         AnglePositionY = 3647-23*AverageAngleY/34;

         // find target location in terms of servo counts
         if (ServoCurrent[1] + AnglePositionY < 1950) //less than 90 degress
         {
            ServoTargetY = 400;
         }
         else if (ServoCurrent[1] + AnglePositionY> 4250) // greater 450 deg
         {
            ServoTargetY = 2700;
         }
         else
         {
            ServoTargetY = AnglePositionY + ServoCurrent[1] - 1550;
         }
      }
      MomentY = 0;
      MomentCountY = 0;
   }
}
equalize()
This syncs the speed and direction of the rotation of the two encoder motors.
void equalize()                                       //puts motors in phase with each other
{
  if(PositionCountX>PositionCountY)
  {
     set_PWM1_duty(850);
     set_PWM2_duty(1023);
  }
  else if (PositionCountX<PositionCountY)
  {
     set_PWM2_duty(850);
     set_PWM1_duty(1023);
  }
}
servotrack()
While this function isn't in the main function, it is called in one of the interrupts. Its purpose is to slowly move the servos from their current location to its destination.
void servotrack() //Slowly adjusts the pulsing of the servo to place the plan in the appropriate location
{
if(((SlowServoX>15)&&(abs(ServoTargetX-ServoCurrent[0])>5))||((SlowServoX>8)&&(abs(ServoTargetX-ServoCurrent[0])>125))
  ||((SlowServoX>3)&&(abs(ServoTargetX-ServoCurrent[0])>450))||SlowServoX>100)  //Can be used to slow down motion of Servos
   {
      if (ServoCurrent[0] < ServoTargetX - ServoMove)
      {
         ServoNextX = ServoCurrent[0] + ServoMove;
         ServoCurrent[0] = ServoNextX;
      }
      else if (ServoCurrent[0] > ServoTargetX + ServoMove)
      {
         ServoNextX = ServoCurrent[0] - ServoMove;
         ServoCurrent[0] = ServoNextX;
      }
      else
      {
         ServoCurrent[0] = ServoTargetX;
      }
      SlowServoX=0;
   }
   if(((SlowServoY>15)&&(abs(ServoTargetY-ServoCurrent[1])>5))||((SlowServoY>8)&&(abs(ServoTargetY-ServoCurrent[1])>125))
     ||((SlowServoY>3)&&(abs(ServoTargetY-ServoCurrent[1])>450))||SlowServoY>100)

   {
      if (ServoCurrent[1] < ServoTargetY - ServoMove)
      {
         ServoNextY = ServoCurrent[1] + ServoMove;
         ServoCurrent[1] = ServoNextY;
      }
      else if (ServoCurrent[1] > ServoTargetY + ServoMove)
      {
         ServoNextY = ServoCurrent[1] - ServoMove;
         ServoCurrent[1] = ServoNextY;
      }
      else
      {
         ServoCurrent[1] = ServoTargetY;
      }
      SlowServoY=0;
   }

   SlowServoX++;
   SlowServoY++;
}
Results
Final Design
Video
"See Spot Run": Click here to see a movie of our final project.
Reflections
Overall, our team is very satisfied with our end result.
Objectives Met
- Ability to locate the position of an IR emitter on two axises.
- Ability to rotate to align its plane to be normal to an IR emitter.
- Ability to continuously track an IR signal.
Problems Encountered
- (Mechanical) Initially, the device had very shaky movements. We added additional screws to make the device more stable.
- (Electrical) We added Schmidt Triggers to clean up the noisy signals from the servo motors to the PICs.
- (Code) Originally coded to track direction of change of the IR emitter and supposed to move accordingly. We encountered a lot of noise. We changed the code to find the exact position of the IR emitter instead.
- (Electrical) The L298N H-bridge ended up heating up the entire circuit. In our final design, we chose to use MOSFETS in their place.
Future Work
- More powerful servos and a more accurately calculated counterweight would help smooth the movement of the device.
- A more sensitive IR detector could track lower intensities of IR light in a room, instead of specifically an IR emitter.
- With more precise measurements of the relationship between the encoder and servo values, the IR Tracker could more accurately determine the position of an IR signal.
