Difference between revisions of "Stepper Motor Circuits"
m |
|||
| (34 intermediate revisions by 2 users not shown) | |||
| Line 4: | Line 4: | ||
To control a stepper motor, you have to energize each winding individually in a specific and timed order. The energizing is accomplished by a driver circuit (an amplifier). The timing is performed by an indexer circuit and the objective (go forward, go backward, brake, coast, etc.) is controlled by some external user interface, such as a computer or joystick. The figure below shows this process. |
To control a stepper motor, you have to energize each winding individually in a specific and timed order. The energizing is accomplished by a driver circuit (an amplifier). The timing is performed by an indexer circuit and the objective (go forward, go backward, brake, coast, etc.) is controlled by some external user interface, such as a computer or joystick. The figure below shows this process. |
||
[[image:stepper motor block diagram.jpg|500px]] |
[[image:stepper motor block diagram.jpg|500px|center]] |
||
| Line 12: | Line 12: | ||
Care must be taken in the driver circuit to protect against voltage spikes. Because the motor windings are inductors, switching off the power to the winding produces a short burst of voltage. To protect against this, always put a diode in parallel with the winding, making sure the diode can handle the winding current. This is shown in the following figure. |
Care must be taken in the driver circuit to protect against voltage spikes. Because the motor windings are inductors, switching off the power to the winding produces a short burst of voltage. To protect against this, always put a diode in parallel with the winding, making sure the diode can handle the winding current. This is shown in the following figure. |
||
[[image:winding diagram.jpg|200px]] |
[[image:winding diagram.jpg|200px|center]] |
||
===Unipolar Stepper Driver Circuit=== |
===Unipolar Stepper Driver Circuit=== |
||
| Line 18: | Line 18: | ||
The basic drive circuitry for a single unipolar winding is shown in the following figure. |
The basic drive circuitry for a single unipolar winding is shown in the following figure. |
||
[[image:unipolar driver digram.jpg|300px]] |
[[image:unipolar driver digram.jpg|300px|center]] |
||
For the switches, any kind of switching technology can be used. The following figure shows two such switches. The first one uses a power darlington transistor and the second one uses a power field effect transistor. |
For the switches, any kind of switching technology can be used. The following figure shows two such switches. The first one uses a power darlington transistor and the second one uses a power field effect transistor. |
||
[[image:unipolar switch circuits.jpg]] |
[[image:unipolar switch circuits.jpg|center]] |
||
For driving a full stepper motor, with multiple coils, you can either build each of the above circuits individually, or you can use a integrated chip. One such chip is the DS2003, which is a darlington array, and is shown below. This chip can be used when the total current to each winding is less than 500 milliamps. |
For driving a full stepper motor, with multiple coils, you can either build each of the above circuits individually, or you can use a integrated chip. One such chip is the [[media:DS2003.pdf|DS2003]], which is a darlington array, and is shown below. This chip can be used when the total current to each winding is less than 500 milliamps. |
||
[[image:ds2003.png|300px]] |
[[image:ds2003.png|center|300px]] |
||
===Bipolar Stepper Driver Circuit=== |
===Bipolar Stepper Driver Circuit=== |
||
Bipolar stepper drivers use H-bridges to energize the windings of the motor. H-bridges allow you to |
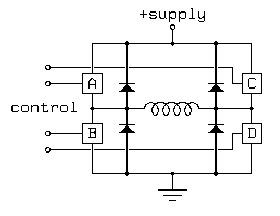
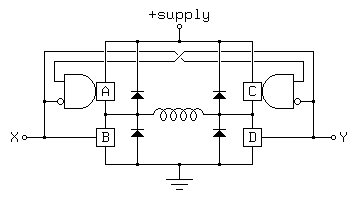
Bipolar stepper drivers use H-bridges to energize the windings of the motor. H-bridges allow you to choose the direction of the current through the winding. Using an H-bridge configuration, there are four transistors for each winding as shown in the first figure below. However, most of the time they are prewired together so that only two inputs are needed. This makes generating pulses easier and also serves to protect against short circuits. This circuit is shown in the second figure below. |
||
{| align="center" |
{| align="center" |
||
| Line 52: | Line 52: | ||
|} |
|} |
||
You should be able to drive a bipolar motor with a unipolar motor circuit. The only difference is that there are no center winding taps to connect to the power source. Somebody correct me? |
|||
==Indexing== |
==Indexing== |
||
There are many methods of producing the index pulses needed to drive stepper motors. This can either be done using a microprocessor or an integrated circuit. The calculations will most likely be so burdensome that the microprocessor would be unable to do any other calculations while producing the pulse trains. However, there are many cheap microcontrollers available these days and they could be used as dedicated indexers. |
|||
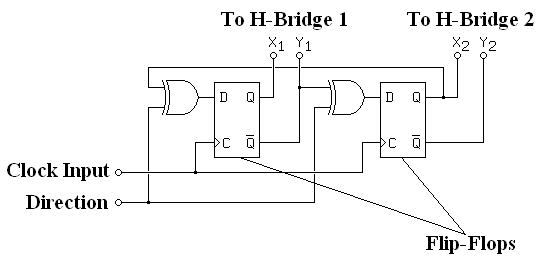
Most indexers have similar inputs and are intended to control the speed and direction of the motor. The logic diagram shows how this is accomplished. |
|||
| ⚫ | |||
===L297=== |
|||
'''Digikey Part #: 497-1394-5-ND''' |
|||
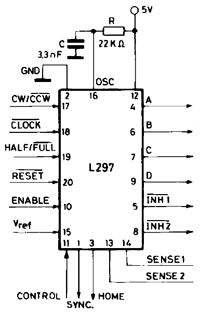
The [[media:L297.pdf|L297]] is a 20-pin DIP chip that was designed specifically to control either unipolar or bipolar stepper motors. It will control two H-bridges to power two windings. Its inputs control the speed and direction of the motor. The diagram below shows the typical setup of the circuit. The A and B outputs would correspond to the X and Y inputs on the H-bridge of the first winding (see above). Likewise, the C and D outputs would correspond to the X and Y inputs on the second winding. |
|||
[[image:l297.png|center]] |
|||
This chip was specifically designed to interface with the L298N stepper motor driver chip, which is also found in the lab. [[media:L297 and L298.pdf|See this document]]. |
|||
===[[PIC16F684]]=== |
|||
The PIC16F684, which is available in the lab, is a good programmable microcontroller ideally suited for controlling stepper motors. |
|||
[[media:PIC Stepper Control.pdf|Read this document]] |
|||
==Integrated Circuits== |
==Integrated Circuits== |
||
| Line 60: | Line 81: | ||
===MC3479=== |
===MC3479=== |
||
'''Allied Electronics Part #: 568-9170''' |
|||
| ⚫ | |||
| ⚫ | |||
{| |
|||
{| align="center" |
|||
|- |
|- |
||
| [[image:mc3479.png| |
| [[image:mc3479.png|center]] |
||
|- |
|||
| ⚫ | |||
| [[image:mc3479 circuit.png|center]] |
|||
|} |
|} |
||
==References== |
==References== |
||
*"Stepper Motor Basics", http://www.ams2000.com/pdf/step101.pdf |
* "Stepper Motor Basics", http://www.ams2000.com/pdf/step101.pdf |
||
*"Jones on Stepping Motor Control Circuits", http://www.cs.uiowa.edu/~jones/step/circuits.html |
* "Jones on Stepping Motor Control Circuits", http://www.cs.uiowa.edu/~jones/step/circuits.html |
||
* MC3479, http://www.onsemi.com/pub/Collateral/MC3479-D.PDF |
|||
* L297, http://www.st.com/stonline/books/pdf/docs/1334.pdf |
|||
Latest revision as of 17:57, 26 February 2008
Basics
To control a stepper motor, you have to energize each winding individually in a specific and timed order. The energizing is accomplished by a driver circuit (an amplifier). The timing is performed by an indexer circuit and the objective (go forward, go backward, brake, coast, etc.) is controlled by some external user interface, such as a computer or joystick. The figure below shows this process.
Drivers
The circuits for driving unipolar and bipolar stepper motors differ because bipolar stepper motors don't have a "center tap." However, it is possible to use bipolar drivers to drive unipolar steppers after some small modifications.
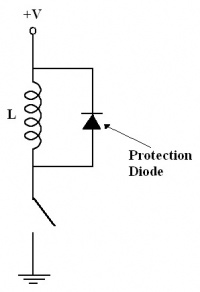
Care must be taken in the driver circuit to protect against voltage spikes. Because the motor windings are inductors, switching off the power to the winding produces a short burst of voltage. To protect against this, always put a diode in parallel with the winding, making sure the diode can handle the winding current. This is shown in the following figure.
Unipolar Stepper Driver Circuit
The basic drive circuitry for a single unipolar winding is shown in the following figure.
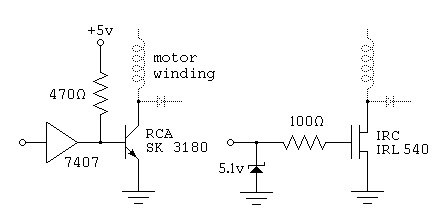
For the switches, any kind of switching technology can be used. The following figure shows two such switches. The first one uses a power darlington transistor and the second one uses a power field effect transistor.
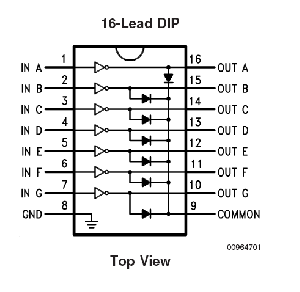
For driving a full stepper motor, with multiple coils, you can either build each of the above circuits individually, or you can use a integrated chip. One such chip is the DS2003, which is a darlington array, and is shown below. This chip can be used when the total current to each winding is less than 500 milliamps.
Bipolar Stepper Driver Circuit
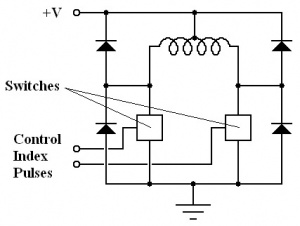
Bipolar stepper drivers use H-bridges to energize the windings of the motor. H-bridges allow you to choose the direction of the current through the winding. Using an H-bridge configuration, there are four transistors for each winding as shown in the first figure below. However, most of the time they are prewired together so that only two inputs are needed. This makes generating pulses easier and also serves to protect against short circuits. This circuit is shown in the second figure below.
|
|
The table below shows the result of each possible control input.
| XY | ABCD | Mode |
|---|---|---|
| 00 | 0000 | coast |
| 01 | 1001 | forward |
| 10 | 0110 | reverse |
| 11 | 1111 | brake |
You should be able to drive a bipolar motor with a unipolar motor circuit. The only difference is that there are no center winding taps to connect to the power source. Somebody correct me?
Indexing
There are many methods of producing the index pulses needed to drive stepper motors. This can either be done using a microprocessor or an integrated circuit. The calculations will most likely be so burdensome that the microprocessor would be unable to do any other calculations while producing the pulse trains. However, there are many cheap microcontrollers available these days and they could be used as dedicated indexers.
Most indexers have similar inputs and are intended to control the speed and direction of the motor. The logic diagram shows how this is accomplished.
L297
Digikey Part #: 497-1394-5-ND
The L297 is a 20-pin DIP chip that was designed specifically to control either unipolar or bipolar stepper motors. It will control two H-bridges to power two windings. Its inputs control the speed and direction of the motor. The diagram below shows the typical setup of the circuit. The A and B outputs would correspond to the X and Y inputs on the H-bridge of the first winding (see above). Likewise, the C and D outputs would correspond to the X and Y inputs on the second winding.
This chip was specifically designed to interface with the L298N stepper motor driver chip, which is also found in the lab. See this document.
PIC16F684
The PIC16F684, which is available in the lab, is a good programmable microcontroller ideally suited for controlling stepper motors.
Integrated Circuits
MC3479
Allied Electronics Part #: 568-9170
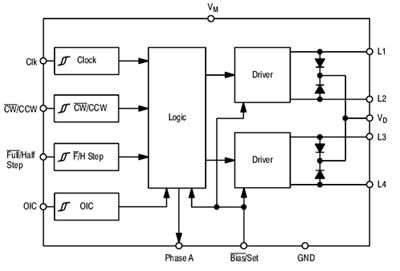
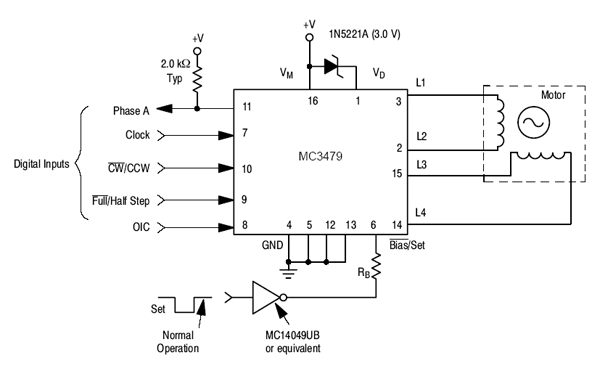
The MC3479 is a single-chip stepper motor driver that can handle 350mA per winding. There are several high-level digital inputs that control the speed and direction of the motor. The first figure below shows the internal circuitry and the second picture shows a typical setup.
References
- "Stepper Motor Basics", http://www.ams2000.com/pdf/step101.pdf
- "Jones on Stepping Motor Control Circuits", http://www.cs.uiowa.edu/~jones/step/circuits.html
- MC3479, http://www.onsemi.com/pub/Collateral/MC3479-D.PDF
- L297, http://www.st.com/stonline/books/pdf/docs/1334.pdf

