Difference between revisions of "Using RS-232 and Printing to LCD"
| (37 intermediate revisions by 3 users not shown) | |||
| Line 1: | Line 1: | ||
__TOC__ |
__TOC__ |
||
This tutorial will show how to print text and data to the Seetron BPI-216 LCD module. |
|||
==Files== |
==Files== |
||
Download the files you need here: [[Media:BPI_216_Send_v1.zip|Matlab and Simulink files]]. |
Download the files you need here: [[Media:BPI_216_Send_v1.zip|Matlab and Simulink files]]. |
||
Download the user's guide for the Seetron BPI 216 LCD display here: [[Media:_RS232_Seetron_BPI_216.pdf|Seetron BPI 216 User's Guide]]. |
Download the user's guide for the Seetron BPI 216 LCD display here: [[Media:_RS232_Seetron_BPI_216.pdf|Seetron BPI 216 User's Guide]]. |
||
Go to [http://www.seetron.com/ www.seetron.com] for more info and tools for the LCD screen. |
|||
==Getting Started== |
==Getting Started== |
||
1.Plug the Seetron BPI-216 LCD display into the COM1 serial port of the target PC, and power the display (see the LCD display’s user’s guide for more information) If you wish to use COM2, see "Changing COM Ports" later in this article. |
1.Plug the Seetron BPI-216 LCD display into the COM1 serial port of the target PC, and power the display (see the LCD display’s user’s guide for more information) If you wish to use COM2, see "Changing COM Ports" later in this article. '''''Note:''' There may be a bug that causes your stack to crash when you use COM2.'' |
||
[[Image:RS232_com1.jpg]] |
[[Image:RS232_com1.jpg]] |
||
2.Copy the file ''RS232Async_Messages.m'' into your work folder. This file contains a data structure that holds configuration parameters for the RS232_Send block within the BPI_216_Send subsystem. Open the ''BPI_216_Send.mdl'' file and copy the BPI_216_Send block into your own model. The other blocks in BPI_216_Send.mdl are just for demonstration purposes. |
2.Copy the file ''RS232Async_Messages.m'' into your work folder. This file contains a data structure that holds configuration parameters for the RS232_Send block within the BPI_216_Send subsystem. '''The model should automatically run the RS232Async_Messages script upon loading. If it doesn't, or if you clear your workspace later on, run the ''RS232Async_Messages.m'' script before compiling the program.''' Open the ''BPI_216_Send.mdl'' file and copy the BPI_216_Send block into your own model. The other blocks in BPI_216_Send.mdl are just for demonstration purposes. |
||
3.To output text to the BPI-216 LCD display using the BPI_216_Send block, the system that is deciding which message to output needs to output a number of data type ''double'' (see ''double'' in the MATLAB help files for more information on data types). The BPI_216_Send subsystem will read this number and display the corresponding message. ''(Note: the default time step of BPI_216_Send is 0.01 seconds. BPI_216_Send’s time step must be an integer multiple of your main system’s time step.)'' |
3.To output static predefined text messages to the BPI-216 LCD display using the BPI_216_Send block, the system that is deciding which message to output needs to output a number of data type ''double'' (see ''double'' in the MATLAB help files for more information on data types). The BPI_216_Send subsystem will read this number and display the corresponding message. ''(Note: the default time step of BPI_216_Send is 0.01 seconds. BPI_216_Send’s time step must be an integer multiple of your main system’s time step.)'' |
||
Figure 1 shows how to hook up the system:<br> |
Figure 1 shows how to hook up the system:<br> |
||
[[Image:RS232_LCD_connections. |
[[Image:RS232_LCD_connections.png]]<br> |
||
Figure 1<br> |
''Figure 1''<br> |
||
The input port ''data1'' will be used later on to send variables to the system, but if only want to display messages, you can delete this port or ground it to aviod a compiler warning about a disconnected input. |
The input port ''data1'' will be used later on to send variables to the system, but if only want to display static messages, you can delete this port or ground it to aviod a compiler warning about a disconnected input. |
||
==Displaying Text Messages== |
==Displaying Text Messages== |
||
| Line 30: | Line 34: | ||
See Figure 2:<br> |
See Figure 2:<br> |
||
[[Image:RS232_LCD_messageselect. |
[[Image:RS232_LCD_messageselect.png]]<br> |
||
Figure 2<br> |
''Figure 2''<br> |
||
The number outputted by your main system will be read in as the variable msgID. The switch-case control structure will find the case that matches the value of msgID, and print out the message corresponding message, displaying the message under otherwise if no match if found. Replace message_1, message_2, and message_default with your own message, preserving the single quotes. You may add or remove as many cases as you need, but case "otherwise" '''must''' be defined. |
The number outputted by your main system will be read in as the variable msgID. The switch-case control structure will find the case that matches the value of msgID, and print out the message corresponding message, displaying the message under otherwise if no match if found. Replace message_1, message_2, and message_default with your own message, preserving the single quotes. You may add or remove as many cases as you need, but case "otherwise" '''must''' be defined. |
||
| Line 39: | Line 43: | ||
==Displaying Variable Values== |
==Displaying Variable Values== |
||
===If the variable is numeric=== |
===If the variable is numeric=== |
||
If you wish to display numeric data you must add an input port to the ''message_select'' m-function to accept the incoming data. Add or remove as many input ports as you need, and beware that you may need to insert a "rate transation" block between the data source and ''message_select.'' |
If you wish to display numeric data you must add an input port to the ''message_select'' m-function to accept the incoming data. Add or remove as many input ports as you need, and beware that you may need to insert a "rate transation" block between the data source and ''message_select.'' |
||
'''''Note:''' you don't have to worry about the size of the variable for this case, because any number stored as type "double" takes up the same amount of space in the memory. On the other hand, a text string is an array of 8-bit integers, so the size in memory of a text string is determined by its length.'' |
|||
| ⚫ | |||
| ⚫ | |||
Your system now looks something like this: |
Your system now looks something like this: |
||
[[Image:RS232_LCD_data_setup. |
[[Image:RS232_LCD_data_setup.png]] |
||
Note the rate transitions: |
Note the rate transitions: |
||
[[Image:RS232_LCD_ratetransition. |
[[Image:RS232_LCD_ratetransition.png]] |
||
Use the subfunction ''numtostr'' to convert it into a uint8 vector (because Simulink does not support string data types, we cannot simply use num2str for this). Simply insert numtostr(''yourdata'') in between strings, as shown in the figure below (Note:be sure to put blank spaces around ''numtostr()'', or you will get a compiler error) |
Use the subfunction ''numtostr'' to convert it into a uint8 vector (because Simulink does not support string data types, we cannot simply use num2str for this). Simply insert numtostr(''yourdata'') in between strings, as shown in the figure below (Note:be sure to put blank spaces around ''numtostr()'', or you will get a compiler error.) |
||
'''''Warning:''' if you don't use "numtostr," the program will try to read your number as an ASCII code, not a numeric value.'' |
|||
| ⚫ | |||
| ⚫ | |||
| ⚫ | You must manually set how many digits ''numtostr'' will display. Open the ''message_select'' m-function block, and scroll towards the bottom until you find the function header for ''numtostr''. Set number of integer places(int_p) and decimal places(dec_p) that you want displayed. If the inputted number has more integer places than int_p, the offending most significant digits will be lost. Negative numbers will need an additional integer place to hold the negative sign. Unused integer spaces will be filled in by blank spaces, and |
||
| ⚫ | You must manually set how many digits ''numtostr'' will display. Open the ''message_select'' m-function block, and scroll towards the bottom until you find the function header for ''numtostr''. Set number of integer places(int_p) and decimal places(dec_p) that you want displayed. If the inputted number has more integer places than int_p, the offending most significant digits will be lost. Negative numbers will need an additional integer place to hold the negative sign. Unused integer spaces will be filled in by blank spaces, and unused decimal places will be filled with zeros. |
||
| ⚫ | |||
| ⚫ | |||
===If the variable is a text string=== |
===If the variable is a text string=== |
||
If you want to send text to the system via a variable, you must make sure the variable is always the same size. For example, if you wanted ''data1'' to be the words "true" and "false, you could program it like this in your main program: |
If you want to send text to the system via a variable, you must make sure the variable is always the same size. Again, use uint8() to prevent a data type mismatch. For example, if you wanted ''data1'' to be the words "true" and "false, you could program it like this in your main program: |
||
<pre> |
<pre> |
||
if x==1 |
if x==1 |
||
| Line 69: | Line 77: | ||
</pre> |
</pre> |
||
Note that there is a blank space after the word "true" to make it the same length as "false". |
Note that there is a blank space after the word "true" to make it the same length as "false". |
||
In your main program, you would format the message like this: |
|||
[text,numPages]=lcd_text(uint8(['data1 is set to' data1 'right now.'])) |
|||
===Specifying data types=== |
===Specifying data types=== |
||
You should also specify the data type of the variable ('''uint8''' if the variable is text, '''double''' if it is numeric) at the function ''message_select''. ''Note: if your variable is numeric, the function may still work because Simulink chooses "double" by default. To make the model display port data types, go to the menu and select '''Format>Port/Signal Displays>Port Data Types'''.'' To specify data types (also see the figure below): |
You should also specify the data type of the variable ('''uint8''' if the variable is text, '''double''' if it is numeric) at the function ''message_select''. ''Note: if your variable is numeric, the function may still work because Simulink chooses "double" by default. To make the model display port data types, go to the menu and select '''Format>Port/Signal Displays>Port Data Types'''.'' To specify data types (also see the figure below): |
||
#right-click on the ''' |
#right-click on the '''Message Bank/Selector''' block |
||
#select ''' |
#select '''Explore''' |
||
#Inside the '''Model Hierarchy''' frame, select '''BPI_216_Send'''. |
#Inside the '''Model Hierarchy''' frame, select '''BPI_216_Send'''. |
||
#Inside the '''Contents of BPI_216_Send''' frame, select '''data1'''. |
#Inside the '''Contents of BPI_216_Send''' frame, select '''data1'''. |
||
| Line 80: | Line 91: | ||
#Under the '''data type''' menu, select '''uint8''' if data1 is a text string, or '''double''' if data1 is a numeric value. |
#Under the '''data type''' menu, select '''uint8''' if data1 is a text string, or '''double''' if data1 is a numeric value. |
||
[[Image:RS232_LCD_select_datatype. |
[[Image:RS232_LCD_select_datatype.png]] |
||
===Quick test=== |
|||
As a quick test, hook up the system like this: |
|||
[[Image:RS232_LCD_quicktest1.png]] |
|||
Then, enter the following into the message bank: |
|||
[[Image:RS232_LCD_quicktest2.png]] |
|||
Load the program and change the gains while it is running. You should be able to change both the message ID and the data variable by manipulating the gains. |
|||
==Integrating with your own model== |
|||
To integrate this system into your own Simulink model, simply copy and paste the entire '''BPI_216_Send''' block, and copy the '''RS232Async_Messages.m''' file into your work directory. Then, in drop-down menu, go to '''File>Model Properties>Callback>PreloadFcn''' and enter ''RS232Async_Messages''. This will make the model run the RS232Async_Message script upon loading, or else you will have to run it manually before you compile the program. |
|||
[[Image:RS232_LCD_preloadfcn.png]] |
|||
==The maxPages variable== |
==The maxPages variable== |
||
The maxPages variable will set maximum number of "pages" your message can be; each page being one of the separate screens needed to display a long message (remember, Simulink doesn' have dynamic memory allocation for input/output variables, so you have to tell it how big the array is). The LCD screenn holds 32 characters, so the maximum number of characters (including white spaces) a message can contain is equal to 32*maxPages. There is also a local variable maxPages in the subfunction ''lcd_text''; '''both values of ''maxPages'' must match |
The maxPages variable will set maximum number of "pages" your message can be; each page being one of the separate screens needed to display a long message (remember, Simulink doesn't have dynamic memory allocation for input/output variables, so you have to tell it how big the array is). The LCD screenn holds 32 characters, so the maximum number of characters (including white spaces) a message can contain is equal to 32*maxPages. There is also a local variable maxPages in the subfunction ''lcd_text''; '''both values of ''maxPages'' must match''' (unfortunately, global variables are not supported). A small value of ''maxPages'' will reduce the overhead memory and CPU cycles needed to run the system, so don't make ''maxPages'' larger than it has to be. |
||
==Changing COM Ports== |
==Changing COM Ports== |
||
| Line 98: | Line 125: | ||
Set the variable ''pageRate'' to the time you want between screen changes, in seconds. |
Set the variable ''pageRate'' to the time you want between screen changes, in seconds. |
||
==Further Development== |
|||
Here are some files provided by Mathworks tech support that can send stuff to RS232: [[Media:RS232_Mathworks_model.zip|Mathworks RS232 mdl]] |
|||
[[Category:xPC]] |
[[Category:xPC]] |
||
Latest revision as of 17:38, 29 November 2006
This tutorial will show how to print text and data to the Seetron BPI-216 LCD module.
Files
Download the files you need here: Matlab and Simulink files.
Download the user's guide for the Seetron BPI 216 LCD display here: Seetron BPI 216 User's Guide.
Go to www.seetron.com for more info and tools for the LCD screen.
Getting Started
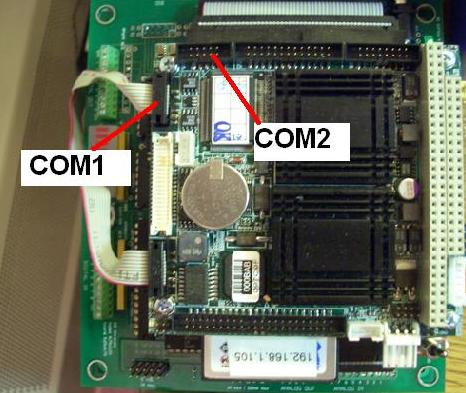
1.Plug the Seetron BPI-216 LCD display into the COM1 serial port of the target PC, and power the display (see the LCD display’s user’s guide for more information) If you wish to use COM2, see "Changing COM Ports" later in this article. Note: There may be a bug that causes your stack to crash when you use COM2.
2.Copy the file RS232Async_Messages.m into your work folder. This file contains a data structure that holds configuration parameters for the RS232_Send block within the BPI_216_Send subsystem. The model should automatically run the RS232Async_Messages script upon loading. If it doesn't, or if you clear your workspace later on, run the RS232Async_Messages.m script before compiling the program. Open the BPI_216_Send.mdl file and copy the BPI_216_Send block into your own model. The other blocks in BPI_216_Send.mdl are just for demonstration purposes.
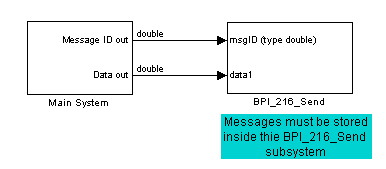
3.To output static predefined text messages to the BPI-216 LCD display using the BPI_216_Send block, the system that is deciding which message to output needs to output a number of data type double (see double in the MATLAB help files for more information on data types). The BPI_216_Send subsystem will read this number and display the corresponding message. (Note: the default time step of BPI_216_Send is 0.01 seconds. BPI_216_Send’s time step must be an integer multiple of your main system’s time step.)
Figure 1 shows how to hook up the system:
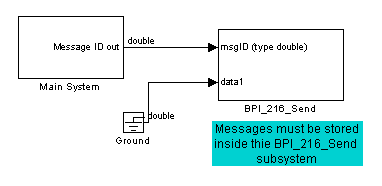
Figure 1
The input port data1 will be used later on to send variables to the system, but if only want to display static messages, you can delete this port or ground it to aviod a compiler warning about a disconnected input.
Displaying Text Messages
Because Simulink input and output variables must have a predefined size, we can't send text messages as arrays of characters unless the arrays are always the same size; the compiler will check for this. To avoid having to pad the text messages to make them all the same size, we will instead pass the text to a subfunction that will copy the text into a pre-padded array of preset size, and then send the array to the LCD control subsystem.
Open BPI_216_Send, and then open Message Bank/Selector. Find the switch-case control structure in the embedded MATLAB function. This is where we will store the messages. Messages must be entered in the form:
[text,numPages]=lcd_text(uint8(['Your_Message_Here.']))
The MATLAB function "uint8()" makes sure that each letter of your text is converted into data type uint8(unsigned 8 bit integer, also known as an unsigned char). If omitted, the program might not display your messages correctly.
The number outputted by your main system will be read in as the variable msgID. The switch-case control structure will find the case that matches the value of msgID, and print out the message corresponding message, displaying the message under otherwise if no match if found. Replace message_1, message_2, and message_default with your own message, preserving the single quotes. You may add or remove as many cases as you need, but case "otherwise" must be defined.
If your message is too long to display on a single screen, your message will be automatically split up into multiple screens, and displayed one at a time; after the last screen is displayed, it will loop back to the first screen and keep looping. Extra spaces on the last screen will be padded with black triangles; this will help you identify the last screen. The default time between screens is 3 seconds. Extra spaces on the last page will be padded with black triangles.
Displaying Variable Values
If the variable is numeric
If you wish to display numeric data you must add an input port to the message_select m-function to accept the incoming data. Add or remove as many input ports as you need, and beware that you may need to insert a "rate transation" block between the data source and message_select.
Note: you don't have to worry about the size of the variable for this case, because any number stored as type "double" takes up the same amount of space in the memory. On the other hand, a text string is an array of 8-bit integers, so the size in memory of a text string is determined by its length.
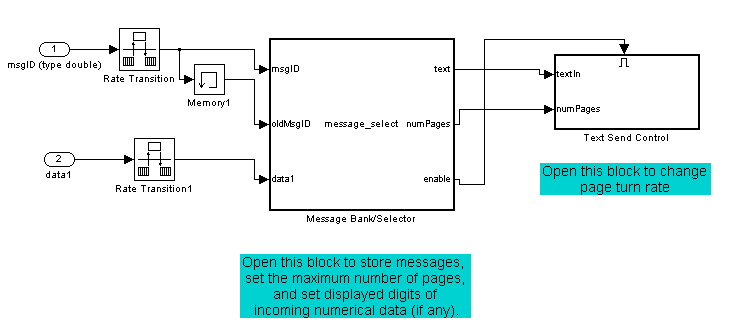
Your system now looks something like this:
Note the rate transitions:
Use the subfunction numtostr to convert it into a uint8 vector (because Simulink does not support string data types, we cannot simply use num2str for this). Simply insert numtostr(yourdata) in between strings, as shown in the figure below (Note:be sure to put blank spaces around numtostr(), or you will get a compiler error.)
Warning: if you don't use "numtostr," the program will try to read your number as an ASCII code, not a numeric value.
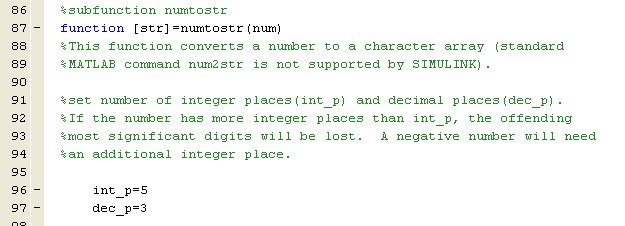
You must manually set how many digits numtostr will display. Open the message_select m-function block, and scroll towards the bottom until you find the function header for numtostr. Set number of integer places(int_p) and decimal places(dec_p) that you want displayed. If the inputted number has more integer places than int_p, the offending most significant digits will be lost. Negative numbers will need an additional integer place to hold the negative sign. Unused integer spaces will be filled in by blank spaces, and unused decimal places will be filled with zeros.
If the variable is a text string
If you want to send text to the system via a variable, you must make sure the variable is always the same size. Again, use uint8() to prevent a data type mismatch. For example, if you wanted data1 to be the words "true" and "false, you could program it like this in your main program:
if x==1
   data1=uint8(['true '])
else
   data1=uint8(['false'])
end
Note that there is a blank space after the word "true" to make it the same length as "false".
In your main program, you would format the message like this:
[text,numPages]=lcd_text(uint8(['data1 is set to' data1 'right now.']))
Specifying data types
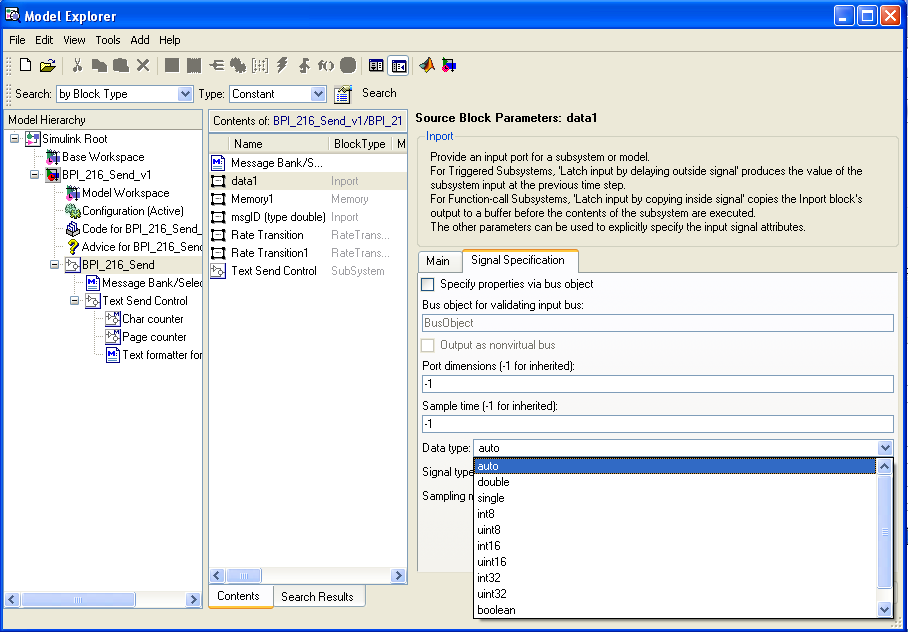
You should also specify the data type of the variable (uint8 if the variable is text, double if it is numeric) at the function message_select. Note: if your variable is numeric, the function may still work because Simulink chooses "double" by default. To make the model display port data types, go to the menu and select Format>Port/Signal Displays>Port Data Types. To specify data types (also see the figure below):
- right-click on the Message Bank/Selector block
- select Explore
- Inside the Model Hierarchy frame, select BPI_216_Send.
- Inside the Contents of BPI_216_Send frame, select data1.
- Inside the Source Block Parameters frame, select the Signal Specification tab.
- Under the data type menu, select uint8 if data1 is a text string, or double if data1 is a numeric value.
Quick test
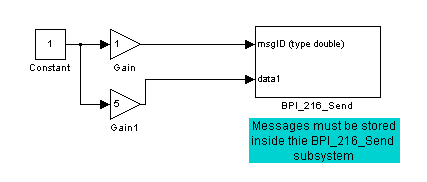
As a quick test, hook up the system like this:
Then, enter the following into the message bank:
Load the program and change the gains while it is running. You should be able to change both the message ID and the data variable by manipulating the gains.
Integrating with your own model
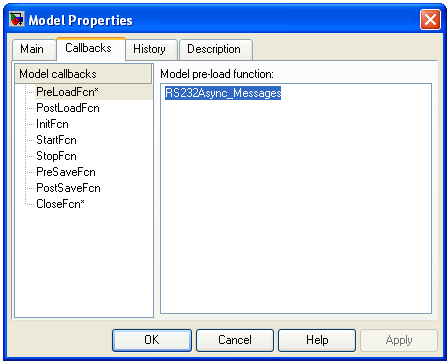
To integrate this system into your own Simulink model, simply copy and paste the entire BPI_216_Send block, and copy the RS232Async_Messages.m file into your work directory. Then, in drop-down menu, go to File>Model Properties>Callback>PreloadFcn and enter RS232Async_Messages. This will make the model run the RS232Async_Message script upon loading, or else you will have to run it manually before you compile the program.
The maxPages variable
The maxPages variable will set maximum number of "pages" your message can be; each page being one of the separate screens needed to display a long message (remember, Simulink doesn't have dynamic memory allocation for input/output variables, so you have to tell it how big the array is). The LCD screenn holds 32 characters, so the maximum number of characters (including white spaces) a message can contain is equal to 32*maxPages. There is also a local variable maxPages in the subfunction lcd_text; both values of maxPages must match (unfortunately, global variables are not supported). A small value of maxPages will reduce the overhead memory and CPU cycles needed to run the system, so don't make maxPages larger than it has to be.
Changing COM Ports
To change the COM port, open
BPI_216_Send>Text_Send_Control>RS232_Mainboard_Setup.
Change Port from COM1 to the COM port you want. Then open
BPI_216_Send>Text_Send_Control>RS232_Mainboard_Send.
Change Port from COM1 to the COM port you want.
Changing Screen Change Rate
To change the rate at which successive screens are displayed when the message is broken up into multiple screens, open
BPI_216_Send>Text_Send_Control>output_controller.
Set the variable pageRate to the time you want between screen changes, in seconds.
Further Development
Here are some files provided by Mathworks tech support that can send stuff to RS232: Mathworks RS232 mdl
