Difference between revisions of "Remote Controlled Wiitar"
| Line 192: | Line 192: | ||
WIUSE_USING_ACC(wm) will return 0 if the accelerometer is disabled or 1 if the accelerometer is enabled. Assuming the accelerometer is enabled, the code will monitor the accelerometer and not do anything until the wiimote is tilted above 50 degress or below -100 degrees. The accelerometers report absolute values. That is, the closer you tilt the wiimote upwards to vertical, the more positive the numbers become. The thresholds we set were determined from just playing around with the wiimote. When the wiimote passes one of these thresholds, the character "S" is sent to the PIC. When the wiimote is brought back to roughly a horizontal position, the computer sends the character "T" to the PIC. These values will all make sense when the PIC code is discussed. Note that there are two different pitch values. There is an absolute pitch value and a corrected pitch value. The corrected pitch value can be changed by altering the sensitivity in the wiiuse.h file. We did not bother to do this, as the sensitivity was fine. |
WIUSE_USING_ACC(wm) will return 0 if the accelerometer is disabled or 1 if the accelerometer is enabled. Assuming the accelerometer is enabled, the code will monitor the accelerometer and not do anything until the wiimote is tilted above 50 degress or below -100 degrees. The accelerometers report absolute values. That is, the closer you tilt the wiimote upwards to vertical, the more positive the numbers become. The thresholds we set were determined from just playing around with the wiimote. When the wiimote passes one of these thresholds, the character "S" is sent to the PIC. When the wiimote is brought back to roughly a horizontal position, the computer sends the character "T" to the PIC. These values will all make sense when the PIC code is discussed. Note that there are two different pitch values. There is an absolute pitch value and a corrected pitch value. The corrected pitch value can be changed by altering the sensitivity in the wiiuse.h file. We did not bother to do this, as the sensitivity was fine. |
||
Writing to the PIC involved sending data via an RS232 cable through a COM port. The process involved in writing to a COM port in a Windows environment is cumbersome to say the least. (Aggravatingly, this whole process could have been avoided if a UNIX based OS was used, as all the COM port information is kept in the dev folder. Unfortunately, the wiiuse code does not work on UNIX systems because of its dependency on .dll files). The steps to send data through a COM port are |
|||
*Create a handle to point to the serial port |
|||
*Initialize the serial port |
|||
*Open the serial port |
|||
*Write the data to the serial port |
|||
*Send the data |
|||
*Close the port |
|||
The portions of the code that do this are scattered throughout the entire wiiuse.c file. But the most important chucks of the code are |
|||
HANDLE serial_port; /* Handle to the serial port */ |
|||
long baud_rate = 9600; /* Specified baud rate */ |
|||
char port_name[] = "COM7:"; /* Name of the serial port */ |
|||
//Initialize Serial Port ------------------------------------------------------------ |
|||
/* Open up a handle to the serial port */ |
|||
serial_port = CreateFile(port_name, GENERIC_READ | GENERIC_WRITE, 0, 0, OPEN_EXISTING, 0, 0); |
|||
/* Make sure port was opened */ |
|||
if (serial_port == INVALID_HANDLE_VALUE) |
|||
{ |
|||
fprintf(stderr, "Error opening port\n"); |
|||
CloseHandle(serial_port); |
|||
exit(0); |
|||
} |
|||
/* Set up the serial port */ |
|||
set_up_serial_port(serial_port, baud_rate); |
|||
//End Serial Port Initialization ---------------------------------------------------- |
|||
These commands are all located at the beginning of main(). |
|||
== Results and Reflections == |
== Results and Reflections == |
||
Revision as of 03:56, 18 March 2010
Team Members
- Nathan Hirsch - Mechanical Engineering - Class of 2010
- George Randolph - Mechanical Engineering - Class of 2010
Overview
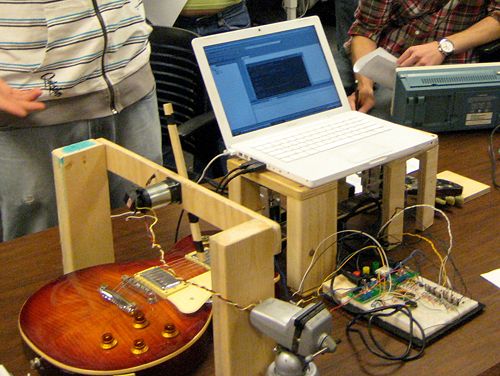
The goal of our project was to create a system that allows a user to use a remote control to play a guitar. The Remote Controlled Wiitar uses a Nintendo Wii Remote to control an array of solenoids and a motor that are capable of playing several different chords on a guitar.
Mechanical Design
Our design consisted of two major components. The solenoid bridge, which was responsible for depressing strings on the neck of the guitar, and the strumming bridge, which was responsible for strumming the strings of the guitar.
Solenoid Bridge
The solenoid bridge was constructed out of wood. Its table shape was designed to allow the neck of the guitar to fit under it, with enough clearance for several solenoids to be attached to the underside of the bridge.
Brackets made of eighth inch aluminum sheet metal were fashioned to mount the solenoids on the bridge. The brackets also included holes where elastic cable was attached. The elastic cable retracted the solenoids when they were not powered.
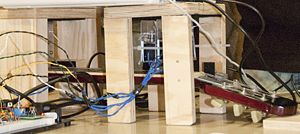
The solenoids were originally attached to bridge using nuts and bolts. Though this worked, it was difficult to attach the solenoids precisely enough to accurately depress the guitar strings. In the final design, Velcro was used instead of nuts and bolts. This allowed for more precise mounting of the solenoids on the solenoid bridge and facilitated easy reconfiguration of the solenoids into different chord shapes. A second solenoid bridge was added in the final design to allow additional notes to be fretted near the body of the guitar.
Strumming Bridge
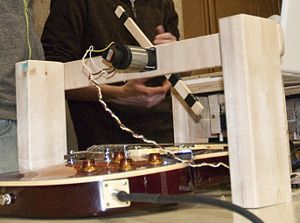
The strumming bridge was also constructed out of wood. Two 2x4 legs were cut and connected at the top by a strip of plywood. The strumming bridge was designed to allow the body of the guitar to fit underneath, with enough clearance for a strumming arm to sweep across the strings.
The motor was attached at the center of the top of the strumming bridge using nuts and bolts. A thin plywood strip that served as a strummer was attached to the shaft of the motor using a set screw. The circular motion of the motor caused the strummer to be closer to the guitar strings in the center than the guitar strings on the outside. For this reason, a rotational spring was attached to one side of the strummer which deflected as it swept across the springs resulting in an even strum.
A hall effect sensor was mounted about six inches from the motor on the strumming bridge. A magnet was attached to the strummer that aligned with the hall effect sensor when the strummer was parallel to the ground. When these components were aligned, the hall effect sensor sent signals to the PIC, providing feedback on the position of the strummer.
Electrical Design
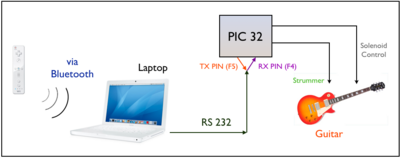
The circuity used to control the Wiitar is relatively simple. The figure to the right shows the basic concept of our project. The Wiimote communicates with a laptop via Bluetooth. Whenever a user shakes the Wiimote or presses a button on the Wiimote, a signal is sent to the computer. The computer then sends a message to the PIC via RS 232. The PIC takes those signals and outputs voltages to control the solenoids or strum the guitar, depending on the signal from the Wiimote.
Parts List
Fortunately, not very many electrical components are required to build the necessary circuitry to control the Wiitar. The parts that are needed can all be found in the mechatronics lab.
They are:
- PIC 32 microcontroller
- 100 Ω, 1 KΩ resistors and a 10 KΩ potentiometer
- 0.1 uF capacitor
- LM311N voltage comparator
- L293D H-Bridge
- Diodes (1N4003)
- Hall Effect Sensor (A3240LUA-T)
- NPN Darlington Pair Transistors (2N 6045)
- LEDs
- Wiimote
- Computer with Bluetooth
Motor Circuit
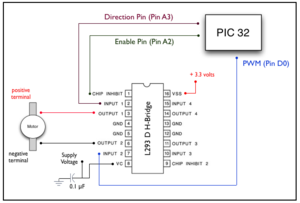
The motor that drive the strummer is operated by the PIC. The circuit to the right gives pin-outs and shows how to connect the motor to the PIC. Three pins on the PIC are used. A direction pin, an enable pin and a pin for PWM. The following table shows how they are related
| Direction | PWM | Motion |
|---|---|---|
| 0 | 0 | Brake |
| 0 | 1 | Forward |
| 1 | 0 | Reverse |
| 1 | 1 | Brake |
The H-Bridge we used to drive the motor was an L293D. It's data sheet can be found here
Hall Effect Sensor Circuit
We used a hall effect sensor to monitor the position of the strummer. The concept behind a hall effect sensor is simple: it's a device that senses a change in magnetic fields. So, if a magnet is waved across the sensor, it outputs varying voltages. We put a pill magnet on one end of the strummer bar so when the motor spun, the hall effect sensor could detect the bar's rotation. The hall effect sensor basically acted like an ultra-low encoder, but worked for our purposes. The hall effect sensor was an A2340LUA-T which is stocked in the mechatronics lab. Its data sheet can be found here.
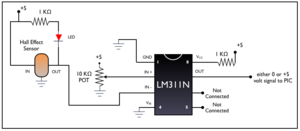
The graphic at the right illustrates the circuit we used to hook up the hall sensor. There is an LED and 1 KΩ in the hall sensor portion of the circuit. This is just used as feedback. When a magnet is in the vicinity of the sensor, the light will turn on. If that doesn't happen, then the circuit is wired incorrectly.
The circuit outputs HI when the hall sensor is engaged and LOW when not. However, a hall effect sensor is an analog device. We needed it to output either high or low and not voltages in between. To solve this problem, we used a LM311D voltage comparator. This chip is basically a really fancy op-amp. It's data sheet can be downloaded here.
We used the comparator to compare the voltage coming from the hall sensor against some variable threshold which we set. The inverting input of the comparator was connected to the output of the hall sensor and the noninverting input was connected to a 10 KΩ potentiometer. By playing with the resistance of the potentiometer, we were able to set the comparator to the correct sensitivity level. A pull up resistor was connected to the output so that the comparator had sensible outputs. That is, we wanted the comparator to output HI when the LED was on (and thus when the magnet was near the hall sensor) and not the other way around.
Solenoid Circuit
All the solenoids we used on the Wiitar are stocked in the mechatronics lab. These solenoids are rated at +12 volts. The power supply in our mechatronics kit could supply that voltage, but the PIC could not output enough current to drive the solenoids with enough force. To overcome this, we used an NPN Darlington Pair transistor. The part number is 2N6045 and its data sheet can be downloaded here.
The circuit we used can be seen at the right. Using the transistor to increase the current through the solenoid, we were able to successfully drive the solenoids with the PIC. The output from the PIC was connected to the base of the transistor. The solenoid was connected between power and the collector. The emitter was grouned. There is a 100 Ω resistor between the PIC and the base of the transistor to produce a voltage potential. We used a 100 Ω resistor because we wanted as much current to go into the base as possible. By Ohm's Law, the lower the resistance, the more current we could get into the base. More current into the base means more current through the solenoid and thus more force by the solenoid.
An important note is the suck up diode in parallel with the solenoid. Remember, a solenoid is basically like an inductor. When the voltage is shut off, the inductor still wants to emit current. To prevent the transistor from being on, even after the PIC was outputting a LOW signal, a 1N4003 diode was placed in parallel with the solenoid.
Our Wiitar used 6 solenoids and thus this circuit was produced 6 times on our protoboard.
Code
There are two separate codes for the Wiitar. One code runs on the laptop and is the interface between the wiimote and the PIC. The IDE we use was Code::Blocks. It's open source, multi-platform and very easy to learn. It can be downloaded here. This code connects the wiimote to the laptop. Remember that the computer code will only work if there is bluetooth present on the laptop. If the laptop does not have built in bluetooth, a bluetooth dongle may be used instead.
Overview
The code used for the Wiitar is relatively simple. The wiimote talks to the computer through wiiuse.c. The computer then talks to the PIC using transmit.c. The transmit code runs on the PIC and the wiiuse code runs on the PC. The structure of the code is as follows:
- An event occurs on the wiimote. This can be a change in the accelerometer orientation, a button pressed or a button released
- The computer recognizes this event and sends a character to the PIC via RS232
- The PIC receives the signal and either activates digital out puts or spins the motor.
Notes about Wiiuse
The code used to talk to the Wii was downloaded and heavily modified from www.wiiuse.net. The download section includes the wiiuse.h, a custom header file that formats all the outputs from the wiimote to easy to use functions. That all can be downloaded here. Included in the zip file are the header file, and a few .dll files. It's these dynamic link library files that prevent wiiuse from operating correctly on any UNIX system. Code::Blocks makes it easy to link these files to a project. Once a new project has been created, go to Project-->build options. A dialog box will appear and click on the Linker Settings tab. There is a link libraries window. Click the add button and direct the program to look where the .dll file is. When the program asks if you want to add it as a relative path, click No. The .dll file should be linked to the project.
Computer Code
The first part of the computer code deals with buttons being pressed on the wiimote. Each time a user presses a button, it constitutes as an event. Unintuitively, when a user releases a button, that also constitutes an event.
// If a button is pressed, report it and send appropriate signal to PIC
 printf("\n\n--- EVENT [id %i] ---\n", wm->unid);
	if (IS_PRESSED(wm, WIIMOTE_BUTTON_A)){
		printf("A pressed\n");
		buttonPressed = 'A';
		WriteFile(serial_port, &buttonPressed, sizeof(char), &bytes_written, NULL);
		printf("%d bytes (char = %c) successfully transferred to PIC!\n", (int) bytes_written, buttonPressed);
IS_PRESSED is a built in function in the wiiuse.h file that lets you point directly to the various button. This part of the code says if a user presses the "A" button, print a message saying so and then send the character "A" to the PIC. Finally, it prints a message indicating successful data transmission. The WriteFile function will be discussed in detail later. Several of these if statements are in wiiuse.c, specific to every button on the wiimote. For our code, we only use buttons A, B, 1 and 2.
A similar function is used when users release a button.
//If a button is released, print it and send 0 to PIC
	if (IS_RELEASED(wm, WIIMOTE_BUTTON_A)){
		printf("A Released.\n");
		buttonPressed = 'N';
		WriteFile(serial_port, &buttonPressed, sizeof(char), &bytes_written, NULL);
		printf("%d bytes (char = %c) successfully transferred to PIC!\n", (int) bytes_written, buttonPressed);
IS_RELEASED is another built in function. We need these statements so that the PIC knows that the "A" button is not being pressed anymore. This portion of the code prints a message when a user releases a button and sends the character "N" to the PIC via RS232 and then prints a message indicating successful data transmission.
By default, the code does not monitor accelerometer values. This is simply to conserve battery life. If we want to monitor the accelerometers in the wiimote, all we need to do is press the TWO button.
// Accelerometer Info: Pressing two will tell the Wii Mote that we are interested in movement
	if (IS_JUST_PRESSED(wm, WIIMOTE_BUTTON_TWO))
		wiiuse_motion_sensing(wm, 0);

// Accelerometer Info: Pressing one will tell the Wiimote athat we are no longer interested in movement.  This may
// be useful for conserving batterly life.
	if (IS_JUST_PRESSED(wm, WIIMOTE_BUTTON_ONE))
		wiiuse_motion_sensing(wm, 1);
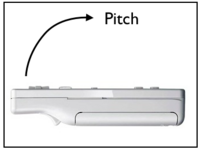
IS_JUST_PRESSED is another built in function. This function changes based on the button that was just pressed. In this case, we are using the ONE and TWO buttons to toggle the accelerometer. For our project, we only used pitch. The image below shows what orientation of the wiimote pitch corresponds to.
It's great that the computer can monitor the accelerometer, but we need to set thresholds so that the stummer knows when to activate. The if loops below do just that.
// If the accelerometer is active, print the appropriate angles.  We only used pitch in our code, but if you want to use the other
// orientations, uncomment them.
	if (WIIUSE_USING_ACC(wm)){
		//printf("wiimote roll  = %f [%f]\n", wm->orient.roll, wm->orient.a_roll);
		printf("wiimote pitch = %f [%f]\n", wm->orient.pitch, wm->orient.a_pitch);
		//printf("wiimote yaw   = %f \n", wm->orient.yaw);

		// If the Wiimote is tilted beyond 50 degrees or -100 degrees, then send data to the PIC, indicating that we want the motor to spin
		if((wm->orient.pitch > 50) | (wm->orient.pitch <-100)){
            motor_signal = 'S';
			WriteFile(serial_port, &motor_signal, sizeof(char), &bytes_written, NULL); // Sends the data
            printf("%d bytes (char = %c) successfully transferred to PIC!\n", (int) bytes_written, motor_signal);
				// Prints a message to indicate successful data transmission
		}

		// Once Wiimote has been brought back to horizontal, the system has been "reset" and the user can restrum the guitar
		else if((wm->orient.pitch > -25) & (wm->orient.pitch < 25)){
			motor_signal = 'T';
			WriteFile(serial_port, &motor_signal, sizeof(char), &bytes_written, NULL); // Sends a "reset" message
			printf("%d bytes (char = %c) successfully transferred to PIC!\n", (int) bytes_written, motor_signal);
				// Prints a message to indicate successful data transmission
		}
	}
WIUSE_USING_ACC(wm) will return 0 if the accelerometer is disabled or 1 if the accelerometer is enabled. Assuming the accelerometer is enabled, the code will monitor the accelerometer and not do anything until the wiimote is tilted above 50 degress or below -100 degrees. The accelerometers report absolute values. That is, the closer you tilt the wiimote upwards to vertical, the more positive the numbers become. The thresholds we set were determined from just playing around with the wiimote. When the wiimote passes one of these thresholds, the character "S" is sent to the PIC. When the wiimote is brought back to roughly a horizontal position, the computer sends the character "T" to the PIC. These values will all make sense when the PIC code is discussed. Note that there are two different pitch values. There is an absolute pitch value and a corrected pitch value. The corrected pitch value can be changed by altering the sensitivity in the wiiuse.h file. We did not bother to do this, as the sensitivity was fine.
Writing to the PIC involved sending data via an RS232 cable through a COM port. The process involved in writing to a COM port in a Windows environment is cumbersome to say the least. (Aggravatingly, this whole process could have been avoided if a UNIX based OS was used, as all the COM port information is kept in the dev folder. Unfortunately, the wiiuse code does not work on UNIX systems because of its dependency on .dll files). The steps to send data through a COM port are
- Create a handle to point to the serial port
- Initialize the serial port
- Open the serial port
- Write the data to the serial port
- Send the data
- Close the port
The portions of the code that do this are scattered throughout the entire wiiuse.c file. But the most important chucks of the code are
	HANDLE serial_port;				/* Handle to the serial port */
	long baud_rate = 9600;		    /* Specified baud rate */
	char port_name[] = "COM7:";		/* Name of the serial port */

 //Initialize Serial Port ------------------------------------------------------------

	/* Open up a handle to the serial port */
	serial_port = CreateFile(port_name, GENERIC_READ | GENERIC_WRITE, 0, 0, OPEN_EXISTING, 0, 0);

	/* Make sure port was opened */
	if (serial_port == INVALID_HANDLE_VALUE)
	{
		fprintf(stderr, "Error opening port\n");
		CloseHandle(serial_port);
		exit(0);
	}

	/* Set up the serial port */
	set_up_serial_port(serial_port, baud_rate);

//End Serial Port Initialization ----------------------------------------------------
These commands are all located at the beginning of main().
Results and Reflections
When we first envisioned the Remote Controlled Wiitar, we wanted to create a system that could play many different chords and songs very easily. We originally wanted an array of eighteen solenoids (one for each string on the first three frets) that would allow us to play dozens of chords and thousands of songs. Our final project had only six solenoids and could play a grand total of three chords.
Despite a creating a system that was simpler than intended, our project was very successful. At the beginning of the quarter, we had limited knowledge of electronic circuitry, no knowledge of microcontrollers, and almost no experience programming in C. Using knowledge that we gained throughout the quarter, we were able to design and build a system that was fun for anyone to use and could control a guitar using a Wii Remote.
There are many things that we could have done to improve our project. Perhaps the largest problem we encountered was the fact that the smallest solenoids available to us were too large to fit more than a couple solenoids per fret on the guitar. This was the main reason for the simplification of the solenoid array from eighteen solenoids to only six. To fix this problem, we could have positioned the solenoids away from the neck of the guitar and used a system of levers to push the guitar strings. This would have allowed us to depress more strings and enabled us to play more chords.
Another improvement would be made to the strummer. We wanted to be able to strum the strings up and down, but our final system could only strum down (from the lowest string to the highest). This was primarily an issue of feedback. We decided early in our project that we did not need the resolution of an encoder to control the strumming bar, so we opted for a hall effect sensor instead. We quickly realized that there was significant overshoot when using the feedback from the hall effect sensor that prevented us from being able to strum the strings in both directions. Had we used an encoder, we would have had better control over the position of the strummer and we would have been able to strum both up and down.
There was also talk of adding a "player piano" mode to our system. This mode would have had the PIC automatically play a song using timed strums and chord changes without input from a Wii Remote. Due to a number of other issues we were having with our project, we did not have time to add the player piano mode. This would have been a great addition to the system that could have really demonstrated its capabilities.
Over the course of building our Wiitar, we burnt out one PIC. We noticed that when the PIC was powered on it was getting very hot, even when it was completely disconnected from the rest of our circuit. We could not find the cause of this, but we suspect that something on the PIC board was shorting. When a new PIC was placed into the circuit, the system returned to functioning properly.
Despite having little experience in electronic design or programming, most of our issues were a result of mechanical problems. The underlying circuitry and code functioned exactly as originally planned. Coding entirely in C, we were able to receive signals from a Wii Remote on a computer, relay those signals to our PIC using RS232 communication, and have the PIC depress appropriate guitar strings and strum a guitar. Learning how to do all of this and applying it to our project was our greatest success.
