Difference between revisions of "Finger Position Sensing with a Photodiode Array"
| Line 15: | Line 15: | ||
2) To achieve 2ms loop times on the 18F4520 PIC, minimalistic integer code is required. To improve looptime further, the PIC is running on a 40MHz clock. |
2) To achieve 2ms loop times on the 18F4520 PIC, minimalistic integer code is required. To improve looptime further, the PIC is running on a 40MHz clock. |
||
The [[http://hades.mech.northwestern.edu/wiki/index.php/Image: |
The [[http://hades.mech.northwestern.edu/wiki/index.php/Image:FingerPosition v05.pcb| Finger Position PCB file]] for this device can viewed using PCBartist. Before populating it with electronic components, be sure to mill out the 2"x2" square. Clamping the PCB to a piece of plywood and using an 1/8" end mill was easy, and accurate. |
||
The PIC code to run this PCB is here: <b>Finger_position.c</b> [http://peshkin.mech.northwestern.edu/pic/code Link to all sample code here.] |
The PIC code to run this PCB is here: <b>Finger_position.c</b> [http://peshkin.mech.northwestern.edu/pic/code Link to all sample code here.] |
||
Revision as of 20:01, 10 June 2009
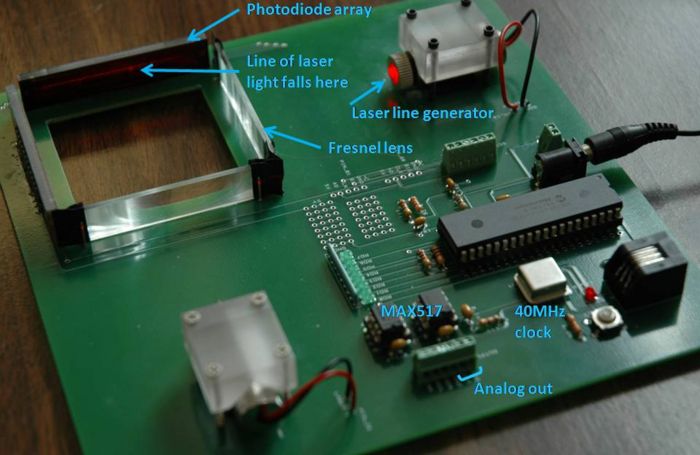
This device finds the X and Y position of a finger (or other object) in a 2"x2" square area. The resolution is about 256 counts per axis and the update rate is 2ms. The board output is a 0-5V analog signal for each X and Y position.
For each axis, there is a 768-pixel photodiode array (TSL1406R) illuminated by laser light. The laser light is produced by a "line generator" laser, which is simply a laser pointer capped with a cylindrical lens. The cylindrical lens creates a triangular area (not a cone) of divergent light. To redirect the divergent light into parallel light in the sensing area, a 2" cylindrical Fresnel lens is placed between the laser and the photodiode array. This parallel light creates a distinct shadow on the photodiode array and allows for a a full 2"x2" working area.
The analog data is clocked out of the TSL1406R using the PICs PWM signal and read into the PIC using the PIC's on-board A2D. The process is described in more detail on the wiki page, Interfacing with a Photodiode Array, and in the data sheet for the TSL1406R.
The center of the shadow that the finger casts on the photodiode array is found by doing a "center of mass" calculation on the shadow's profile. The resultant X and Y position is communicated via I2C to two MAX517 D2A chips, which output analog values for X and Y position.
There are only two tricky parts to the design of the code and circuit,
1) Interfacing with the TSL1406R requires precise timing. The "start integration" (SI) pulse and the clock signal (being generated by the PIC's PWM feature must be accurately phased.
2) To achieve 2ms loop times on the 18F4520 PIC, minimalistic integer code is required. To improve looptime further, the PIC is running on a 40MHz clock.
The [v05.pcb| Finger Position PCB file] for this device can viewed using PCBartist. Before populating it with electronic components, be sure to mill out the 2"x2" square. Clamping the PCB to a piece of plywood and using an 1/8" end mill was easy, and accurate.
The PIC code to run this PCB is here: Finger_position.c Link to all sample code here.
