Interfacing the PIC32 with an Android device
THIS PAGE REFERS TO A PRE-RELEASE VERSION OF THE NU32 PIC32 DEVELOPMENT BOARD. FOR INFORMATION, SAMPLE CODE, AND VIDEOS RELATED TO THE PRODUCTION VERSION (2016 AND LATER), AND TO THE CORRESPONDING BOOK "EMBEDDED COMPUTING AND MECHATRONICS WITH THE PIC32 MICROCONTROLLER," VISIT THE NU32 PAGE.
Introduction
Learn to connect an Android device and a PIC32 microprocessor. This guide was developed with the NU32 (2012 version).
Get the starter code: Media:Android_PIC_starter_code.zip or on Github
Getting Started
Things you need
You'll need the following hardware:
- A PIC32 microprocessor (i.e. the NU32 development board)
- An Android device running at least version 2.2
- USB cables:
- Type-A to Mini-B cable (computer to PIC32)
- Type-A to Micro-B cable (computer to Android device)
- A spare USB cable with a Micro-B end (Android device to PIC32)
and the following software:
- Microchip's MPLAB X with the C32 compiler (download from Microchip's website)
- Eclipse (download from the Eclipse project's website -- Eclipse Classic recommended)
- Android SDK (download from the Android website)
Follow the instructions to get the ADT Plugin for Eclipse and to link the SDK Manager to Eclipse. In Eclipse, this requires going to the Help menu at the very left and selecting "Install New Software". You must install the ADT Plugin to develop Android applications with Eclipse. After doing that, you'll need to open the SDK Manager (probably as administrator) and download the appropriate packages. For my Nexus S 4G, I downloaded the Android 2.3.3 and the Google USB Driver packages. Turn on USB debugging on your Android device in Settings > Applications > Development > USB debugging. It's optional, but you'll want the HD44780, a 2 by 16 character LCD with libraries available for the PIC32.
You'll need the starter code associated with this documentation (linked above), Media:Android_PIC_starter_code.zip. The code includes the String Passing Demo, a firmware/application pair that passes raw sequences of bytes back and forth, interpreted as strings. There's also the Android Sensor Demo, a firmware/application pair that shows you how to access the GPS, camera, touchscreen, and microphone of the Android device to collect data that may be useful for the PIC.
The PIC32 firmware is written in C and compiled with MPLAB X and C32; the Android applications are written in Java and are built with Eclipse. Be sure to take advantage of the features in MPLAB X and Eclipse. These IDEs can quickly rename variables (Ctrl-R in MPLAB X, Alt-Shift-R in Eclipse), jump to where a function is defined (hold Ctrl and click), and perform other refactoring that will save you time when programming. Ctrl-Shift-O in Eclipse updates your Java imports based on the code in the file.
Accessing USB on the PIC
You'll need to create a USB cable to connect your Android device to the PIC and some other parts. Here's a list:
- Spare USB cable with a Micro-B end
- (2) capacitors in the 1 uF range
- Soldering iron
- Red, black, green, and white wire
- Electrical tape
Cut the non-Micro-B end off your USB cable. Inside the outer insulation, you should see four wires: a red wire (VBUS), a black wire (GND), a green wire (D+), and a white wire (D-). Solder each stranded wire to a solid wire of the same color, and wrap the joints in electrical tape so they don't accidentally bump into each other.
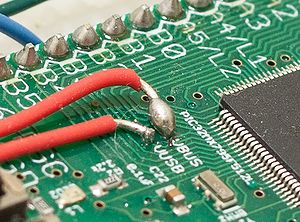
On the NU32 board, you'll need to solder wires to the VBUS and VUSB pads right below the microprocessor.
Now, you'll need to wire everything up. Here's the diagram from the PIC32MX reference manual: Media:Pic32_usb_wiring.pdf. Ignore VBUSON and wire VBUS directly to 5V. D+ is G2 and D- is G3 on the NU32. When you power on the development board and connect your Android device, the device should begin charging.
String Passing Demo
Unzip the folder you downloaded earlier. From the applications folder, import String Passing Demo into Eclipse. From the firmware folder, import String Passing Demo into MPLAB X. Connect your Android device to your computer and write the program onto the device by pressing the green play button. In MPLAB X, build the firmware and write the .hex file onto the PIC.
Start the String Passing Demo on your Android device. Then turn on the PIC and connect the USB cable to the Android device. (You must connect or reset the pic AFTER starting the application.) If you see "Hello from PIC32!" on your Android device, congratulations!
Firmware
The firmware consists of initialization code and a while loop with a state machine. When the phone is connected to the PIC, the state is STATE_CONNECTED. The code under the STATE_CONNECTED case transmits a string to the Android device if the user button has been pressed or released. When data is received, the function ADBCallback is called. The ADBCallback for the String Passing Demo displays any bytes received as a string on the LCD.
Application
The main parts of the application code are StringPassing.java inside src/lims.stringpassing.app and main.xml inside res/layout. There's also code that manages the connection inside src/lims.stringpassing.server.
StringPassing.java starts with the declaration of several variables: Buttons, TextViews, etc. Inside onCreate, these variables are linked to parts of the layout in main.xml. Most of the code describes listeners - basically, code that is executed in response to an event like a button press or when data is received.
Android Sensor Demo
This code contains demonstrations of four Android sensors: the GPS/location service, the camera, the touchscreen, and the microphone.
GPS demo
The location demonstration will try to determine the device's current location. It will transmit the coordinates to the PIC. When the PIC receives a set of coordinates, it will send back a random set of coordinates that will end up somewhere in Africa, Europe, or Asia.
See the Location documentation for more information.
Camera demo
The camera demo captures a 640 by 480 image. It saves the image as a .jpeg, then creates a 40 by 30 pixel version and sends that to the PIC in a 3600-byte array of RGB values. The PIC inverts the RGB data and sends the sample back.
See Android's Camera documentation. Usually, it's best to use the approach described in "Taking Photos Simply", where you use the device's built-in camera activity to capture an image.
Touchscreen demo
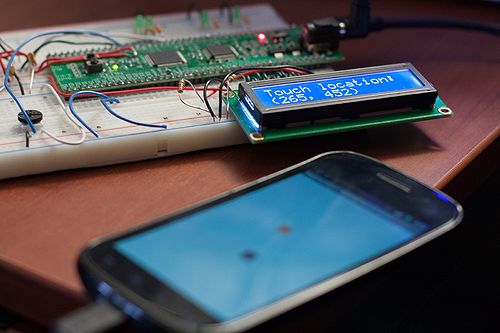
The touchscreen demonstration detects where you've touched the screen and indicates this with the purple cursor. It scales each of the touch coordinates to a float between 0 and 1 and sends this pair of floats to the PIC. (That's why the integer coordinates displayed on the PIC's LCD aren't exact.) Every time the PIC receives data, it responds with coordinates for the orange cursor, which is moved around randomly.
Microphone demo
The microphone demo captures data from the Android device's microphone but doesn't do much with it. The level bar in the application shows the maximum amplitude found in the previous sample. It sends this maximum amplitude to the PIC as an integer. The PIC comments on the loudness.
This activity uses AudioRecord to access raw data from the microphone rather than MediaRecorder, which is designed to record audio and/or video for saving to files.
Overview of an Android application

The Activity is the basic building block of an Android application. There's an Activity for each screen in an app. The String Passing Demo is an application that consists of a single Activity because there's only one screen. The Android Sensor Demo has one Activity for the menu and four Activities for the four sensor demos. To create your own activity, you create ClassName.java file containing a subclass of Android's Activity class. In the String Passing Demo, the file is called StringPassing.java and the class declaration is public class StringPassing extends Activity.
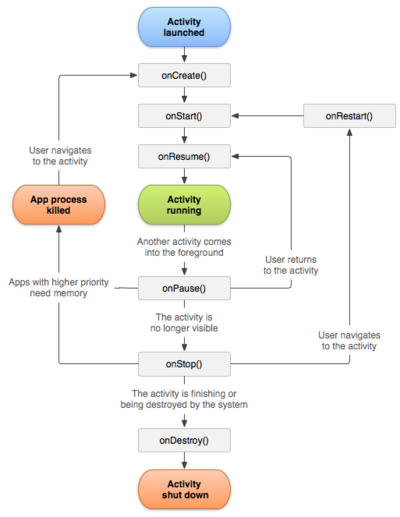
Inside the Activity class, there are functions that are called at different parts of the Activity's life (see right). When the Activity is started by the user, a method called onCreate is called. When the user closes the Activity by pressing the back button, the onDestroy method is called. For example, here's some code from the String Passing Demo:
@Override
public void onCreate(Bundle savedInstanceState) {
    super.onCreate(savedInstanceState);
    setContentView(R.layout.main);
    ...
The @Override designation means we're overriding the base Activity class's onCreate function. For things to work properly, the superclass's onCreate function still needs to be called; that's what super.onCreate(savedInstanceState) does. The savedInstanceState is a structure in which you can save variables. We're not going to worry about it. The final line, setContentView(R.layout.main), tells Android that the application should display the main.xml layout. The rest of onCreate is code that we want to execute at the start of the Activity.
An application's layout files are found in res/layouts in the Eclipse Package Explorer. A layout file is an xml file describing how text fields, buttons, checkboxes, and other widgets will be laid out on the screen. Eclipse gives you a friendly drag-and-drop interface with which to create these.
Of course, we need to connect the layout widgets to our application code so we can control their functionality. In the String Passing Demo, you'll see
public class StringPassing extends Activity {

    Button sendButton;
    Button clearButton;
    ...
and later, in the onCreate function,
sendButton = (Button) findViewById(R.id.button1);
clearButton = (Button) findViewById(R.id.button2);
...
This associates the buttons in the layout with variables (here, sendButton and clearButton). Now, we can call sendButton.setOnClickListener to execute certain code when sendButton or clearButton is pressed by the user.
To learn more, see the official documentation.
Communication overview
Here's a little bit about how we're transferring data.
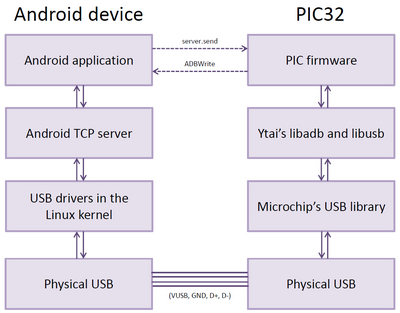
We're using a protocol based on the Android Debug Bridge (ADB). ADB is a tool that's usually used for development of Android applications. Google has released the Open Accessory protocol for communication with Android USB accessories, but it's only guaranteed to be supported on devices running Android 3.1 or above, where ADB is compatible with devices running Android 1.6 or above.
In this code, the Android device acts as a TCP server. On the PIC, we're able to abuse ADB to send arbitrary sequences of bytes to an Android device. The Android side uses ADB libraries to accept incoming connections from the PIC and to send data to the PIC. All of this runs on top of Microchip USB libraries for the PIC and Linux USB drivers used by the Android operating system.
Troubleshooting
Everything should work as downloaded. If you're getting errors, the first thing to do is to make sure you've installed all of the correct programs, with the correct Android SDK platforms.
In MPLAB X, there's a very specific compiler configuration for each firmware project. Right click the project name in the right toolbar and choose Properties. The compiler toolchain should be C32 (v2.02 when this was written). Under the tab at left called C32 (Global Options), you'll see pic32-as, pic32-gcc, and pic32-ld. Under pic32-as, only "Have symbols in production build" should be checked. Under pic32-gcc, "Have symbols in production build" should be checked too. The "Preprocessor macros" should appear as PLATFORM=400;NDEBUG. The include directories should reference all of the libraries and should be the following list:
..\_Libraries\libadb
..\_Libraries\libconn
..\_Libraries\libusb
..\_Libraries\libbtstack\src
..\_Libraries\libbtstack\include\btstack
..\_Libraries\libbtstack
..\_Libraries\microchip\common
..\_Libraries\microchip\usb
..\_Libraries\microchip\include
..\_Libraries\microchip\include\USB
..\_Libraries\common
Because of this list, you shouldn't need to import the library projects into MPLAB X. Doing so may introduce problems. Under the pic32-ld tab, the heap size should be 3000 bytes and "Remove unused sections" should be checked. Because of these specific settings, it's recommended to right click the String Passing Demo and select "Copy..." to start a new firmware project.
Each of the firmware projects includes procdefs.ld, NU32.h/NU32.c, and LCD.h/LCD.c libraries meant for the NU32. If you aren't using the NU32, remove these files and their references in the code.
If you want to use XC32 compiler (recently released when this was written), you'll need to right click the project name in the left toolbar, select Properties, and switch to the XC32 compiler toolchain. You'll have to do this for the firmware (Android Sensor Demo or String Passing Demo) as well as for each of the four libraries and patch up the compiler errors. It's best to just download and use the C32 compiler.
In Eclipse: if you're getting compiler errors with the projects, right click the project name at left > Android Tools > Fix Project Properties. If there are still errors, go to right click > Properties and check the following. In the Android tab, make sure you're building for Android 2.3.3 or for a version that's at least 2.2. In the Java compiler tab, make sure the compiler compliance level is 1.6.
Credit
This project adapts code from two projects for the PIC32. The firmware uses Ytai Ben-Tsvi's libadb, libbtstack, libconn, and libusb libraries from the ioio project. The application code uses server libraries from microbridge.


