Guitar Tuning Project
Guitar Tuning Project (GTTP)
Overview
Project Goal --- Achieve guitar tuning function. By manually plucking a guitar string, the system will determine whether the frequency is higher or lower than the set frequency. Based on the results, the system will tune the string's vibration frequency to the set frequency with a small error range (0.5Hz?).
System Diagram
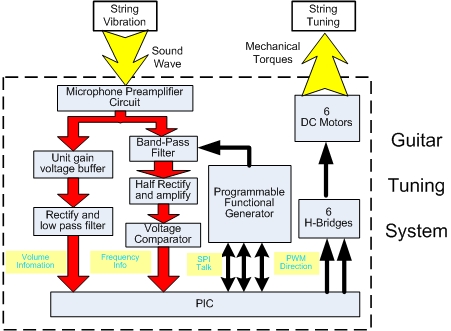
   The whole system is shown in following figure.
   The microphone and preamplifier convert the sound wave into a voltage wave and amplify it into AC voltage signal. This AC voltage signal goes into 2 directions. The 1st
   direction goes into a unit gain voltage buffer and then converted into a DC signal after rectifying and low-pass filtering. This DC signal provides the volume information of the
   sound wave to the PIC. The 2nd direction goes into a Band-Pass filter. Because the AC voltage signal from the preamplifier contains a lot of environmental noise as well as
   harmonic waves. The band-pass filter can let a narrow band pass. The band-pass properties are controlled by the centering frequency set by a programmable waveform generator
   communicating with PIC. After the band-pass filter, the signal is a fairly clean sine wave signal. This signal experiences half-wave rectifying and amplifying. Later it goes
   into the voltage comparator and becomes a square wave. This square wave is connected to the I/O pin of the PIC and the sound frequency is calculated by the PIC based upon this
   signal. With the calculated frequency of the current sound wave of the string, PIC compares it to the accurate frequency of the string stored in the program and generates
   corresponding control signals to control 6 DC motors using H bridges to tune the guitar string till the string's frequency approximates the standard frequency by a limited error
   (0.5Hz?)
Circuit Design and building
Microphone and preamplifier circuit
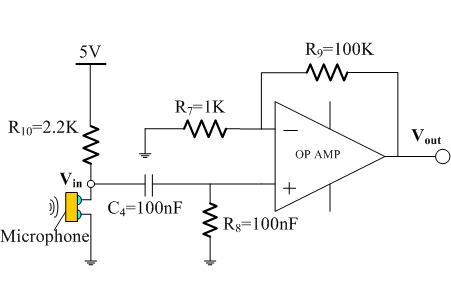
The microphone converts the sound into the change of capacitance, which causes a voltage change of Vin. The capacitor C4 is used here to block DC signal only allowing AC signal to pass. The gain of the preamplifier is set to (R9+R7)/R7=101.
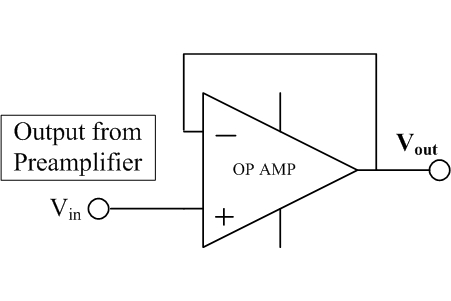
Unit Gain Voltage buffer
The output of the voltage buffer is always the same with the input.
The unit gain voltage buffer is used here for two benefits:
1. It serves as an impedance match. The input impedance of this voltage buffer is infinitely small while the output impedance of this voltage buffer is infinitely large.
Thus it can fully receives the signal from preceding circuit and output the full signal to succeeding circuit.
2. It prevents the preamplifier circuits to interfere with succeeding circuit.
Rectify and low pass filter
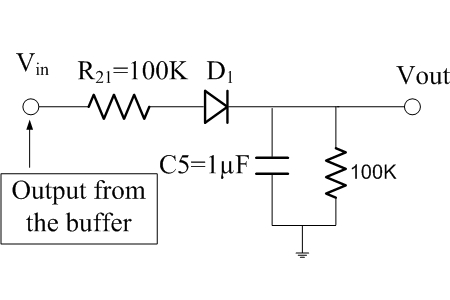
This circuit is to convert the AC signal from the preamplifier into DC analogue signal to be read by PIC as the amplitude of the sound wave. The Cut-Off frequency of the low pass filter is determined by the time constant R*C=R21*C5=100K*1µF=0.1 second (equivalent frequency 10Hz)
Voltage Comparator with hysteresis band
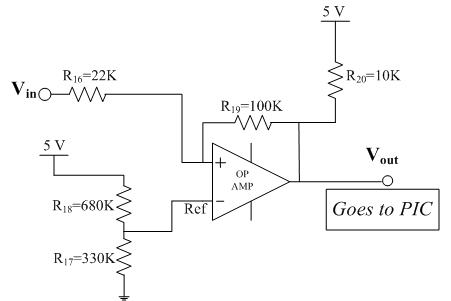
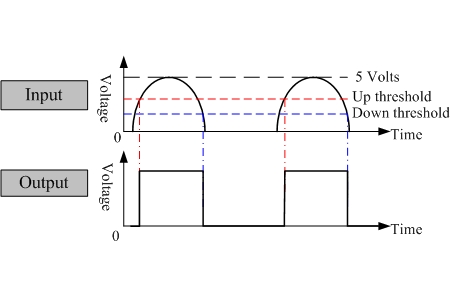
The function of this circuit is to convert the sine wave signal into a square wave signal while keeping the same frequency. In order to prevent the wrong turn caused by noise, 2 thresholds are set in the circuits, namely up threshold and down threshold. The circuit is shown in following figure:
Reference voltage in V- is 5*R17/(R17+R18)=1.65 volts.
Assuming Vin is 5V at the beginning, then Vout is 5V. In this case, V+ equals Vout*(R16)/(R16+R19)+Vin*(R19)/(R16+R19), when V+ < Vref, (Vin=0.91Volt), Vout turns from 5 volt to 0 volt. 0.91 volt is down threshold.
Assuming Vin is 0V at the begining, then Vout is 0V. In this case, V+ equals Vin*(R19)/(R19+R16), when V+ > Vref,(Vin=2.01V), Vout turns from 0 volt to 5 votls. 2.01 Volts is the up threshold
So the behavior of the circuit will be like the above right figure.
Programmable Function generator (Using AD9833)
The function generator is to set the center frequency of band pass filter. The AD9833 is a low power programmable waveform generator capable of producing sine, triangular, and square wave outputs. The AD9833 is written to via a 3-wire serial interface: FSYNC, SCLK, SDATA.
SDATA: Serial Data Input. The 16-bit serial data-word is applied to this input.
SCLK: Serial Clock Input. Data is clocked into the AD9833 on each falling SCLK edge.
FSYNC: Active Low Control Input. This is the frame synchronization signal for the input data. When FSYNC is taken low, the internal logic is informed that a new word is being loaded into the device.
The series timing is shown in following figure. When FSYNC is low, one bit is transmitted at each falling edge of SCLK.

Communicating with PIC
First, we have to convert the frequency (freq) into a value that AD 9833 wants named conv_freq
conv_freq = (int32)(freq*13.4218);// 2^28/CLOCK = (2^28)/(20*10^6) = 13.4218
Then, separate the conv_freq into two 16 bits bits, msb (most significant bits) and lsb (least significant bits)
  lsb= (int 16)(conv_freq)&(0b0011111111111111);  (Get the lowest 14 bits of conv_freq)
  msb= (int 16)(conv_freq>>14)(0b0011111111111111); (get the 14 most significant bits out of 28 bits conv_freq)
 spi_xfer(0x2168);       // reset, tell it to expect two writes-*
 spi_xfer(0x4000 | lsb); // lsb in freq0
 spi_xfer(0x4000 | msb); // msb in freq0
 spi_xfer(0xB000);       // zero in phase0
 spi_xfer(0x0068);       // unreset, set up write
Band-pass filter (Using LMF100)
Because the output signal from the microphone and preamplifier contains environmental noise, more importantly, the harmonics of string vibration, so we need a band-filter to remove the harmonics, only let the signal with the fundamental frequency pass.
LMF100 is used here.
DC motor Drive
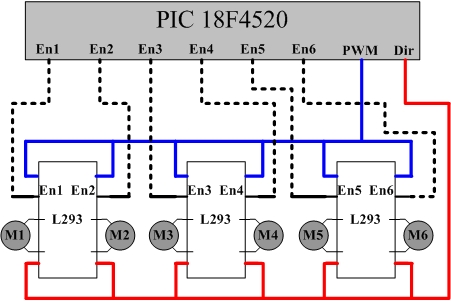
We have 6 DC motors (Faulhaber 141:1 gear motor) to be driven. L293 is used here containing 2 full H-bridges,therefore 3 LM293 are used to drive 6 DC motors. The circuits diagram is shown as the figure. We used 6 enable pins to address each full H-bridges,
Direction and PWM signals are connected to each H-bridge.
Software coding
Algorithm
The basic algorithm is shown in the picture. First, we decide whether volume of the current sound is above certain threshold, when below the threshold, the frequency reading tends not be meaningful; when above the threshold, the frequency reading is compared with the set frequency, the corresponding control signal is sent to H bridges to control motor to tune guitar till it reaches the set frequency. 
Mechanical Design and machining
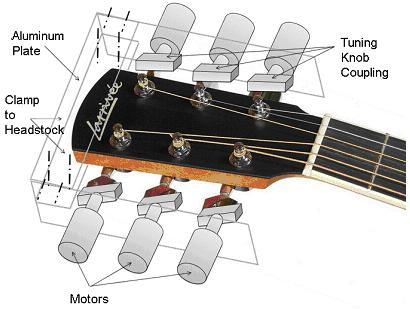
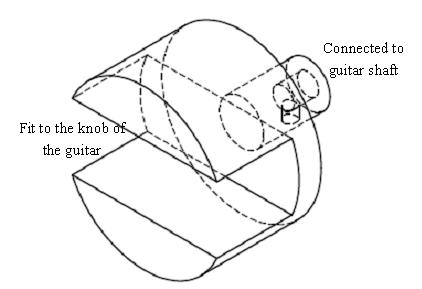
A head fit accustomed to the guitar is designed and machined. 6 DC motors are mounted on the outer surface of the side aluminum plate. 6 knob couplings are machined. The knob coupling is shown as following. The slot is to fit the knobs of the guitar while the hole in the other is to fit into the shaft of the DC motor. There is a set screw hole letting a set screw to hold the shaft tight to the hole.
