Laser cutter
Overview
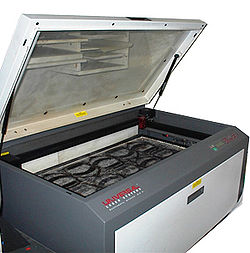
The laser cutter, available in the prototyping lab, is an extremely useful tool for quickly cutting 2-D plastic parts. The machine uses a high intensity IR laser to cut any two dimensional design out of a plastic sheet. Acrylic is by far the best material for use with the laser cutter; when acrylic is used, the tool is capable of cutting through up to a 1/2" thick piece.
The laser can be used for both cutting and etching; if the intensity is low, or the piece is thick it will only cut part way through the sheet in one pass.
If you are using a plastic other than acrylic, consult with the shop staff before cutting.
If you have never used the laser cutter before, ask for help if you encounter any problems.
Creating and Importing a File
To print to the laser cutter, a drawing must be prepared in CorelDRAW and placed on the laser cutter template, found on the desktop of the laser cutter computer. Drawing simple shapes, such as squares and circles is easy in CorelDRAW, however, for most applications with more advanced geometry it is better to use a more sophisticated CAD program. To transport the geometry from a solid modeler, such as Unigraphics, the part must be saved in a two-dimensional format, such as .dxf or .dwg. The drawing can then be imported into CorelDRAW and printed.
Creating a .DXF or .DWG
The part must first be designed in a CAD system. If using AutoCAD, the part will automatically be saved in a .dwg format. However, if you are using a solid modeler, such as UG or SolidWorks, the part will be saved as a .prt. To convert a three dimensional piece, to a two-dimensional drawing in .dxf or .dwg format, simply go to Save As ... and select the appropriate extension. This file can now be imported into CorelDRAW, where it can be printed.
Importing Files
To import the file, first open the Laser Cutter Template, found on the desktop. This is a canvass, the same size as the laser cutter's cutting area, which is used to lay out the drawing or drawings for printing. To add a .dxf or .dwg, simply gp to File -> Import and select the correct extension and browse to you desired file. The drawing can then be placed anywhere on the template. The rulers on the template correspond exactly to the rulers on the laser cutter, so if your sheet of plastic is smaller than the cutting area of the laser cutter, be sure that the drawing lies entirely within the necessary dimensions. The sheet is normally placed in the top left corner, using the rulers as a square corner, so place your drawings here.
Using the Laser Cutter
Once the drawing is loaded and ready to print, follow the instructions below. To turn the laser cutter on, press the orange power button on the right side of the machine in the back.
Fumes Release Valve
Cutting some plastic releases toxic fumes. In order to prevent leaking these fumes into the air, the fumes release valve must be opened. This creates a vacuum, which sucks the toxic fumes out of the machine. The valve is yellow, and located above the machine on the left. Push down to open. To verify that the valve is open, check the pressure gauge.
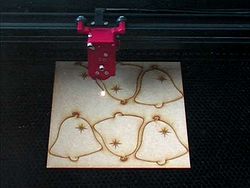
Setting the Laser Height
The laser must be set at a specific height (~1/8" above the material) for the best results. There is a tool, located just to the left of the laser cutter bed, which is designed for this purpose. On the laser cutter control panel, select Z-height. This allows you to move the table up and down to the proper level. Place your material in the bed and the tool on top of the material as shown. Adjust the table so that the laser mounting aligns with the flat edge on the tool. The proper height is shown in the image. Once the height is correct, select exit.
Printing to the Laser Cutter
You are now ready to print. From CorelDRAW, select file Print. The laser cutter will appear as the first printer listed. Select 'Properties' from the printer window to set the laser parameters. First, select the black from the list of colors. This allows you to set the laser speed and intensity.
Selecting Speed
Set the speed anywhere from 25-50%. The slower the speed, the deeper the cut will be. If the first couple of passes does not complete cut through the plastic, try reducing the speed so that each cut is deeper.
Selecting Intensity
For most cutting applications, 100% intensity is fine. However, if you are etching, less intensity might be desired.Consult the shop staff if you have questions regarding an appropriate intensity level.
Printing
Once the speed and intensity are selected, press the large 'Set' button. Then exit the properties window and select print. This will send the document to the laser cutter. On the laser cutter screen, the document name will be displayed. If this is correct, press the green button to proceed. This will cause the laser to make the first pass. Multiple passes may be necessary to complete cut the plastic. Once the run is complete, simply repress the green button to start another pass. If you want to adjust the speed or intensity, you must reprint the document, with the new values, from the computer.