RGB LEDs
From Mech
Revision as of 19:25, 27 March 2015 by JaneMiller (talk | contribs)
The printable version is no longer supported and may have rendering errors. Please update your browser bookmarks and please use the default browser print function instead.
WS2812 Addressable RGB LEDs (NeoPixels)
Install the NeoPixels Library
- Download ZIP of all library files here
- Unzip the ZIP file when it's done downloading
- Put all of the files from the folder into a new folder called "Adafruit_NeoPixels"
- Put this new folder into your Adruino Libraries folder (usually located at (home folder)/Documents/Arduino/Libraries)
- If you don't have a "Libraries" folder in Arduino/Libraries, create one and put the Adafruit_NeoPixels folder in it
- Restart the Arduino IDE if it's already running
- Open up a new Arduino sketch (program) and check to see if the Adafruit NeoPixels library is installed by going to Sketch-->Import Library and seeing if the NeoPixels library is listed.
Wire Up Your LEDs
- The pinout for one of our RGB LEDs is as shown to the right
- When creating a circuit with RGB LEDs, make sure to have a 300-500 ohm resistor on the data input for the first LED
- Also make sure to connect the ground wire, then the +5V wire
- When disconnecting, disconnect power, then ground
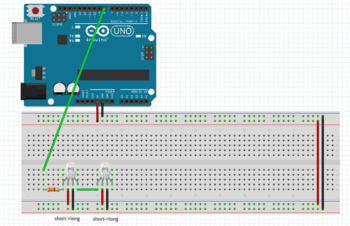
- The next diagram down to the right shows how to wire up two RGB LEDs in a chain to an Arduino Uno.
- The signal for the second LED will travel through the first one.
Writing Code
- This program is a simple test program based on the "simple" example program that comes with the NeoPixels Library.
- If you're using the circuit diagrammed above, this program should make both of your LEDs a moderate green color
#include <Adafruit_NeoPixel.h>
#include <avr/power.h>

// Which pin on the Arduino is connected to the NeoPixels?
// On a Trinket or Gemma we suggest changing this to 1
#define PIN            8

// How many NeoPixels are attached to the Arduino?
#define NUMPIXELS      2

// When we setup the NeoPixel library, we tell it how many pixels, and which pin to use to send signals.
// example for more information on possible values.
Adafruit_NeoPixel pixels = Adafruit_NeoPixel(NUMPIXELS, PIN, NEO_RGB + NEO_KHZ800);

int delayval = 500; // delay for half a second

void setup() {
  pixels.begin(); // This initializes the NeoPixel library.
}

void loop() {

  // For a set of NeoPixels the first NeoPixel is 0, second is 1, all the way up to the count of pixels minus one.
  for(int i=0;i<NUMPIXELS;i++){

    // pixels.Color takes RGB values, from 0,0,0 up to 255,255,255
    pixels.setPixelColor(i, pixels.Color(0,150,0)); // Moderately bright green color.

    pixels.show(); // This sends the updated pixel color to the hardware.

    delay(delayval); // Delay for a period of time (in milliseconds).

  }
}
- The other examples in the NeoPixels example folder give demonstrations of more complex programs and other displays you can create with the NeoPixels
Applications
- RGB LEDs are great to use as analog "status" lights telling you information such as:
- How much battery something has left
- How much pressure is applied to something
- If it's an appropriate time to trigger some other action


