Difference between revisions of "NU32v2: Starting a New Project and Putting it on the NU32v2"
Andrew Long (talk | contribs) |
Andrew Long (talk | contribs) |
||
| Line 39: | Line 39: | ||
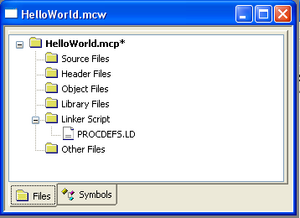
You have now created a project. The project window should appear as below. |
You have now created a project. The project window should appear as below. |
||
[[Image:PIC32_ProjectWindow1.jpg|thumb|300 px|left]] |
[[Image:PIC32_ProjectWindow1.jpg|thumb|300 px|left]] |
||
<br clear=all> |
|||
The procdefs.ld is not the only linker file. |
|||
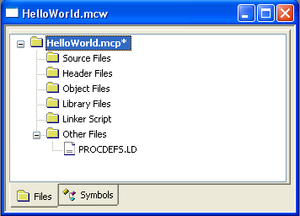
* In the project window, drag procdefs.ld from the 'Linker Script' folder to the 'Other Files' folder. |
|||
[[Image:PIC32_ProjectWindow2.jpg|thumb|300 px|left]] |
|||
<br clear=all> |
<br clear=all> |
||
Revision as of 16:30, 15 January 2011
Return to Using the NU32v2
**THIS PAGE IS UNDER CONSTRUCTION AND IS NOT COMPLETE**
**AWL 1/15/2011**
PIC32 Programming in C
Note: Code downloaded from Microchip is constantly evolving, and it is possible that the information below will be outdated for future code releases. This information is accurate for code downloaded from Microchip's website in January 2011. Also, sample code developed by us and others are generally modified from working code for different purposes, and therefore you may find unnecessary legacy code, programming inefficiency, or even incorrect code in some samples.
You should complete the instructions in NU32v2: Software to Install if you have not already. For this page specifically, you need to
- download and install the MPLAB IDE (Integrated Development Environment) that you use for programming, compiling, debugging, and simulating your PIC code. The MPLAB C Compiler for PIC32 is included in the "complete" installation of the IDE
- download the Serial Bootloader for NU32v2 PC application
- install drivers for FTDI
The remainder of this page describes how to create a new Project in MPLAB, compile a general "Hello World" program to blink the LEDs on the NU32v2, and use the Serial Bootloader of NU32v2 PC application to put the program on the NU32v2.
Create a New Project in MPLAB for the NU32v2
For organizational reasons, it is recommended to have a folder on your computer to store your PIC projects. If you do not already have a space to save your projects. Create a new folder and call it PIC_Projects. Each project should have its own folder inside PIC_Projects.
- Create a folder in PIC_Projects and call it HelloWorld
- Download this procdefs.ld file and place it in the new HelloWorld folder.
When creating new projects to download to the PIC, you must include a linker file. If you have installed a bootloader (such as with the NU32v2), the linker file tells the bootloader to put the program after the bootloader memory to prevent erasing of the bootloader. The required linker file is called procdefs.ld. You will always need to add this procdefs file to your project folders in order to properly install your programs on the PIC. If you do not use this procdefs file, you potentially could overwrite the bootloader.
- Open MPLAB
- Choose Project -> Project Wizard to create a new project.
- Click Next.
- Select the device you are using. The NU32v2 is using the PIC32MX795F512L.
- Choose the Microchip PIC32 C-Compiler Toolsuite from the drop down menu for Active Toolsuite. This sets up the compiler that will be used for creating the hex code that will be placed on the PIC. Click Next
- Create a new project called HelloWorld in the folder called HelloWorld (click browse to navigate to that folder). Click Next.
- Highlight the PROCDEFS.ld file under the HelloWorld folder and click Add. This adds the file to your project. For future projects, if you have existing .c and .h code, this is the step to add these files to your project. For this tutorial, we will be creating our own file, so no additional files need to be added.
- On this last step, it displays a summary of the previous steps. Click finish.
You have now created a project. The project window should appear as below.
The procdefs.ld is not the only linker file.
- In the project window, drag procdefs.ld from the 'Linker Script' folder to the 'Other Files' folder.
Compiling the "Hello World" example code for NU32v2
Using the Serial Bootloader for NU32v2 PC Application
PIC32 Programming in C with the MPLAB X Beta IDE
Open 'MPLAB X IDE beta'. You will see the following screen.
Click Create New Project.
In Categories, select the Microchip Embedded folder. In Projects, select C/ASM Standalone Project. Click Next >.
In Family, select PIC32, and in Device, select PIC32MX795F512L.
In Select Tool, select PICkit3 if you are going to program the code onto your NU32v2, or select Simulator if you are going to practice coding on your computer.
In Select Compiler, select C32.
In Select Project Name and Folder, create a name for your project, select a location to save it to, ab

