Difference between revisions of "NU32: Starting a New Project and Putting it on the NU32"
NickMarchuk (talk | contribs) |
|||
| (26 intermediate revisions by one other user not shown) | |||
| Line 1: | Line 1: | ||
'''THIS PAGE REFERS TO A PRE-RELEASE VERSION OF THE NU32 PIC32 DEVELOPMENT BOARD. FOR INFORMATION, SAMPLE CODE, AND VIDEOS RELATED TO THE PRODUCTION VERSION (2016 AND LATER), AND TO THE CORRESPONDING BOOK "EMBEDDED COMPUTING AND MECHATRONICS WITH THE PIC32 MICROCONTROLLER," VISIT [[NU32|THE NU32 PAGE]].''' |
|||
Return to [[Microchip PICs#Using the NU32|Using the NU32]] |
|||
= PIC32 Programming in C = |
|||
'''Note: Code downloaded from Microchip is constantly evolving, and it is possible that the information below will be outdated for future code releases. This information is accurate for code downloaded from Microchip's website in January 2011. Also, sample code developed by us and others are generally modified from working code for different purposes, and therefore you may find unnecessary legacy code, programming inefficiency, or even incorrect code in some samples.''' |
|||
You should complete the instructions in [[NU32: Software to Install]] if you have not already. For this page specifically, you need to |
You should complete the instructions in [[NU32: Software to Install]] if you have not already. For this page specifically, you need to |
||
* download and install the |
* download and install the MPLAB X IDE (Integrated Development Environment) that you use for programming, compiling, debugging, and simulating your PIC code. The MPLAB XC32 Compiler is included in the installation instructions |
||
* download the NU32 Utility |
* download the NU32 Utility computer application |
||
* install drivers for the FTDI USB-to-Serial chip on the NU32 board |
* install drivers for the FTDI USB-to-Serial chip on the NU32 board |
||
The remainder of this page describes how to create a new Project in |
The remainder of this page describes how to create a new Project in MPLAB X, compile a general "Hello World" program to blink the LEDs on the NU32, and use the NU32 Utility computer application to put the program on the NU32. |
||
Here are the files you will need to complete this page: NU32_BasicTemplate.zip. |
|||
[[Media:NU32_hello.zip|text hex files]] |
|||
Here is a less detailed version of this page: [[NU32: Quickstart]] |
|||
= Create a New Project in MPLAB X v1.XX for the NU32 = |
|||
For organizational reasons, it is recommended to use the MPLABXProjects folder created during the MPLAB X IDE installation to store your projects. |
|||
= Create a New Project in MPLAB 8.xx for the NU32v2 = |
|||
'''Download and unzip NU32_BasicTemplate.zip and place it in the MPLABXProjects folder. Note that every project you make will need a copy of app.ld.''' |
|||
For organizational reasons, it is recommended to have a folder on your computer to store your NU32v2 projects. If you do not already have a space to save your projects, create a new folder and call it PIC_Projects. Each project should have its own folder inside PIC_Projects. |
|||
app.ld is a linker file. If you have installed a bootloader (such as with the NU32), the linker file tells the compiler to rearrange the memory of your program so that it doesn't overwrite the bootloader code that is already on your PIC32. If you do not put app.ld in the folder that contains your source code, MPLAB X will use the default linker, named procdefs.ld. Fortunately the bootloader will not overwrite itself, but '''your code will not work''' and will not give you an error telling you that you used the wrong .ld file. So every time you make a new project, copy the app.ld file you put in the MPLABXProjects folder into the new folder that MPLAB X generates for each project. |
|||
* Create a folder in PIC_Projects and call it HelloWorld |
|||
* Download the [[Media:procdefs_for_NU32v2.zip | procdefs.ld file from this .zip file]] and place procdefs.ld in the new HelloWorld folder. |
|||
Fist, make a new project, compile some pre-written code, and use the NU32 Utility to put it on your NU32. |
|||
When creating new projects to download to the NU32v2, you must include a linker file. If you have installed a bootloader (such as with the NU32v2), the linker file tells the bootloader to put the program after the bootloader memory to prevent erasing of the bootloader. The required linker file is called procdefs.ld. You will always need to add this procdefs file to your project folders in order to properly install your programs on the PIC. If you do not use this procdefs file, your code will not function properly or at all. |
|||
* Open MPLAB |
* Open MPLAB X |
||
* Choose |
* Choose File -> New Project... to create a new project. |
||
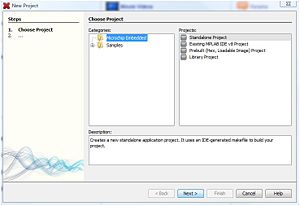
* Select Microchip Embedded and Standalone Project and click Next >. |
|||
* Click Next. |
|||
[[Image:mplabx_newproject_1.jpg|thumb|300 px|left]]<br clear=all> |
|||
* Select the device you are using. The NU32v2 uses the PIC32MX795F512L. |
|||
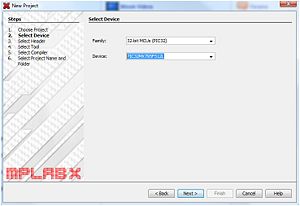
* Select 32-bit MCUs (PIC32) and the PIC32MX795F512L (the last one in the list) and click Next >. |
|||
* Choose the Microchip PIC32 C-Compiler Toolsuite from the drop down menu for Active Toolsuite. This sets up the compiler that will be used for creating the hex code that will be placed on the NU32v2. Click Next. |
|||
[[Image:mplabx_newproject_2.jpg|thumb|300 px|left]]<br clear=all> |
|||
* Create a new project called HelloWorld in the folder called HelloWorld (click browse to navigate to that folder). Click Next. |
|||
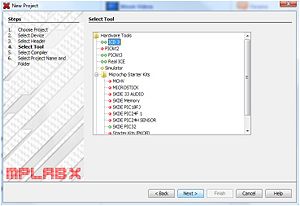
* Select the ICD 3 Hardware Tool (we will not be using the ICD 3, but select it anyway) and click Next >. |
|||
* Highlight the procdefs.ld file under the HelloWorld folder and click Add. This adds the file to your project. For future projects, if you have existing .c and .h code, this is the step to add these files to your project. For this tutorial, we will be creating our own file, so no additional files need to be added. |
|||
[[Image:mplabx_newproject_3.jpg|thumb|300 px|left]]<br clear=all> |
|||
* On this last step, it displays a summary of the previous steps. Click finish. |
|||
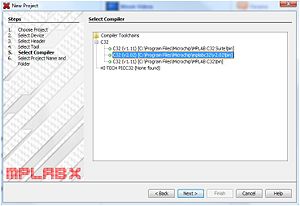
* Select XC32(v1.xx) from the Compiler Toolchains and click Next >. |
|||
[[Image:mplabx_newproject_4.jpg|thumb|300 px|left]]<br clear=all> |
|||
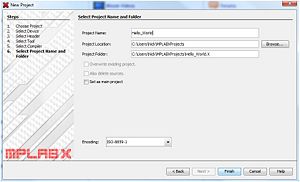
* Enter a project Name ("Hello_World") and click Finish. |
|||
[[Image:mplabx_newproject_5.jpg|thumb|300 px|left]]<br clear=all> |
|||
Now go back to the MPLABXProjects folder, and you should see a new folder called "Hello_World.X". Copy app.ld into "Hello_World.X", as well as the other files, hello_world.c, NU32.c, and NU32.h. |
|||
You have now created a project. The project window should appear as below. |
|||
[[Image:PIC32_ProjectWindow.jpg|thumb|300 px|left]] |
|||
<br clear=all> |
|||
In MPLAB X, you can close the Start Page tab. Add the code to the project: |
|||
The procdefs.ld is not the only linker file. |
|||
* Right click on Header Files in the Projects tab on the left and select Add Existing Item... Select NU32.h. |
|||
* In the project window, drag procdefs.ld from the 'Linker Script' folder to the 'Other Files' folder. |
|||
* Right click on Source Files and select Add Existing Item... Select NU32.c and hello_world.c. |
|||
[[Image:PIC32_ProjectWindow2.jpg|thumb|300 px|left]] |
|||
* Right click on Linker Files and select Add Existing Item... Select app.ld. |
|||
<br clear=all> |
|||
[[Image:mplabx_hello_1.jpg|thumb|300 px|left]]<br clear=all> |
|||
This code is ready to be used, so compile it by pressing the Build Project button (the hammer). |
|||
Now we are going to create a .c file to add to this project. |
|||
[[Image:mplabx_hello_2.jpg|thumb|300 px|left]]<br clear=all> |
|||
* Choose File -> New. |
|||
* Choose File -> Save As and call the new file HelloWorld.c in the HelloWorld folder. This will create a source file for your code. You need to include '.c' on the file name, otherwise MPLAB does not know that it is a source file. |
|||
* Right click on the 'Source Files' folder and choose 'Add files'. Choose the HelloWorld.c file to add it to the project. |
|||
[[Image:PIC32_AddFiles1.jpg|thumb|300 px|left]] |
|||
<br clear=all> |
|||
The Output window at the bottom of the screen should say BUILD SUCCESSFUL. |
|||
You have now created a project and added a blank source file to your project. You are now ready to code your first program, which will toggle on and off the two LEDs on the NU32v2 board. |
|||
MPLAB X creates a .hex file when you compile the code. It is hidden away in your project folder, in dist -> default -> production, and given a name (projectfoldername).production.hex, or in this case, Hello_World.X.production.hex. |
|||
* Cut and paste the code below into your HelloWorld.c file. |
|||
Next we will use the NU32_Utility program to put the .hex file on your NU32 board. |
|||
<pre> |
|||
/* HelloWorld.c |
|||
* |
|||
* Our first PIC program, which simply flashes LEDs on the NU32v2 |
|||
* board. We have already installed a "bootloader" on our PIC32, |
|||
* which specifies "configuration bits" that set the clock frequency |
|||
* to 80 MHz (assuming the 8 MHz crystal on the NU32v2 board). |
|||
* |
|||
* |
|||
* HISTORY |
|||
* 1/15/2011 Created by Nick Marchuk, Andrew Long and Kevin Lynch |
|||
* |
|||
*/ |
|||
= Using the NU32 Utility Computer Application = |
|||
// plib.h gives access to useful constant and function definitions, found in |
|||
// Program Files/Microchip/MPLAB C32/pic32-libs/include |
|||
#include <plib.h> |
|||
Now that you have compiled your code, you can put it on your NU32 board using the NU32 Utility and the bootloader program already on the NU32. |
|||
#define SYS_FREQ (80000000L) // clock frequency set by bootloader |
|||
#define LED0 LATGbits.LATG12 // mnemonic constants for LEDs on NU32v2 |
|||
#define LED1 LATGbits.LATG13 |
|||
#define WAIT_LOOPS 2000000 // delay between toggling LEDs |
|||
Plug your NU32 into your power supply (6V wall wart from the kit, or a supply >6V) and turn on the board. Plug the USB cable into the board and your computer. If this is the first time you have plugged the board into your computer, drivers will be installed assigning your board two communication port numbers (COM in Windows, TTY.USBSERIAL on MAC). Note what the port numbers or names are. The larger number is used for bootloading communication, and the smaller number is used for general communication. |
|||
void initLEDs(void); |
|||
void delay(unsigned int loops); |
|||
For example: My Windows computer already has a COM1. When I plug in my NU32 I also get COM19 and COM20, so I choose COM20 for bootloading and COM19 for general communication. On my MAC I already have a bunch of ports, like /DEV/TTY.BLUETOOTH-MODEM and CU.NOKIA6205-DUNONBRCMPHONE-2. When I plug in my NU32 I get 4 more, /DEV/TTY.USBSERIAL-000030FDA, /DEV/CU.USBSERIAL-000030FDA, /DEV/TTY.USBSERIAL-000030FDB, and /DEV/CU.USBSERIAL-000030FDB. Ignore the versions with CU, and use /DEV/TTY.USBSERIAL-000030FDB for bootloading and /DEV/TTY.USBSERIAL-000030FDA for general communication. |
|||
int main(void) { |
|||
int i=0; // loop counter |
|||
Now open NU32_Utility.exe. The left hand side of the window is used for bootloading, and the right hand side for general communication. |
|||
// SYSTEMConfig() optimizes performance for our clock frequency. |
|||
// in Microchip/MPLAB C32/pic32-libs/include/peripheral/system.h |
|||
SYSTEMConfig(SYS_FREQ, SYS_CFG_ALL); |
|||
initLEDs(); // set LED pins as outputs |
|||
while(1) { // infinite loop |
|||
if(i==0) { |
|||
LED0 = 0; // low output turns an LED on; see NU32v2 circuit |
|||
LED1 = 1; // high output turns an LED off |
|||
delay(WAIT_LOOPS); |
|||
} |
|||
if(i>0) { // toggle the LEDs, wait, and begin loop again |
|||
LED0 = 1; |
|||
LED1 = 0; |
|||
delay(WAIT_LOOPS); |
|||
i = -1; |
|||
} |
|||
i++; |
|||
} |
|||
return 0; |
|||
} // end main |
|||
[[Image:nu32_utility_open.jpg|thumb|300 px|left|Initial NU32_Utility.exe window]] |
|||
/* initLEDs() |
|||
<br clear=all> |
|||
* |
|||
* initLEDs sets RG12 and RG13 to outputs to control the LEDs on the NU32v2. |
|||
*/ |
|||
void initLEDs(void) { |
|||
LATG |= 0x3000; // Initializes G12 and G13 to 1 (turns LEDs "off" on NU32v2) |
|||
TRISG &= 0xCFFF; // sets the G12 and G13 pins to outputs |
|||
} |
|||
Select the larger of the two communication ports under "Select a bootloader port". |
|||
/* delay(unsigned int loops) |
|||
* |
|||
* This function just wastes time. Note; it just uses an unsigned int number |
|||
* of loops, which should be less than 2^32 - 1, or about 4 billion. If you |
|||
* really want to waste a lot of time, you could use a long long. |
|||
*/ |
|||
void delay(unsigned int loops) { |
|||
int i; |
|||
for (i=0; i<loops; i++) { |
|||
} |
|||
} |
|||
</pre> |
|||
[[Image:nu32_utility_bootloaderopen.jpg|thumb|300 px|left|NU32_Utility.exe with a bootloader port selected]] |
|||
<br clear=all> |
|||
Push "Select_Hex" and navigate to your .hex file. |
|||
To load this program to the PIC with the bootloader, we need a hex file. MPLAB creates a hex file in the project folder when you compile the program. |
|||
* Choose Project -> Build all OR F10 on PCs. |
|||
The output window should say 'Build Succeeded'. If it doesn't, fix the errors. |
|||
[[Image:nu32_utility_selecthex.jpg|thumb|300 px|left|NU32_Utility.exe with a .hex file selected]] |
|||
= Create a New Project in MPLAB X for the NU32v2 = |
|||
<br clear=all> |
|||
There are two options to get the NU32 board into bootloader mode. The first is to press and hold the RESET button on the board, press and hold the USER button, let go of the RESET button, then let go of the USER button. In bootloader mode L1, just above the RESET button, will blink. To connect NU32_Utility.exe to the NU32, press CONNECT. |
|||
The cross-platform MPLAB X IDE is currently in beta testing, and some features from MPLAB 8.xx are known to be missing or not fully implemented. For example, there is no disassembly view, and the debugger/simulator capabilities are limited. However, it can be used to compile .hex files for loading on the PIC with the bootloader app (process described below). This has been tested on both PCs and Macs for some simple programs without errors, but we cannot be certain there will be no beta-related errors. Use at your own risk. Directions for downloading the software are [[NU32v2: Software to Install|here]]. |
|||
The second way to get the NU32 board into bootloader mode is to press REQUEST_BOOT. This will command the NU32 to perform a reset in software, and to enter bootloader mode. L1 will blink, and NU32_Utility.exe will automatically connect to the NU32. This method will only work if you use the standard NU32 header files when you write your code. If you do not use these files you will have to physically press the buttons on the NU32 board to get it into bootloader mode. |
|||
Specific instructions below are for MPLAB X running on a Mac. For example, ctrl-click on the Mac replaces right click on the PC. |
|||
Once NU32_Utility.exe has connected to the NU32, you will see a message that the NU32 is connected. |
|||
Start up MPLAB X. On a Mac, you should see your screen looks something like [[Media:MPLABX-mac-startscreen.png|this]]. The menus are slightly different from the PC version, to follow Mac conventions. For example, some of the settings under the menu Tools>Options on the PC show up under mplab_ide>Preferences on the Mac. |
|||
[[Image:nu32_utility_connected.jpg|thumb|300 px|left|NU32_Utility.exe connected to the NU32 in bootloader mode]] |
|||
Now try opening mplab_ide>Preferences (or Tools>Options on the PC) and select "Editor" and "Formatting." Choose "All Languages" and Category "Tabs and Indents." Check the box "Expand Tabs to Spaces" and choose 2 for both "Number of Spaces per Indent" and "Tab Size" and a "Right Margin" of 80. Your window should look like [[Media:MPLABX-mac-formatting.png|this]]. Now choose each language individually and uncheck the box "Override Global Options" so each language uses these same formatting conventions. Now click "OK" to apply the changes and close the window. You won't ever need to do this step again. This simply ensures a uniform, non-space-wasting look for the automatic indenting of code you write. |
|||
<br clear=all> |
|||
Now you can press PROGRAM to transfer the .hex file to the NU32 and have the PIC program itself. |
|||
Now, to create a new project: |
|||
* Choose File>New Project. |
|||
** Choose Categories: Microchip Embedded, Projects: C/ASM Standalone Project, and click Next. |
|||
** Choose Family: PIC32, Device: PIC32MX795F512L, and click Next. |
|||
** Choose Hardware Tools: PICkit3 and click Next. |
|||
** Choose Compiler Toolchains: C32 (and you may select a specific version number) and click Next. |
|||
** Use the suggested Project Location (the folder where all your PIC code will be stored), or browse to a new folder. Every project will be a folder in this folder. Type in the name of the project under Project Name. As you type, the name of the folder that will be created will automatically appear. Call the project "HelloWorld," for example. Click Finish. |
|||
* Copy the file [[Media:procdefs_for_NU32v2.zip | procdefs.ld file from this .zip file]] to your new project folder (e.g., MPLABXProjects/HelloWorld.X), where currently there is only a Makefile and an nbproject folder. |
|||
* ctrl-click on the icon "Important Files" in your IDE window and choose "Add Item to Important Files." In the window that appears, navigate to your project directory and select procdefs.ld. |
|||
* Now ctrl-click on the icon "Source Files" and choose New>mainp32.c. You will be prompted for the name of the file; let's call it HelloWorld. The extension .c will be appended. Click Finish. You should now have a sample main program populated in your editing window, and your IDE window will look like [[Media:MPLABX-mac-editing.png|this]]. |
|||
** You can add .h header files to your project in the same way to the folder "Header Files." |
|||
** Another option for adding a source file to your project is to copy the file to your project folder in your operating system, then ctrl-click the icon in the IDE and select "Add Existing Item..." |
|||
** While you can add files to your project that are not in the project folder, it is a good idea to keep your files in the folder, at least the procdefs.ld. |
|||
* Now you can replace the sample code by typing in your own program, or cutting and pasting the HelloWorld source code above. Make sure to save your code (File>Save). |
|||
* Now we will create a hex file which can be loaded on the PIC. Click the hammer icon (Build) or hammer plus broom icon (Clean and Build, which erases previous builds and then builds again). |
|||
[[Image:nu32_utility_programmed.jpg|thumb|300 px|left|NU32_Utility.exe completed programming the NU32]] |
|||
You should see BUILD SUCCESSFUL at the bottom of your Output window, as shown [[Media:MPLABX-mac-successful.png|here]]. If you look at your HelloWorld folder on your operating system, you will see a new "dist" folder (distribution) which, has subfolders default>production, where HelloWorld.X.production.hex now resides. This is the .hex file you will load on to your PIC. |
|||
= Using the Serial Bootloader for NU32v2 PC Application = |
|||
Now that you have compiled your code, you can use the bootloader to put it on your NU32v2. |
|||
Plug your NU32v2 into a power supply and turn on the board. Plug in the USB cable to the board and your computer. If this is the first time you have plugged the board into your computer, drivers will be installed assigning your board a communication (COM) port number. Note what the port number is. If you are running Windows inside of OSX, you may need to specify that Windows is using the USB port, not OSX. Follow the instructions for your virtual machine to assign use of the USB port. |
|||
Now open NU32v2_Serial_Bootloader.exe. Note that the text in the 'Status' box are red and your COM port is listed in 'Serial Ports'. If multiple ports are listed and you don't know which is your NU32v2 board, you can check 'Ports (COM & LPT)' in 'Device Manager'. Right click on each Port. The NU32v2 uses a chip made by FTDI, so your NU32v2 COM port will say "Manufacturer: FTDI". Usually your NU32v2 has the largest COM port number. |
|||
[[Image:nu32v2_serial_bootloader_open.png|thumb|300 px|left|Initial NU32v2_serial_bootloader.exe window]] |
|||
<br clear=all> |
<br clear=all> |
||
Now press RUN to have the NU32 leave bootloader mode and run the code you just programmed. |
|||
Click "Select .hex File", navigate to your project and select your hex file (projectname.hex). The path to your file will be listed in the first line in 'Status' in green. |
|||
[[Image:nu32v2_serial_bootloader_hex.png|thumb|300 px|left|.hex file selected, noted in green in 'Status']] |
|||
<br clear=all> |
|||
On the right side of the window, select the smaller of the communication port numbers under "Select a debug port". The text area that appears bellow will display anything that the computer receives from the NU32. |
|||
Next click on the button corresponding to your COM port. The COM port you selected will be listed in the second line in 'Status' in green. |
|||
[[Image: |
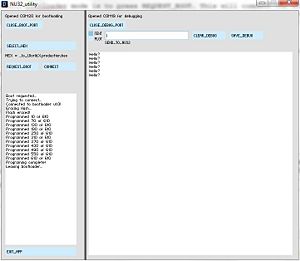
[[Image:nu32_utility_debug.jpg|thumb|300 px|left|NU32_Utility.exe receiving data from "Hello_World"]] |
||
<br clear=all> |
<br clear=all> |
||
From here, you can send data to the NU32 by typing followed by an enter, you can save or clear the data received, or if the data is coming in in a special format, plot it by pressing the PLOT button. |
|||
Next put your NU32v2 board into bootloader mode by pressing and holding the reset button on the NU32v2, pressing and holding the button in the top left breadboard between pin G6 and GND, releasing reset, then releasing G6. The 'Message' box will show "Bootloader v1.1" and the third line in 'Status' will state that your NU32v2 has connected in green. |
|||
[[Image: |
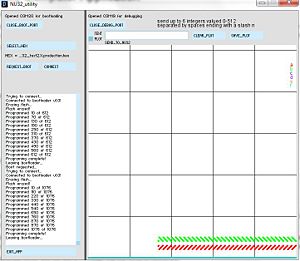
[[Image:nu32_utility_plot.jpg|thumb|300 px|left|NU32_Utility.exe plotting data from the NU32]] |
||
<br clear=all> |
<br clear=all> |
||
Enjoy! |
|||
Next click the "Program" button. Doing this will clear the memory of your NU32v2, write your code to the board, reset the board and close NU32v2_serial_bootloader.exe. Your code is now running on the NU32v2. |
|||
Latest revision as of 06:21, 16 January 2016
THIS PAGE REFERS TO A PRE-RELEASE VERSION OF THE NU32 PIC32 DEVELOPMENT BOARD. FOR INFORMATION, SAMPLE CODE, AND VIDEOS RELATED TO THE PRODUCTION VERSION (2016 AND LATER), AND TO THE CORRESPONDING BOOK "EMBEDDED COMPUTING AND MECHATRONICS WITH THE PIC32 MICROCONTROLLER," VISIT THE NU32 PAGE.
You should complete the instructions in NU32: Software to Install if you have not already. For this page specifically, you need to
- download and install the MPLAB X IDE (Integrated Development Environment) that you use for programming, compiling, debugging, and simulating your PIC code. The MPLAB XC32 Compiler is included in the installation instructions
- download the NU32 Utility computer application
- install drivers for the FTDI USB-to-Serial chip on the NU32 board
The remainder of this page describes how to create a new Project in MPLAB X, compile a general "Hello World" program to blink the LEDs on the NU32, and use the NU32 Utility computer application to put the program on the NU32.
Here are the files you will need to complete this page: NU32_BasicTemplate.zip.
Here is a less detailed version of this page: NU32: Quickstart
Create a New Project in MPLAB X v1.XX for the NU32
For organizational reasons, it is recommended to use the MPLABXProjects folder created during the MPLAB X IDE installation to store your projects.
Download and unzip NU32_BasicTemplate.zip and place it in the MPLABXProjects folder. Note that every project you make will need a copy of app.ld.
app.ld is a linker file. If you have installed a bootloader (such as with the NU32), the linker file tells the compiler to rearrange the memory of your program so that it doesn't overwrite the bootloader code that is already on your PIC32. If you do not put app.ld in the folder that contains your source code, MPLAB X will use the default linker, named procdefs.ld. Fortunately the bootloader will not overwrite itself, but your code will not work and will not give you an error telling you that you used the wrong .ld file. So every time you make a new project, copy the app.ld file you put in the MPLABXProjects folder into the new folder that MPLAB X generates for each project.
Fist, make a new project, compile some pre-written code, and use the NU32 Utility to put it on your NU32.
- Open MPLAB X
- Choose File -> New Project... to create a new project.
- Select Microchip Embedded and Standalone Project and click Next >.
- Select 32-bit MCUs (PIC32) and the PIC32MX795F512L (the last one in the list) and click Next >.
- Select the ICD 3 Hardware Tool (we will not be using the ICD 3, but select it anyway) and click Next >.
- Select XC32(v1.xx) from the Compiler Toolchains and click Next >.
- Enter a project Name ("Hello_World") and click Finish.
Now go back to the MPLABXProjects folder, and you should see a new folder called "Hello_World.X". Copy app.ld into "Hello_World.X", as well as the other files, hello_world.c, NU32.c, and NU32.h.
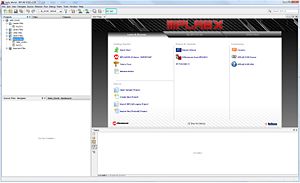
In MPLAB X, you can close the Start Page tab. Add the code to the project:
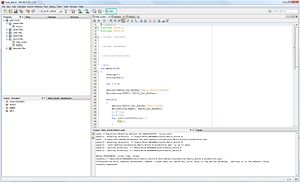
- Right click on Header Files in the Projects tab on the left and select Add Existing Item... Select NU32.h.
- Right click on Source Files and select Add Existing Item... Select NU32.c and hello_world.c.
- Right click on Linker Files and select Add Existing Item... Select app.ld.
This code is ready to be used, so compile it by pressing the Build Project button (the hammer).
The Output window at the bottom of the screen should say BUILD SUCCESSFUL.
MPLAB X creates a .hex file when you compile the code. It is hidden away in your project folder, in dist -> default -> production, and given a name (projectfoldername).production.hex, or in this case, Hello_World.X.production.hex.
Next we will use the NU32_Utility program to put the .hex file on your NU32 board.
Using the NU32 Utility Computer Application
Now that you have compiled your code, you can put it on your NU32 board using the NU32 Utility and the bootloader program already on the NU32.
Plug your NU32 into your power supply (6V wall wart from the kit, or a supply >6V) and turn on the board. Plug the USB cable into the board and your computer. If this is the first time you have plugged the board into your computer, drivers will be installed assigning your board two communication port numbers (COM in Windows, TTY.USBSERIAL on MAC). Note what the port numbers or names are. The larger number is used for bootloading communication, and the smaller number is used for general communication.
For example: My Windows computer already has a COM1. When I plug in my NU32 I also get COM19 and COM20, so I choose COM20 for bootloading and COM19 for general communication. On my MAC I already have a bunch of ports, like /DEV/TTY.BLUETOOTH-MODEM and CU.NOKIA6205-DUNONBRCMPHONE-2. When I plug in my NU32 I get 4 more, /DEV/TTY.USBSERIAL-000030FDA, /DEV/CU.USBSERIAL-000030FDA, /DEV/TTY.USBSERIAL-000030FDB, and /DEV/CU.USBSERIAL-000030FDB. Ignore the versions with CU, and use /DEV/TTY.USBSERIAL-000030FDB for bootloading and /DEV/TTY.USBSERIAL-000030FDA for general communication.
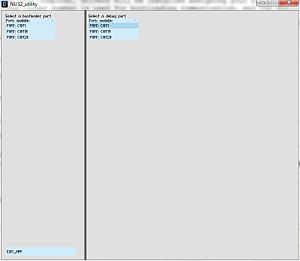
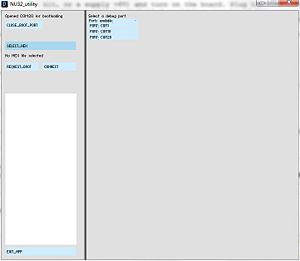
Now open NU32_Utility.exe. The left hand side of the window is used for bootloading, and the right hand side for general communication.
Select the larger of the two communication ports under "Select a bootloader port".
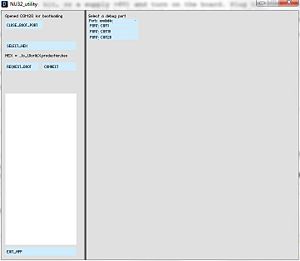
Push "Select_Hex" and navigate to your .hex file.
There are two options to get the NU32 board into bootloader mode. The first is to press and hold the RESET button on the board, press and hold the USER button, let go of the RESET button, then let go of the USER button. In bootloader mode L1, just above the RESET button, will blink. To connect NU32_Utility.exe to the NU32, press CONNECT.
The second way to get the NU32 board into bootloader mode is to press REQUEST_BOOT. This will command the NU32 to perform a reset in software, and to enter bootloader mode. L1 will blink, and NU32_Utility.exe will automatically connect to the NU32. This method will only work if you use the standard NU32 header files when you write your code. If you do not use these files you will have to physically press the buttons on the NU32 board to get it into bootloader mode.
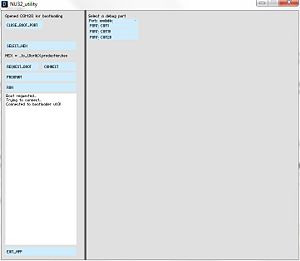
Once NU32_Utility.exe has connected to the NU32, you will see a message that the NU32 is connected.
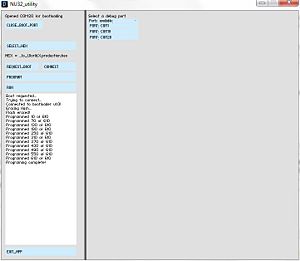
Now you can press PROGRAM to transfer the .hex file to the NU32 and have the PIC program itself.
Now press RUN to have the NU32 leave bootloader mode and run the code you just programmed.
On the right side of the window, select the smaller of the communication port numbers under "Select a debug port". The text area that appears bellow will display anything that the computer receives from the NU32.
From here, you can send data to the NU32 by typing followed by an enter, you can save or clear the data received, or if the data is coming in in a special format, plot it by pressing the PLOT button.
Enjoy!
