NI-DAQ Cards on Linux
Overview
Project by: James Yeung, Master in Electrical and Computer Engineering, 2010.
Last updated: April 23, 2010
The goal of this project was to get the National Instruments Data Acquisition Cards to work on Linux. More specifically, the two cards that will be documented here are:
- NI PCI-6220 16-Bit, 250 kS/s, 16 Analog Inputs
- NI PCI-6713 12-Bit, 1 MS/s per Channel Analog Output Board
This wiki document assumes that you have real-time patched SUSE 11.0 operating system installed. You can follow the guide here.
Installing Drivers and C-API
The supporting software is all available on the National Instruments website. The specific package that we will need is NI-DAQmx 8.0.1. This package contains the drivers, C-API library, documentation on the library functions and example code.
Instructions
- Download the NI-DAQmx 8.0.1
- In this guide, we will be using a 64-bit version.
- Follow on screen instructions and note the root password that you set.
- When prompted about partition setup, be sure to use file system format “ext3” for the swap and home partitions. The version of the kernel that we will be building does not properly support “ext4” (or higher).
- Check what is the newest version of the kernel that is supported by RTLinux and other applications/drivers that you will be using.
- For RTLinux, you can check here: http://www.kernel.org/pub/linux/kernel/projects/rt/
- In this guide, we will be using version 2.6.24.7, the highest kernel version that our frame grabber software was tested on.
- Download the vanilla kernel and the RTLinux patch
- Open a terminal window. GNOME Terminal would do.
- Go into superuser mode. You will need to know the root password. >> su
- Go into the directory where source code is commonly stored. >> cd /usr/src
- Download the vanilla kernel. >> wget http://www.kernel.org/pub/linux/kernel/v2.6/linux-2.6.24.7.tar.bz2
- Download the RTLinux patch for the matching kernel. >> wget http://www.kernel.org/pub/linux/kernel/projects/rt/ older/patch-2.6.24.7-rt17.bz2
- Unpack the packages >> tar -xvjf linux-2.6.24.7.tar.bz2 >> bunzip2 patch-2.6.24.7-rt17.bz2
- Make symbolic link to new directory >> rm -f linux >> ln -fs linux-2.6.24.7 linux
- Copy the config file provided with the menable driver. >> cd linux >> cp /home/lims/Download/menable/menable_linuxdrv_3.9.10/ 2.6.24.7-rt17/CORE2_x86_64/.config .config
- Install needed packages >> zypper in make patch gcc gtk2 gtk2-devel libglade2 libglade2-devel glib2 glib2-devel mkinitrd
- Apply the RTLinux patch. (Note that p1 has a one, not L) >> cat ../patch-2.6.29.6-rt24 | patch -p1
- Make oldconfig >> make oldconfig
- When prompted, use default by pressing enter.
- Configure the config file through gconfig >> make gconfig
- Make sure the following sections are untouched:
- Processor type and features
- Except you need to set "High Resolution Timer Support" to "Yes".
- Bus options
- Kernel hacking
- If you know which modules are needed for your hardware, enable them.
- If you don't know which modules are needed for your hardware, compile the kernel and error messages from your attempt to install will give you a better idea of which modules need to be enabled.
- Save and close out of gconfig
- Need to change “getline” to “parseline” in scripts/unifdef.c (There are 3 getline's)
- Type “vi scripts/unifdef.c" to view and edit the file.
- Type “/getline” to search for “getline”
- Hit “i” to get into insert mode
- Change “getline” to “parseline”
- Hit the “Escape” key to get out of insert mode
- Search again until all getlines are changed
- Type “:wq” to save and quit
- Need to change “=r” to “=q” in arch/x86/boot/boot.h
- Type “vi arch/x86/boot/boot.h”
- Type “112” to get to line 112
- Hit “i” to get into insert mode
- Change “=r” to “=q”
- Hit the “Escape” key to get out of insert mode
- Type “:wq” to save and quit
- Compile & install kernel. (-j 4 is to use all 4 CPU cores, should take 15 minutes) >> make -j 4 >> make -j 4 modules_install >> make -j 4 install
- If you didn't enable all required modules, you will get error messages hinting which ones you need here.
- Make sure “fstab” has correct paths. >> cd /etc >> vi fstab
- The first couple of lines should look something like this: /dev/sda5 swap swap defaults 0 0 /dev/sda6 / ext3 acl,user_xattr 1 1 /dev/sda7 /home ext3 acl,user_xattr 1 2
- If not, change the part after “/dev/” to “sda#” where # is the corresponding number to “-part#”.
- You'll need to change the grub config file to match the changes in fstab.
- Grub is the software that controls which OS to boot into during boot up.
- Files to configure Grub are located at /boot/grub/
- You may also want to edit the menu.lst file to your desire.
How To Install MicroEnable Frame Grabber Drivers/Software
- This guide assumes that you have downloaded and untarred the following files under /home/lims/Download/menable/
- menable_linuxdrv_3.9.10.tar.bz2
- siso-rt3-meIII-3.2.1-2.i586.rpm
- siso-rt-basesystem-1.0.0-1.i586.rpm
- We will be using menable_linuxdrv_3.9.10 with the 2.6.23.7-rt17 kernel.
Drivers
- Go into the root of the driver folder. >> cd /home/lims/Download/menable/menable_linuxdrv_3.9.10
- We need to copy the binary objects from the subdirectory matching our kernel and architecture. >> cp 2.6.24.7-rt17/CORE2_x86_64/* .
- Compile >> ./compile.sh
- Install the compiled driver >> insmod menable.ko
- Confirm the install >> dmesg | tail
- The output should look like this: 0000:00:19.0: eth0: Link is Up 100 Mbps Full Duplex, Flow Control: RX 0000:00:19.0: eth0: 10/100 speed: disabling TSO ADDRCONF(NETDEV_CHANGE): eth0: link becomes ready martian source 255.255.255.255 from 129.105.69.13, on dev eth0 ll header: ff:ff:ff:ff:ff:ff:d4:9a:20:d0:13:88:08:00 eth0: no IPv6 routers present devkit-disks-da[3482]: segfault at 18 rip 41cb5e rsp 7fff78425850 error 4 ACPI: PCI Interrupt 0000:11:00.0[A] -> GSI 20 (level, low) -> IRQ 20 menable 0000:11:00.0: microEnable III card will be called menable0 menable menable0: allocated dummy DMA area of 128 kiB
Software
- Go into the direction with the RPM packages. >> cd /home/lims/Download/menable
- Install the two rpm packages. >> rpm -i siso-rt-basesystem-1.0.0-1.i586.rpm >> rpm -i siso-rt3-meIII-3.2.1-2.i586.rpm
- Confirm the install
- Use the following commands to see where the files should have been installed. >> rpm -qlp siso-rt-basesystem-1.0.0-1.i586.rpm >> rpm -qlp siso-rt3-meIII-3.2.1-2.i586.rpm
- Go into the directories and see if they are there.
How To Install OpenCV on Linux
- Make sure the following packages are installed.
- gcc (version 4.x)
- cmake (version 2.6 or higher)
- pkg-config
- Download module “FindOpenCV.cmake” and add it to cmake.
- Module can be downloaded via: http://opencv.willowgarage.com/wiki/Getting_started?action=AttachFile&do=view&target=FindOpenCV.cmake
- Download and place file into /usr/share/cmake/Modules.
- Download OpenCV source code, configure, compile and install.
- Source can be downloaded via: http://sourceforge.net/projects/opencvlibrary/files/opencv-unix/2.0/
- ./configure
- make
- make install
- (Optional) Go through the “Hello World” tutorial to make sure it works.
Benchmarking
This section was an attempt to see how "real-time" the operating system is.
Cyclictest
Cyclictest is program available on the rt-wiki for testing the latency of commands on your operating system. All the code and instructions are available on their website.
http://rt.wiki.kernel.org/index.php/Cyclictest
Homemade Test
I found a "Hello World" code for real-time applications on the -rt Linux patch online. I then modified the code such that it would have the highest possible priority (1) and that it would take a snapshot of the timer every 10ms.
#include <stdlib.h>
#include <stdio.h>
#include <time.h>
#include <sys/time.h>
#include <sched.h>
#include <sys/mman.h>
#include <string.h>
#define MY_PRIORITY (1 /* we use 1 as the PRREMPT_RT use 50
as the priority of kernel tasklets
and interrupt handler by default */
#define MAX_SAFE_STACK (8*1024) /* The maximum stack size which is
guranteed safe to access without
faulting */
#define NSEC_PER_SEC (1000000000) /* The number of nsecs per sec. */
void stack_prefault(void) {
unsigned char dummy[MAX_SAFE_STACK];
memset(&dummy, 0, MAX_SAFE_STACK);
return;
}
int main(int argc, char* argv[]) {
//int time[1002];
//int rc[1002];
struct timespec t;
struct timespec ti[1002];
struct timespec tt[1002];
struct timespec tf[1002];
struct sched_param param;
int interval = 10000000; /* 10ms*/
/* Declare ourself as a real time task */
param.sched_priority = MY_PRIORITY;
if(sched_setscheduler(0, SCHED_FIFO, ¶m) == -1) {
perror("sched_setscheduler failed");
exit(-1);
}
/* Lock memory */
if(mlockall(MCL_CURRENT|MCL_FUTURE) == -1) {
perror("mlockall failed");
exit(-2);
}
/* Pre-fault our stack */
stack_prefault();
clock_gettime(CLOCK_MONOTONIC ,&t);
/* start after one second */
t.tv_sec++;
int ii = 0;
while(ii < 1002) {
tt[ii].tv_nsec = t.tv_nsec; //target time stamp
clock_gettime(CLOCK_MONOTONIC ,&ti[ii]); //time before releasing CPU
/* release CPU until target time stamp is reached */
clock_nanosleep(CLOCK_MONOTONIC, TIMER_ABSTIME, &t, NULL);
/* do the stuff */
clock_gettime(CLOCK_MONOTONIC ,&tf[ii]); //time right after waking up
ii++;
/* calculate next target */
t.tv_nsec += interval;
while (t.tv_nsec >= NSEC_PER_SEC) {
t.tv_nsec -= NSEC_PER_SEC;
t.tv_sec++;
}
}
for(int ii = 1; ii < 1002; ii++){
printf("%d %d %d %d\t%d\n", ti[ii].tv_nsec, tt[ii].tv_nsec, tf[ii].tv_nsec, tf[ii].tv_nsec - tt[ii].tv_nsec, tf[ii].tv_nsec - tf[ii-1].tv_nsec);
}
}
Results
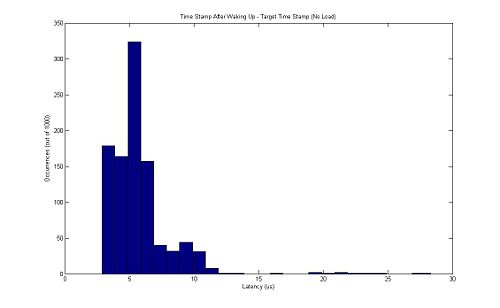
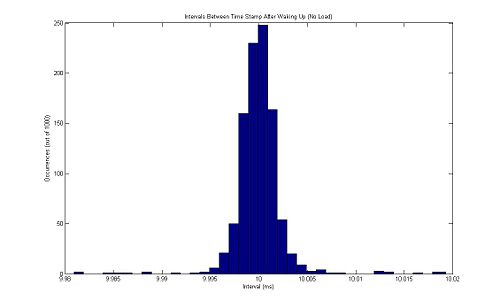
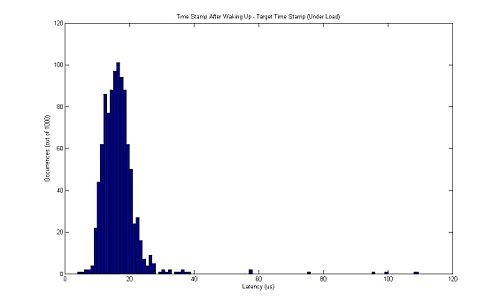
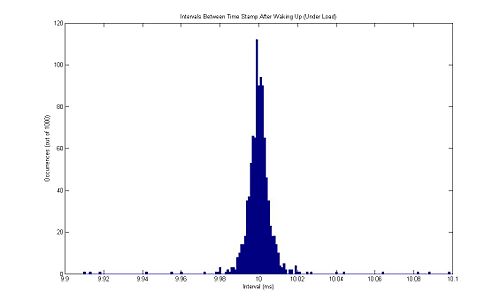
To ensure that the operating system is truly "real-time", I ran the two tests (Cyclictest and Homemade Test) under two conditions, load and no load. The no load condition is simply where except for system processes, only the test programs are running. The load condition is where I compile the source code of OpenCV and the Linux kernel using a niceness of -20.
Cyclictest
Using the Cyclictest program, I was able to get some very nice results.
Arguments: t = number of threads to work p = priority level to set n = use nano_sleep i = interval in microseconds l = number of times to loop
- No Load
- Priority Level = 1 sudo cyclictest -t1 -p 1 -n -i 1000 -l 10000 policy: fifo: loadavg: 1.14 0.46 0.18 1/291 5891 T: 0 ( 5791) P: 1 I:1000 C: 10000 Min: 1 Act: 1 Avg: 1 Max: 712
- Priority Level = 2 sudo cyclictest -t1 -p 2 -n -i 1000 -l 10000 policy: fifo: loadavg: 0.11 0.59 0.44 1/294 16748 T: 0 (16624) P: 2 I:1000 C: 10000 Min: 1 Act: 2 Avg: 1 Max: 5
- Priority Level = 80 sudo cyclictest -t1 -p 80 -n -i 1000 -l 10000 policy: fifo: loadavg: 0.19 0.66 0.46 1/293 16414 T: 0 (16289) P:80 I:1000 C: 10000 Min: 2 Act: 2 Avg: 2 Max: 8
- Under Load
- Priority Level = 1 sudo cyclictest -t1 -p 1 -n -i 1000 -l 10000 policy: fifo: loadavg: 3.52 1.16 0.44 16/331 11374 T: 0 ( 8812) P: 1 I:1000 C: 10000 Min: 1 Act: 3 Avg: 10 Max: 3093
- Priority Level = 2 sudo cyclictest -t1 -p 2 -n -i 1000 -l 10000 policy: fifo: loadavg: 4.56 1.47 0.74 14/333 23801 T: 0 (22748) P: 2 I:1000 C: 10000 Min: 1 Act: 5 Avg: 6 Max: 17
- Priority Level = 80 sudo cyclictest -t1 -p 80 -n -i 1000 -l 10000 policy: fifo: loadavg: 5.40 2.38 1.15 12/332 28779 T: 0 (27402) P:80 I:1000 C: 10000 Min: 1 Act: 6 Avg: 5 Max: 14
It is interesting to note that when using a priority level of 1 in Cyclictest, we get a much higher Max than a priority level of 2 or 80.
Homemade Test
The results of this test can be summarized and better visualized in histograms. Below are two histograms from each of the two conditions.
.
Future Work
Now that we have an operating system with sub 100us latency, our next step is to port the code for the camera over to the Linux side. Once that is done, we would like to be able to capture images at 1000fps or better and track the location of bright spots in the image.


