Difference between revisions of "Configuring xPC Target PC"
From Mech
Jump to navigationJump to searchm |
|||
| Line 8: | Line 8: | ||
#*Under Select C Compiler, select "Visual C" |
#*Under Select C Compiler, select "Visual C" |
||
#*Compiler path should be "C:\Program Files\Microsoft Visual Studio .NET 2003" - if it is not, you will have to Browse to that directory. |
#*Compiler path should be "C:\Program Files\Microsoft Visual Studio .NET 2003" - if it is not, you will have to Browse to that directory. |
||
#:[imagexpcexplr00.jpg|center|500px] |
#:[[imagexpcexplr00.jpg|center|500px]] |
||
#Now under TargetPC1, click on "Communications" |
#Now under TargetPC1, click on "Communications" |
||
#*Set Host Target Communication to "TCP/IP" |
#*Set Host Target Communication to "TCP/IP" |
||
| Line 15: | Line 15: | ||
#*Set the IP address to match the one written on your CompactFlash card. <STRONG><----- VERY IMPORTANT</STRONG> |
#*Set the IP address to match the one written on your CompactFlash card. <STRONG><----- VERY IMPORTANT</STRONG> |
||
#*Set gateway address to "192.168.1.1" (B100 lab) |
#*Set gateway address to "192.168.1.1" (B100 lab) |
||
#:[image:xpcexplr01.jpg|center|500px] |
#:[[image:xpcexplr01.jpg|center|500px]] |
||
#Now under TargetPC1, click "Settings" |
#Now under TargetPC1, click "Settings" |
||
#*Set Maximum Model Size to "16MB" |
#*Set Maximum Model Size to "16MB" |
||
#*Check the box next to Enable Secondary IDE |
#*Check the box next to Enable Secondary IDE |
||
#:[image:xpcexplr02.jpg|center|500px] |
#:[[image:xpcexplr02.jpg|center|500px]] |
||
#Under TargetPC1, click "Appearance" |
#Under TargetPC1, click "Appearance" |
||
#*Check the box next to Enable Target Scope |
#*Check the box next to Enable Target Scope |
||
#*Set Target Mouse to "None" |
#*Set Target Mouse to "None" |
||
#:[image:xpcexplr03.jpg|center|500px] |
#:[[image:xpcexplr03.jpg|center|500px]] |
||
Revision as of 11:04, 24 May 2006
Configuring the Host/Target PC
This section describes how you tell the Host PC the specific Target PC with which you will be communicating. This also configures the settings that will be stored on the xPC boot disk (mainly, the Target PC IP address).
- Open Matlab
- Open up the xPC Explorer Program
>> xpcexplr
- In the xPC Target Hierarchy (on the left), click on "Compiler Configuration"
- Under Select C Compiler, select "Visual C"
- Compiler path should be "C:\Program Files\Microsoft Visual Studio .NET 2003" - if it is not, you will have to Browse to that directory.
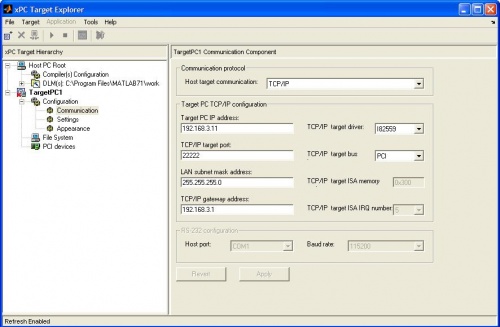
- Now under TargetPC1, click on "Communications"
- Set Host Target Communication to "TCP/IP"
- Set TCP/IP target driver to "I82559"
- Set TCP/IP target bus to "PCI"
- Set the IP address to match the one written on your CompactFlash card. <----- VERY IMPORTANT
- Set gateway address to "192.168.1.1" (B100 lab)
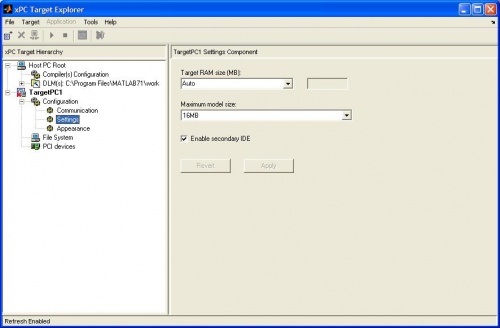
- Now under TargetPC1, click "Settings"
- Set Maximum Model Size to "16MB"
- Check the box next to Enable Secondary IDE
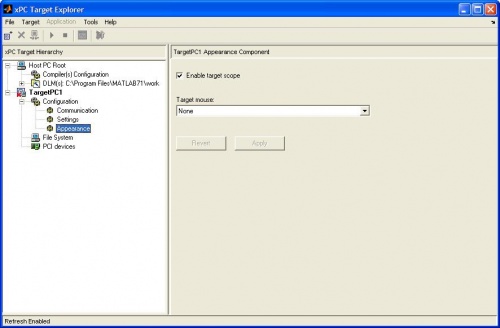
- Under TargetPC1, click "Appearance"
- Check the box next to Enable Target Scope
- Set Target Mouse to "None"


